yzh52521 / yii2-jwt
为 Yii 2 集成的 JWT
Requires
- php: >=7.4
- lcobucci/jwt: ^4.1
- yiisoft/yii2: >=2.0.14 <2.1
README
本扩展为 Yii 2.0 框架(需要 PHP 5.6+)提供 JWT 集成。它包括基本的 HTTP 身份验证支持。
目录
安装
该软件包可在 Packagist 上找到,您可以使用 Composer 进行安装。
composer require yzh52521/yii2-jwt
依赖
- PHP 5.6+
- OpenSSL 扩展
- lcobucci/jwt 3.3
基本用法
将 jwt 组件添加到您的配置文件中,
'components' => [
    'jwt' => [
        'class' => \yzh52521\jwt\Jwt::class,
        'constraints' => [
            function () {
                return new \Lcobucci\JWT\Validation\Constraint\LooseValidAt(
                    \Lcobucci\Clock\SystemClock::fromSystemTimezone()
                );
            },
        ],
    ],
],
按以下方式配置 authenticator 行为。
namespace app\controllers;

class ExampleController extends \yii\rest\Controller
{

    /**
     * @inheritdoc
     */
    public function behaviors()
    {
        $behaviors = parent::behaviors();
        $behaviors['authenticator'] = [
            'class' => \yzh52521\jwt\JwtHttpBearerAuth::class,
        ];

        return $behaviors;
    }
}
您还可以使用它与 CompositeAuth,请参阅 文档。
创建
只需使用构建器创建新的 JWT/JWS 令牌
$now = new DateTimeImmutable();
$algorithm = $this->jwt->getSigner();
$key = $this->jwt->getSignerKey();

$token = Yii::$app->jwt->getBuilder()
   // Configures the issuer (iss claim)
   ->issuedBy('http://example.com')
   // Configures the audience (aud claim)
   ->permittedFor('http://example.org')
   // Configures the id (jti claim)
   ->identifiedBy('4f1g23a12aa')
   // Configures the time that the token was issue (iat claim)
   ->issuedAt($now)
   // Configures the time that the token can be used (nbf claim)
   ->canOnlyBeUsedAfter($now->modify('+1 minute'))
   // Configures the expiration time of the token (exp claim)
   ->expiresAt($now->modify('+1 hour'))
   // Configures a new claim, called "uid"
   ->withClaim('uid', 1)
   // Configures a new header, called "foo"
   ->withHeader('foo', 'bar');
   // Builds a new token
   ->getToken($algorithm, $key);

$token->headers(); // Retrieves the token headers
$token->claims(); // Retrieves the token claims

echo $token->headers()->get('foo'); // will print "bar"
echo $token->claims()->get('jti'); // will print "4f1g23a12aa"
echo $token->claims()->get('iss'); // will print "http://example.com"
echo $token->claims()->get('uid'); // will print "1"
echo $token->toString(); // The string representation of the object is a JWT string (pretty easy, right?)
从字符串解析
使用解析器从 JWT 字符串创建新的令牌(以之前的令牌为例)
use Lcobucci\JWT\Encoding\CannotDecodeContent;
use Lcobucci\JWT\Token\InvalidTokenStructure;
use Lcobucci\JWT\Token\UnsupportedHeaderFound;
use Lcobucci\JWT\UnencryptedToken;

try {
    /** @var string $jwt JWT token string */
    $token = Yii::$app->jwt->parse($jwt); // Parses from a string
} catch (CannotDecodeContent | InvalidTokenStructure | UnsupportedHeaderFound $e) {
    echo 'Oh no, an error: ' . $e->getMessage();
}

assert($token instanceof UnencryptedToken);
验证
我们可以轻松地验证令牌是否有效(以之前的令牌为例)
use \Lcobucci\JWT\Validation\Constraint\IssuedBy;

if (!Yii::$app->jwt->validate($token, new IssuedBy('http://example.com'))) {
    echo 'Invalid token (1)!', PHP_EOL; // will not print this
}

if (!Yii::$app->jwt->validate($token, new IssuedBy('http://example.org'))) {
    echo 'Invalid token (1)!', PHP_EOL; // will print this
}
可用约束
\Lcobucci\JWT\Validation\Constraint\IdentifiedBy:验证 claim jti 是否匹配预期值\Lcobucci\JWT\Validation\Constraint\IssuedBy:验证 claim iss 是否列在预期值中\Lcobucci\JWT\Validation\Constraint\PermittedFor:验证 claim aud 是否包含预期值\Lcobucci\JWT\Validation\Constraint\RelatedTo:验证 claim sub 是否匹配预期值\Lcobucci\JWT\Validation\Constraint\SignedWith:验证令牌是否使用预期的签名者和密钥进行签名\Lcobucci\JWT\Validation\Constraint\StrictValidAt:验证 claims iat、nbf 和 exp 的存在和有效性(支持容错配置)\Lcobucci\JWT\Validation\Constraint\LooseValidAt:验证 claims iat、nbf 和 exp,当它们存在时(支持容错配置)\Lcobucci\JWT\Validation\Constraint\HasClaimWithValue:验证自定义 claim 是否具有预期的值(不建议在比较加密散列时使用)
重要
- 您必须配置
\yzh52521\jwt\Jwt::$constraints,通过Yii::$app->jwt->loadToken()通知所有您希望通过该令牌进行验证的 claim,此方法也位于\sizeg\jwt\JwtHttpBearerAuth内。
令牌签名
我们可以使用签名来验证令牌在其生成后是否未被修改。本扩展实现了 Hmac、RSA 和 ECDSA 签名(使用 256、384 和 512)。
重要
不允许向解析器发送的字符串决定要使用的签名算法,否则您的应用程序将容易受到 关键 JWT 安全漏洞 的影响。
以下示例是安全的,因为 Signer 的选择是硬编码的,不能被恶意用户影响。
Hmac
Hmac 签名非常简单易用。
您可能需要配置组件
'components' => [
    'jwt' => [
        'class' => \yzh52521\jwt\Jwt::class,
        'signer' => \yzh52521\jwt\JwtSigner::HS256,
        'signerKey' => \yzh52521\jwt\JwtKey::PLAIN_TEXT,
        'signerKeyContents' => random_bytes(32),
        'signerKeyPassphrase' => 'secret',
        'constraints' => [
            function () {
                // Verifies the claims iat, nbf, and exp, when present (supports leeway configuration)
                return new \Lcobucci\JWT\Validation\Constraint\LooseValidAt(
                    \Lcobucci\Clock\SystemClock::fromSystemTimezone()
                );
            },
            function () {
                // Verifies if the token was signed with the expected signer and key
                return new \Lcobucci\JWT\Validation\Constraint\SignedWith(
                    Yii::$app->jwt->getSigner(),
                    Yii::$app->jwt->getSignerKey()
                );
            },
         ],
    ],
],
use \Lcobucci\JWT\Validation\Constraint\SignedWith;

$now = new DateTimeImmutable();

$algorithm = $this->jwt->getSigner(\yzh52521\jwt\JwtSigner::HS256);
// ... and key
$contents = random_bytes(32);
$passphrase = 'secret';
$key = $this->jwt->getSignerKey(\yzh52521\jwt\JwtKey::PLAIN_TEXT, $contents, $passphrase);

$token = Yii::$app->jwt->getBuilder()
    // Configures the issuer (iss claim)
    ->issuedBy('http://example.com')
    // Configures the audience (aud claim)
    ->permittedFor('http://example.org')
    // Configures the id (jti claim)
    ->identifiedBy('4f1g23a12aa')
    // Configures the time that the token was issue (iat claim)
    ->issuedAt($now)
    // Configures the time that the token can be used (nbf claim)
    ->canOnlyBeUsedAfter($now->modify('+1 minute'))
    // Configures the expiration time of the token (exp claim)
    ->expiresAt($now->modify('+1 hour'))
    // Configures a new claim, called "uid"
    ->withClaim('uid', 1)
    // Configures a new header, called "foo"
    ->withHeader('foo', 'bar')
    // Builds a new token
    ->getToken($algorithm, $key);

if (!Yii::$app->jwt->validate($token, new SignedWith(
    Yii::$app->jwt->getSigner(\yzh52521\jwt\JwtSigner::HS256),
    Yii::$app->jwt->getSignerKey(JwtKey::PLAIN_TEXT, $contents, $passphrase)
))) {
    echo 'Invalid token (1)!', PHP_EOL; // will not print this
}

if (!Yii::$app->jwt->validate($token, new SignedWith(
    Yii::$app->jwt->getSigner(\yzh52521\jwt\JwtSigner::HS256),
    Yii::$app->jwt->getSignerKey(JwtKey::PLAIN_TEXT, random_bytes(32), 'other-secret')
))) {
    echo 'Invalid token (1)!', PHP_EOL; // will print this
}
RSA 和 ECDSA
RSA 和 ECDSA 签名基于公钥和私钥,因此您必须使用私钥生成并使用公钥验证
use \Lcobucci\JWT\Validation\Constraint\SignedWith;

$now = new DateTimeImmutable();

// you can use 'ES256' if you're using ECDSA keys
$algorithm = Yii::$app->jwt->getSigner(\yzh52521\jwt\JwtSigner::RS256);
$privateKey = Yii::$app->jwt->getSignerKey(\yzh52521\jwt\JwtKey::FILE, 'file://{path to your private key}');

$token = Yii::$app->jwt->getBuilder()
    // Configures the issuer (iss claim)
    ->issuedBy('http://example.com')
    // Configures the audience (aud claim)
    ->permittedFor('http://example.org')
    // Configures the id (jti claim)
    ->identifiedBy('4f1g23a12aa')
    // Configures the time that the token was issue (iat claim)
    ->issuedAt($now)
    // Configures the time that the token can be used (nbf claim)
    ->canOnlyBeUsedAfter($now->modify('+1 minute'))
    // Configures the expiration time of the token (exp claim)
    ->expiresAt($now->modify('+1 hour'))
    // Configures a new claim, called "uid"
    ->withClaim('uid', 1)
    // Configures a new header, called "foo"
    ->withHeader('foo', 'bar')
    // Builds a new token
    ->getToken($algorithm, $privateKey);

$publicKey = Yii::$app->jwt->getSignerKey(\yzh52521\jwt\JwtKey::FILE, 'file://{path to your public key}');

var_dump(Yii::$app->jwt->validate($token, new SignedWith(
    Yii::$app->jwt->getSigner(\yzh52521\jwt\JwtSigner::RS256),
    Yii::$app->jwt->getSignerKey(JwtKey::FILE, $publicKey)
))); // true when the public key was generated by the private one =)
需要强调的是,如果您正在使用RSA密钥,则不应调用ECDSA签名者(反之亦然),否则sign()和verify()将引发异常!
Yii2 基本模板示例
基本方案
- 客户端发送凭证。例如,登录名 + 密码
- 后端验证它们
- 如果凭证有效,客户端将收到令牌
- 客户端将令牌存储在未来的请求中使用
逐步使用示例
-
创建Yii2应用
在本例中,我们将使用基本模板,但您也可以以相同的方式使用高级模板。
composer create-project --prefer-dist --stability=dev yiisoft/yii2-app-basic yii2-jwt-test
-
安装组件
composer require yzh52521/yii2-jwt
-
将组件添加到config/web.php中的
components部分$config = [ 'components' => [ // other default components here.. 'jwt' => [ 'class' => \yzh52521\jwt\Jwt::class, 'constraints' => [ function () { return new \Lcobucci\JWT\Validation\Constraint\LooseValidAt( \Lcobucci\Clock\SystemClock::fromSystemTimezone() ); }, ], ], ], ];
-
更改方法
app\models\User::findIdentityByAccessToken()/** * {@inheritdoc} * @param \Lcobucci\JWT\Token $token */ public static function findIdentityByAccessToken($token, $type = null) { foreach (self::$users as $user) { if ($user['id'] === (string) $token->claims()->get('uid')) { return new static($user); } } return null; }
-
创建控制器
   <?php

   namespace app\controllers;

   use yzh52521\jwt\Jwt;
   use yzh52521\jwt\JwtHttpBearerAuth;
   use Yii;
   use yii\rest\Controller;

   class RestController extends Controller
   {
       /**
        * @inheritdoc
        */
       public function behaviors()
       {
           $behaviors = parent::behaviors();
           $behaviors['authenticator'] = [
               'class' => JwtHttpBearerAuth::class,
               'optional' => [
                   'login',
               ],
           ];

           return $behaviors;
       }

       /**
        * @return \yii\web\Response
        */
       public function actionLogin()
       {
           $now = new DateTimeImmutable();
           $algorithm = $this->jwt->getSigner();
           $key = $this->jwt->getSignerKey();

           /** @var Jwt $jwt */
           $jwt = Yii::$app->jwt;

           $token = Yii::$app->jwt->getBuilder()
               // Configures the issuer (iss claim)
               ->issuedBy('http://example.com')
               // Configures the audience (aud claim)
               ->permittedFor('http://example.org')
               // Configures the id (jti claim)
               ->identifiedBy('4f1g23a12aa')
               // Configures the time that the token was issue (iat claim)
               ->issuedAt($now)
               // Configures the expiration time of the token (exp claim)
               ->expiresAt($now->modify('+1 hour'))
               // Configures a new claim, called "uid"
               ->withClaim('uid', 100)
               // Builds a new token
               ->getToken($algorithm, $key);

        return $this->asJson([
            'token' => $token->toString(),
        ]);
    }

    /**
     * @return \yii\web\Response
     */
    public function actionData()
    {
        return $this->asJson([
            'success' => true,
        ]);
    }
}
-
发送简单的登录请求以获取令牌。在此示例中,我们为了简化示例而不发送任何凭证。正如我们在
authenticator行为中指定的那样,将login操作指定为可选的,因此authenticator将跳过对该操作的认证检查。
-
首先,我们尝试发送不带令牌的请求到rest/data,并得到错误
Unauthorized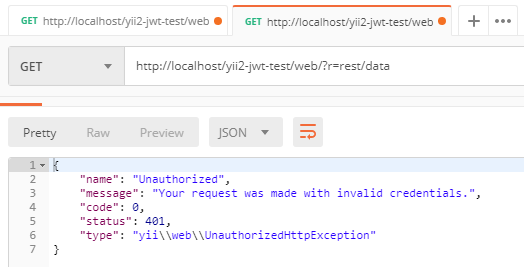
-
然后我们重新发送请求,但已添加包含我们的令牌的
Authorization头