webfiori / mailer
基于Socket的库,用于发送HTML电子邮件。
Requires
- php: >=7.0
- webfiori/file: *
- webfiori/ui: *
README
使用PHP发送基于HTML电子邮件的基本库。
支持的PHP版本
本页内容
用法
基本用法
本节描述了库的最基本用法。它展示了如何连接到SMTP服务器,编写消息并将其发送到特定地址。
连接到SMTP服务器
连接信息使用类webfiori\email\SMTPAccount的一个实例表示。
<?php
require '../vendor/autoload.php';

use webfiori\email\SMTPAccount;
use webfiori\email\AccountOption;

//First, create new SMTP account that holds SMTP connection information.
$smtp = new SMTPAccount([
    AccountOption::PORT => 465,

    //Replace server address with your mail server address
    AccountOption::SERVER_ADDRESS => 'mail.example.com',

    //Replace server username with your mail server username
    AccountOption::USERNAME => 'test@example.com',

    AccountOption::PASSWORD => 'KnvcbxFYCz77',

    AccountOption::SENDER_NAME => 'Ibrahim',

    //Replace sender address with your mail server sender address
    AccountOption::SENDER_ADDRESS => 'test@example.com',

    AccountOption::NAME => 'no-reply'
]);
创建电子邮件消息
在获得SMTP连接信息后,可以创建类webfiori\email\Email的一个实例。类的构造函数将接受一个参数,该参数将用于连接到SMTP服务器。
//Second, create your actual email. using the account that was just created to
//send messages.
$email = new Email($smtp);
设置电子邮件主题
要设置消息的主题,可以使用方法Email::setSubject(),如下所示
//Set subject
$email->setSubject('Hello World From PHP 😀');
添加收件人
//Specify who will receive the message
$email->addTo('super-megaman-x@outlook.com');
编写文本
使用该库创建的电子邮件消息是HTML格式的。它们使用库webfiori\ui来构建虚拟DOM。
可以使用方法Email::insert()将HTML元素插入到消息的主体中。
//Build your HTML Message
$div = $email->insert('div');
$div->addChild('p')->text('Hello World Message');
$div->addChild('p', [
    'style' => [
        'font-weight' => 'bold',
        'color' => 'red'
    ]
])->text('This is just a test message.');
发送消息
最后一步是发送消息。这可以通过使用方法Email::send()来完成。
//Finally, send.
$email->send();
全部
当我们把所有步骤放在一起时,我们会得到以下结果
require '../vendor/autoload.php';

use webfiori\email\AccountOption;
use webfiori\email\SMTPAccount;
use webfiori\email\Email;

$smtp = new SMTPAccount([
    AccountOption::PORT => 465,
    AccountOption::SERVER_ADDRESS => 'mail.example.com',
    AccountOption::USERNAME => 'test@example.com',
    AccountOption::PASSWORD => 'KnvcbxFYCz77',
    AccountOption::SENDER_NAME => 'Ibrahim',
    AccountOption::SENDER_ADDRESS => 'test@example.com',
    AccountOption::NAME => 'no-reply'
]);

$email = new Email($smtp);

$email->setSubject('Hello World From PHP 😀');

$email->addTo('super-megaman-x@outlook.com');

$div = $email->insert('div');
$div->addChild('p')->text('Hello World Message');
$div->addChild('p', [
    'style' => [
        'font-weight' => 'bold',
        'color' => 'red'
    ]
])->text('This is just a test message.');

$email->send();
附件
可以使用方法Email::addAttachment()将附件添加到任何电子邮件中。该方法接受一个参数。该参数可以是表示要附加的文件的绝对路径的string,或者是一个类型为webfiori\file\File的对象。
use webfiori\email\AccountOption;
use webfiori\email\SMTPAccount;
use webfiori\email\Email;
use webfiori\file\File;

$smtp = new SMTPAccount([
    AccountOption::PORT => 465,
    AccountOption::SERVER_ADDRESS => 'mail.example.com',
    AccountOption::USERNAME => 'test@example.com',
    AccountOption::PASSWORD => 'KnvcbxFYCz77',
    AccountOption::SENDER_NAME => 'Ibrahim',
    AccountOption::SENDER_ADDRESS => 'test@example.com',
    AccountOption::NAME => 'no-reply'
]);

$email = new EmailMessage($smtp);

$email->addAttachment('Attach00.txt');
$email->addAttachment(new File('another.txt'));
发送前回调
假设开发者希望在每次调用方法Email::send()时执行一项任务,并且该事件必须在连接到SMTP服务器之前调用。在这种情况下,开发者可以使用方法Email::addBeforeSend()。该方法接受两个参数,第一个是一个function回调,第二个是传递给回调的可选数组参数。
$smtp = new SMTPAccount([
    AccountOption::PORT => 465,
    AccountOption::SERVER_ADDRESS => 'mail.example.com',
    AccountOption::USERNAME => 'test@example.com',
    AccountOption::PASSWORD => 'KnvcbxFYCz77',
    AccountOption::SENDER_NAME => 'Ibrahim',
    AccountOption::SENDER_ADDRESS => 'test@example.com',
    AccountOption::NAME => 'no-reply'
]);

$email = new Email($smtp);
$email->setSubject('Hello World From PHP 😀');
$email->addTo('super-megaman-x@outlook.com');

$email->addBeforeSend(function (Email $e) {
  $e->insert('p')->text('This text is added before sending');
});

$div = $email->insert('div');
$div->addChild('p')->text('Hello World Message');

$email->send();
发送后回调
假设开发者希望在每次调用方法Email::send()时执行一项任务,并且该事件必须在发送电子邮件之后调用。在这种情况下,开发者可以使用方法Email::addAfterSend()。该方法接受两个参数,第一个是一个function回调,第二个是传递给回调的可选数组参数。
$smtp = new SMTPAccount([
    AccountOption::PORT => 465,
    AccountOption::SERVER_ADDRESS => 'mail.example.com',
    AccountOption::USERNAME => 'test@example.com',
    AccountOption::PASSWORD => 'KnvcbxFYCz77',
    AccountOption::SENDER_NAME => 'Ibrahim',
    AccountOption::SENDER_ADDRESS => 'test@example.com',
    AccountOption::NAME => 'no-reply'
]);

$email = new Email($smtp);
$email->setSubject('Hello World From PHP 😀');
$email->addTo('super-megaman-x@outlook.com');

$email->addAfterSend(function (Email $e) {
 // Do any action like storing the log.
});

$div = $email->insert('div');
$div->addChild('p')->text('Hello World Message');

$email->send();
访问SMTP日志
该库的一个功能是记录发送到服务器的SMTP命令。这在开发者需要追踪发送失败原因时非常有用。要访问日志事件,可以使用Email::getLog()方法。该方法将返回一个包含子关联数组的数组。每个关联数组将包含3个索引:command、response-code和response-message。
foreach ($email->getLog() as $logEvent) {
  echo ' Command: '.$logEvent['command'];
  echo ' Code: '.$logEvent['response-code'];
  echo ' Message: '.$logEvent['response-message'];
}
存储电子邮件
由于使用该库构建的电子邮件基于HTML,它们可以存储为HTML网页。当开发者想要测试最终构建的电子邮件预览时,这个功能非常有用。
要将电子邮件存储为HTML网页,可以使用如下方法的Email::storeEmail()
$m = new Email(new SMTPAccount([
    AccountOption::PORT => 465,
    AccountOption::SERVER_ADDRESS => 'mail.example.com',
    AccountOption::USERNAME => 'test@example.com',
    AccountOption::PASSWORD => 'KnvcbxFYCz77',
    AccountOption::SENDER_NAME => 'Ibrahim',
    AccountOption::SENDER_ADDRESS => 'test@example.com',
    AccountOption::NAME => 'no-reply'
]));
$m->setSubject('Test Ability to Store Email');
$m->addTo('ibx@example.com');
$m->insert('p')->text('Dear,')->setStyle([
    'font-weight' => 'bold',
    'font-size' => '15pt'
]);
$m->insert('p')->text('This email is just to inform you that you can store emails as web pages.');
$m->insert('p')->text('Regards,')->setStyle([
    'color' => 'green',
    'font-weight' => 'bold'
]);
$m->storeEmail('/path/to/email/file');
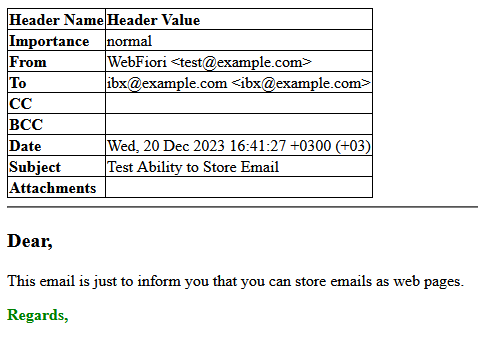
Email::storeEmail()方法的调用将执行以下操作
- 渲染最终电子邮件。
- 在提供的文件夹内创建一个与电子邮件主题相同的文件夹。
- 在文件夹内创建一个以日期和时间命名的HTML文件。
给定代码的最终输出将是类似于以下图像的HTML网页。
设置测试
在测试电子邮件时,我们通常不仅关心电子邮件的最终外观,还关心收件人的信息。该库为开发者提供了两种测试电子邮件消息的选项
- 将它们存储为HTML网页
- 将它们发送到特定地址。
这两种测试模式由Email::setMode()方法控制。该方法用于在调用Email::send方法时设置电子邮件使用的模式。
存储为网页
在这种情况下,发送消息的模式应设置为SendMode::TEST_STORE。此外,必须提供消息将被存储的位置。
$m = new Email(new SMTPAccount([
    AccountOption::PORT => 465,
    AccountOption::SERVER_ADDRESS => 'mail.example.com',
    AccountOption::USERNAME => 'test@example.com',
    AccountOption::PASSWORD => 'KnvcbxFYCz77',
    AccountOption::SENDER_NAME => 'Ibrahim',
    AccountOption::SENDER_ADDRESS => 'test@example.com',
    AccountOption::NAME => 'no-reply'
]));

//Here, set the mode to testing and storing.
$m->setMode(SendMode::TEST_STORE, [
    'store-path' => '/path/to/store/message'
]);


$m->setSubject('Test Ability to Store Email');
$m->addTo('ibx@example.com');
$m->insert('p')->text('Dear,')->setStyle([
    'font-weight' => 'bold',
    'font-size' => '15pt'
]);
$m->insert('p')->text('This email is just to inform you that you can store emails as web pages.');
$m->insert('p')->text('Regards,')->setStyle([
    'color' => 'green',
    'font-weight' => 'bold'
]);
$m->send();
存储为网页
在这种情况下,发送消息的模式应设置为SendMode::TEST_SEND。此外,必须提供将接收电子邮件的用户地址。
$m = new Email(new SMTPAccount([
    AccountOption::PORT => 465,
    AccountOption::SERVER_ADDRESS => 'mail.example.com',
    AccountOption::USERNAME => 'test@example.com',
    AccountOption::PASSWORD => 'KnvcbxFYCz77',
    AccountOption::SENDER_NAME => 'Ibrahim',
    AccountOption::SENDER_ADDRESS => 'test@example.com',
    AccountOption::NAME => 'no-reply'
]));

//Here, set the mode to testing and storing.
$m->setMode(SendMode::TEST_SEND, [
    'send-addresses' => [
        'addr1@example.com',
        'addr2@example.com',
    ]
]);


$m->setSubject('Test Ability to Store Email');
$m->addTo('ibx@example.com');
$m->insert('p')->text('Dear,')->setStyle([
    'font-weight' => 'bold',
    'font-size' => '15pt'
]);
$m->insert('p')->text('This email is just to inform you that you can store emails as web pages.');
$m->insert('p')->text('Regards,')->setStyle([
    'color' => 'green',
    'font-weight' => 'bold'
]);
$m->send();

