tapp / laravel-uppy-s3-multipart-upload
使用 Laravel、AWS S3 和 Uppy 进行分片上传
Requires
- php: ^7.4|^8.0
- illuminate/contracts: ^8.0|^9.0|^10.0|^11.0
- league/flysystem-aws-s3-v3: ^3.0
- spatie/laravel-package-tools: ^1.1
Requires (Dev)
- orchestra/testbench: ^6.0 | ^7.0 | ^8.0 | ^9.0
- phpstan/extension-installer: ^1.1
- phpstan/phpstan-deprecation-rules: ^1.0
- phpstan/phpstan-phpunit: ^1.0
- phpunit/phpunit: ^9.3
- spatie/laravel-ray: ^1.9
- vimeo/psalm: ^4.4
README
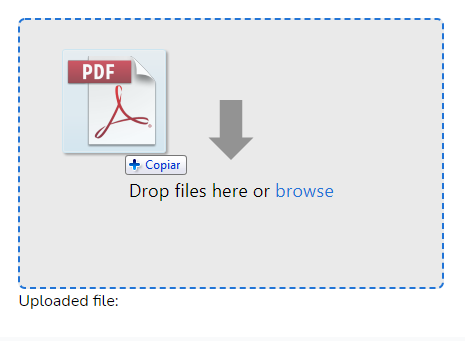
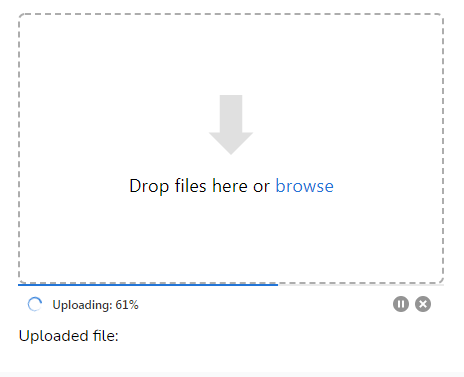
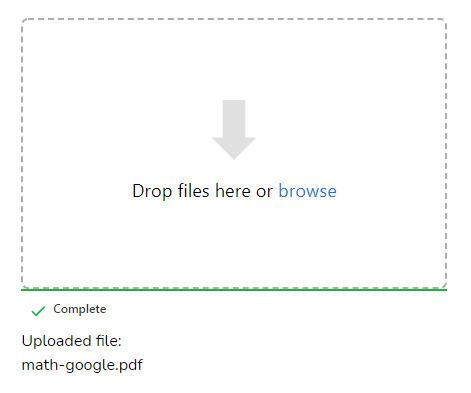
![]()
使用 Laravel(后端)和 Uppy(前端)直接将大文件上传到 AWS S3。
外观
安装
使用 Composer 安装此包
composer require tapp/laravel-uppy-s3-multipart-upload
添加所需的 JS 库
在您的 package.json 文件中添加 Uppy JS 库和 AlpineJS 库
    ...
    "devDependencies": {
        "alpinejs": "^3.11.1",
        ...
    },
    "dependencies": {
        "@uppy/aws-s3-multipart": "^3.1.2",
        "@uppy/core": "^3.0.5",
        "@uppy/drag-drop": "^3.0.1",
        "@uppy/status-bar": "^3.0.1"
        ...
    }
    ...
在您的 resources/js/bootstrap.js 文件中添加
...

require('@uppy/core/dist/style.min.css')
require('@uppy/drag-drop/dist/style.min.css')
require('@uppy/status-bar/dist/style.min.css')

import Uppy from '@uppy/core'
import DragDrop from '@uppy/drag-drop'
import StatusBar from '@uppy/status-bar'
import AwsS3Multipart from '@uppy/aws-s3-multipart'

window.Uppy = Uppy
window.DragDrop = DragDrop
window.StatusBar = StatusBar
window.AwsS3Multipart = AwsS3Multipart
在您的 resources/js/app.js 中添加
...
import Alpine from 'alpinejs';

window.Alpine = Alpine;

Alpine.start();
安装 JS 库
用于 Mix
npm install
npm run dev
用于 Vite
npm install
npm run build
发布配置文件
使用以下命令发布配置文件
php artisan vendor:publish --tag=uppy-s3-multipart-upload-config
这是已发布配置文件的内容
return [
    's3' => [
        'bucket' => [
            /*
             * Folder on bucket to save the file
             */
            'folder' => '',
        ],
        'presigned_url' => [
            /*
             * Expiration time of the presigned URLs
             */
            'expiry_time' => '+1 hour',
        ],
    ],
];
发布视图文件
php artisan vendor:publish --tag=uppy-s3-multipart-upload-views
AWS S3 配置
此包安装了 AWS SDK for PHP 并使用 Laravel 默认的 s3 磁盘配置(来自 config/filesystems.php 文件)。
您只需在您的 .env 文件中使用以下环境变量添加您的 S3 密钥、区域和存储桶
AWS_ACCESS_KEY_ID=
AWS_SECRET_ACCESS_KEY=
AWS_DEFAULT_REGION=
AWS_BUCKET=
警告
当使用自定义、非 AWS 终端时,才应设置
AWS_URL或AWS_POST_END_POINT环境变量。有关更多详细信息,请参阅此问题:#14。
要允许直接将分片上传到您的 S3 存储桶,您需要在存储桶的 CORS 配置 中添加一些额外配置。在您的 AWS S3 控制台中,选择您的存储桶。点击 "Permissions" 选项卡。在 "CORS configuration" 中添加以下配置
[
    {
        "AllowedHeaders": [
            "Authorization",
            "x-amz-date",
            "x-amz-content-sha256",
            "content-type"
        ],
        "AllowedMethods": [
            "PUT",
            "POST",
            "DELETE",
            "GET"
        ],
        "AllowedOrigins": [
            "*"
        ],
        "ExposeHeaders": [
            "ETag"
        ]
    }
]
在 AllowedOrigins
"AllowedOrigins": [
    "*"
]
您应列出允许的 URL,例如:
"AllowedOrigins": [
    "https://example.com"
]
https://uppy.io/docs/aws-s3-multipart/#S3-Bucket-Configuration
https://uppy.io/docs/aws-s3/#S3-Bucket-configuration
添加 S3 转发加速
要使用 S3 转发加速,请通过在您的 .env 文件中添加 AWS_USE_ACCELERATE_ENDPOINT=true 环境变量来启用它,并在您的 config/filesystems.php 中的 s3 选项中添加 'use_accelerate_endpoint' => env('AWS_USE_ACCELERATE_ENDPOINT')
       's3' => [
            ...
            'use_accelerate_endpoint' => env('AWS_USE_ACCELERATE_ENDPOINT'),
        ],
配置
您可以使用 config/uppy-s3-multipart-upload.php 文件配置上传文件的文件夹和用于上传分片的预签名 URL 的过期时间。
return [
    's3' => [
        'bucket' => [
            /*
             * Folder on bucket to save the file
             */
            'folder' => 'videos',
        ],
        'presigned_url' => [
            /*
             * Expiration time of the presigned URLs
             */
            'expiry_time' => '+30 minutes',
        ],
    ],
];
已添加端点
此包添加以下路由
POST    /s3/multipart
OPTIONS /s3/multipart
GET     /s3/multipart/{uploadId}
GET     /s3/multipart/{uploadId}/{partNumber}
POST    /s3/multipart/{uploadId}/complete
DELETE  /s3/multipart/{uploadId}
用法
为上传文件 URL 添加隐藏字段
在您的 blade 模板中添加隐藏的输入表单元素。上传完成后,它将接收上传文件的 URL
例如:
<input type="hidden" name="file" id="file" />
将 uppy blade 组件添加到您的 blade 视图中
<x-input.uppy />
向 uppy blade 组件传递数据
隐藏字段名称
使用 hiddenField 属性提供将接收上传文件 URL 的隐藏字段的名称
$hiddenField = 'image_url';
<x-input.uppy :hiddenField="$hiddenField" />
如果没有提供,则使用 file 名称。
Uppy 核心选项
https://uppy.io/docs/uppy/#Options
您可以通过 options 属性传递任何 uppy 选项
<x-input.uppy :options="$uppyOptions" />
Uppy 核心选项的格式如下
$uppyOptions = "{
    debug: true,
    autoProceed: true,
    allowMultipleUploads: false,
}";
如果没有提供,则使用默认核心选项
{
    debug: true,
    autoProceed: true,
    allowMultipleUploads: false,
}
Uppy状态栏选项
https://uppy.io/docs/status-bar/#Options
您可以通过statusBarOptions属性传递任何Uppy状态栏选项
<x-input.uppy :statusBarOptions="$uppyStatusBarOptions" />
Uppy状态栏选项的格式如下
$uppyStatusBarOptions = "{
    target: '.upload .for-ProgressBar',
    hideAfterFinish: false,
}";
如果没有提供,则使用默认状态栏选项
{
    target: '.upload .for-ProgressBar',
    hideAfterFinish: false,
}
Uppy拖放选项
https://uppy.io/docs/drag-drop/#Options
您可以通过dragDropOptions属性传递任何Uppy拖放选项
<x-input.uppy :dragDropOptions="$uppyDragDropOptions" />
Uppy拖放选项的格式如下
$uppyDragDropOptions = "{
    target: '.upload .for-DragDrop',
}";
如果没有提供,则使用默认拖放选项
{
    target: '.upload .for-DragDrop',
}
上传元素类
使用uploadElementClass属性提供用于上传的HTML元素的类
$imageClass = 'images';
<x-input.uppy :uploadElementClass="$imageClass" />
如果没有提供,则使用upload类。
多个Uppy实例
如果您想使用多个Uppy实例,请为每个实例添加不同的uploadElementClass属性。例如:
<!-- First Uppy instance for image uploads -->
<div>
    <input type="hidden" name="images" id="images" />
    <x-input.uppy :options="$imageOptions" :hiddenField="$imageField" :uploadElementClass="$imageClass" />
</div>


<!-- Second Uppy instance for video uploads -->
<div>
    <input type="hidden" name="videos" id="videos" />
    <x-input.uppy :options="$videoOptions" :hiddenField="$videoField" :uploadElementClass="$videoClass" />
</div>
注意来自Uppy文档:“如果使用多个Uppy实例,例如,在两个不同的页面上,应指定一个id。这允许Uppy在localStorage中存储信息,而不与其他Uppy实例冲突。” 了解更多。
在onUploadSuccess上添加额外JavaScript
如果您需要在onUploadSuccess函数上添加额外的JavaScript代码,请使用extraJSForOnUploadSuccess属性
例如:
$extraJSForOnUploadSuccess = "
    document.getElementById('saveImageButton').removeAttribute('disabled');
    document.getElementById('saveImageButton').click();
"
<x-input.uppy :extraJSForOnUploadSuccess="$extraJSForOnUploadSuccess" />
extraJSForOnUploadSuccess的默认值是空字符串。
清除缓存
运行
php artisan optimize
php artisan view:clear
变更日志
请参阅CHANGELOG以获取有关最近更改的更多信息。
贡献
请参阅CONTRIBUTING以获取详细信息。
安全漏洞
如果您发现任何安全相关的问题,请发送电子邮件至security@tappnetwork.com。
鸣谢
此包中使用的库
许可证
MIT许可证(MIT)。请参阅许可证文件以获取更多信息。