sizeg / yii2-jwt
基于Icobucci的JWT
Requires
- php: ^7.4 || ^8.0
- lcobucci/jwt: ~4.2.1
- phpunit/phpunit: ^9.5
- yiisoft/yii2: ~2.0.0
README
此扩展为 JWT 提供了与 Yii框架2.0 的集成(需要PHP 5.6+)。它包括基本的HTTP身份验证支持。
目录
安装
该包可在 Packagist 上找到,您可以使用 Composer 进行安装。
composer require sizeg/yii2-jwt
依赖
- PHP 5.6+
- OpenSSL扩展
- lcobucci/jwt 3.3
基本使用
将 jwt 组件添加到您的配置文件中,
'components' => [
    'jwt' => [
      'class' => \sizeg\jwt\Jwt::class,
      'key'   => 'secret',
    ],
],
按以下方式配置 authenticator 行为。
namespace app\controllers;

class ExampleController extends \yii\rest\Controller
{

    /**
     * @inheritdoc
     */
    public function behaviors()
    {
        $behaviors = parent::behaviors();
        $behaviors['authenticator'] = [
            'class' => \sizeg\jwt\JwtHttpBearerAuth::class,
        ];

        return $behaviors;
    }
}
您还可以与 CompositeAuth 一起使用,请参阅 文档。
创建
一些方法已被标记为已弃用,并将很快从 lcobucci/jwt 4.x 返回以创建升级路径。
只需使用构建器创建新的JWT/JWS令牌
$time = time();
$token = Yii::$app->jwt->getBuilder()
            ->issuedBy('http://example.com') // Configures the issuer (iss claim)
            ->permittedFor('http://example.org') // Configures the audience (aud claim)
            ->identifiedBy('4f1g23a12aa', true) // Configures the id (jti claim), replicating as a header item
            ->issuedAt($time) // Configures the time that the token was issue (iat claim)
            ->canOnlyBeUsedAfter($time + 60) // Configures the time that the token can be used (nbf claim)
            ->expiresAt($time + 3600) // Configures the expiration time of the token (exp claim)
            ->withClaim('uid', 1) // Configures a new claim, called "uid"
            ->getToken(); // Retrieves the generated token


$token->getHeaders(); // Retrieves the token headers
$token->getClaims(); // Retrieves the token claims

echo $token->getHeader('jti'); // will print "4f1g23a12aa"
echo $token->getClaim('iss'); // will print "http://example.com"
echo $token->getClaim('uid'); // will print "1"
echo $token; // The string representation of the object is a JWT string (pretty easy, right?)
从字符串解析
使用解析器从JWT字符串创建新的令牌(使用前面的令牌作为示例)
$token = Yii::$app->jwt->getParser()->parse((string) $token); // Parses from a string
$token->getHeaders(); // Retrieves the token header
$token->getClaims(); // Retrieves the token claims

echo $token->getHeader('jti'); // will print "4f1g23a12aa"
echo $token->getClaim('iss'); // will print "http://example.com"
echo $token->getClaim('uid'); // will print "1"
验证
我们可以轻松验证令牌是否有效(使用前面的令牌作为示例)
$data = Yii::$app->jwt->getValidationData(); // It will use the current time to validate (iat, nbf and exp)
$data->setIssuer('http://example.com');
$data->setAudience('http://example.org');
$data->setId('4f1g23a12aa');

var_dump($token->validate($data)); // false, because we created a token that cannot be used before of `time() + 60`

$data->setCurrentTime(time() + 61); // changing the validation time to future

var_dump($token->validate($data)); // true, because validation information is equals to data contained on the token

$data->setCurrentTime(time() + 4000); // changing the validation time to future

var_dump($token->validate($data)); // false, because token is expired since current time is greater than exp
我们还可以使用 $leeway 参数来处理时钟偏差(请参阅下面的说明)。如果令牌声明的有效时间无效,但该时间与验证时间之间的差异小于 $leeway,则令牌仍然被认为是有效的
'components' => [
    'jwt' => [
        'class' => \sizeg\jwt\Jwt:class,
        'key'   => 'secret',
        'jwtValidationData' => [
            'class' => \sizeg\jwt\JwtValidationData::class,
             // configure leeway
            'leeway' => 20,
        ],
    ],
],
$dataWithLeeway = Yii::$app->jwt->getValidationData();
$dataWithLeeway->setIssuer('http://example.com');
$dataWithLeeway->setAudience('http://example.org');
$dataWithLeeway->setId('4f1g23a12aa');

var_dump($token->validate($dataWithLeeway)); // false, because token can't be used before now() + 60, not within leeway

$dataWithLeeway->setCurrentTime($time + 61); // changing the validation time to future

var_dump($token->validate($dataWithLeeway)); // true, because current time plus leeway is between "nbf" and "exp" claims

$dataWithLeeway->setCurrentTime($time + 3610); // changing the validation time to future but within leeway

var_dump($token->validate($dataWithLeeway)); // true, because current time - 20 seconds leeway is less than exp

$dataWithLeeway->setCurrentTime($time + 4000); // changing the validation time to future outside of leeway

var_dump($token->validate($dataWithLeeway)); // false, because token is expired since current time is greater than exp
重要
- 您必须配置
ValidationData以告知所有要验证的声明。 - 如果
ValidationData包含在令牌中未使用的声明或令牌包含在ValidationData中未配置的声明,则它们将由Token::validate()忽略。 exp、nbf和iat声明在ValidationData::__construct()中默认配置为当前UNIX时间(time())。ValidationData的可选$leeway参数将使我们能够在验证基于时间的声明时使用该数量的秒数宽限期,对于“已发行”(iat)和“不可用之前”(nbf)声明,我们假装更远在未来,对于“过期时间”(exp)声明,我们假装更远在过去。这允许在发行服务器的时间与验证服务器的时间不同的情况下进行操作,如RFC 7519的第4.1节所述。
令牌签名
我们可以使用签名来验证令牌在生成后是否被修改。此扩展实现了Hmac、RSA和ECDSA签名(使用256、384和512)。
重要
不要允许发送给解析器的字符串指定要使用的签名算法,否则您的应用程序将容易受到 关键的JWT安全漏洞 的影响。
下面的示例是安全的,因为 Signer 的选择是硬编码的,不能被恶意用户影响。
Hmac
Hmac签名非常简单易用
$jwt = Yii::$app->jwt;
$signer = $jwt->getSigner('HS256');
$key = $jwt->getKey();
$time = time();

$token = $jwt->getBuilder()
            ->issuedBy('http://example.com') // Configures the issuer (iss claim)
            ->permittedFor('http://example.org') // Configures the audience (aud claim)
            ->identifiedBy('4f1g23a12aa', true) // Configures the id (jti claim), replicating as a header item
            ->issuedAt($time) // Configures the time that the token was issue (iat claim)
            ->canOnlyBeUsedAfter($time + 60) // Configures the time that the token can be used (nbf claim)
            ->expiresAt($time + 3600) // Configures the expiration time of the token (exp claim)
            ->withClaim('uid', 1) // Configures a new claim, called "uid"
            ->getToken($signer, $key); // Retrieves the generated token

var_dump($token->verify($signer, 'testing 1')); // false, because the key is different
var_dump($token->verify($signer, 'testing')); // true, because the key is the same
RSA和ECDSA
RSA和ECDSA签名基于公钥和私钥,因此您必须使用私钥生成并使用公钥验证
$jwt = Yii::$app->jwt;
$signer = $jwt->getSigner('RS256'); // you can use 'ES256' if you're using ECDSA keys
$privateKey = $jwt->getKey('file://{path to your private key}');
$time = time();

$token = $jwt->getBuilder()
            ->issuedBy('http://example.com') // Configures the issuer (iss claim)
            ->permittedFor('http://example.org') // Configures the audience (aud claim)
            ->identifiedBy('4f1g23a12aa', true) // Configures the id (jti claim), replicating as a header item
            ->issuedAt($time) // Configures the time that the token was issue (iat claim)
            ->canOnlyBeUsedAfter($time + 60) // Configures the time that the token can be used (nbf claim)
            ->expiresAt($time + 3600) // Configures the expiration time of the token (exp claim)
            ->withClaim('uid', 1) // Configures a new claim, called "uid"
            ->getToken($signer, $privateKey); // Retrieves the generated token

$publicKey = $jwt->getKey('file://{path to your public key}');

var_dump($token->verify($signer, $publicKey)); // true when the public key was generated by the private one =)
重要的是要指出,如果您正在使用RSA密钥,则不应调用ECDSA签名者(反之亦然),否则 sign() 和 verify() 将引发异常!
Yii2基本模板示例
基本方案
- 客户端发送凭证。例如,登录名 + 密码
- 后端验证这些凭证
- 如果凭证有效,客户端将收到令牌
- 客户端将令牌存储起来以供将来请求使用
逐步使用示例
-
创建Yii2应用程序
在这个示例中,我们将使用基本模板,但你也可以以相同的方式使用高级模板。
composer create-project --prefer-dist --stability=dev yiisoft/yii2-app-basic yii2-jwt-test
-
安装组件
composer require sizeg/yii2-jwt
-
将组件添加到config/web.php中的
components部分$config = [ 'components' => [ // other default components here.. 'jwt' => [ 'class' => \sizeg\jwt\Jwt::class, 'key' => 'secret', // You have to configure ValidationData informing all claims you want to validate the token. 'jwtValidationData' => \app\components\JwtValidationData::class, ], ], ];
-
创建JwtValidationData类。在这里,你需要配置ValidationData,以告知所有需要验证的令牌声明。
<?php

namespace app\components;

class JwtValidationData extends \sizeg\jwt\JwtValidationData
{

    /**
     * @inheritdoc
     */
    public function init()
    {
        $this->validationData->setIssuer('http://example.com');
        $this->validationData->setAudience('http://example.org');
        $this->validationData->setId('4f1g23a12aa');

        parent::init();
    }
}
-
修改方法
app\models\User::findIdentityByAccessToken()/** * {@inheritdoc} * @param \Lcobucci\JWT\Token $token */ public static function findIdentityByAccessToken($token, $type = null) { foreach (self::$users as $user) { if ($user['id'] === (string) $token->getClaim('uid')) { return new static($user); } } return null; }
-
创建控制器
<?php

namespace app\controllers;

use sizeg\jwt\Jwt;
use sizeg\jwt\JwtHttpBearerAuth;
use Yii;
use yii\rest\Controller;

class RestController extends Controller
{
    /**
     * @inheritdoc
     */
    public function behaviors()
    {
        $behaviors = parent::behaviors();
        $behaviors['authenticator'] = [
            'class' => JwtHttpBearerAuth::class,
            'optional' => [
                'login',
            ],
        ];

        return $behaviors;
    }

    /**
     * @return \yii\web\Response
     */
    public function actionLogin()
    {
        /** @var Jwt $jwt */
        $jwt = Yii::$app->jwt;
        $signer = $jwt->getSigner('HS256');
        $key = $jwt->getKey();
        $time = time();

        // Previous implementation
        /*
        $token = $jwt->getBuilder()
            ->setIssuer('http://example.com')// Configures the issuer (iss claim)
            ->setAudience('http://example.org')// Configures the audience (aud claim)
            ->setId('4f1g23a12aa', true)// Configures the id (jti claim), replicating as a header item
            ->setIssuedAt(time())// Configures the time that the token was issue (iat claim)
            ->setExpiration(time() + 3600)// Configures the expiration time of the token (exp claim)
            ->set('uid', 100)// Configures a new claim, called "uid"
            ->sign($signer, $jwt->key)// creates a signature using [[Jwt::$key]]
            ->getToken(); // Retrieves the generated token
        */

        // Adoption for lcobucci/jwt ^4.0 version
        $token = $jwt->getBuilder()
            ->issuedBy('http://example.com')// Configures the issuer (iss claim)
            ->permittedFor('http://example.org')// Configures the audience (aud claim)
            ->identifiedBy('4f1g23a12aa', true)// Configures the id (jti claim), replicating as a header item
            ->issuedAt($time)// Configures the time that the token was issue (iat claim)
            ->expiresAt($time + 3600)// Configures the expiration time of the token (exp claim)
            ->withClaim('uid', 100)// Configures a new claim, called "uid"
            ->getToken($signer, $key); // Retrieves the generated token

        return $this->asJson([
            'token' => (string)$token,
        ]);
    }

    /**
     * @return \yii\web\Response
     */
    public function actionData()
    {
        return $this->asJson([
            'success' => true,
        ]);
    }
}
-
发送简单的登录请求以获取令牌。在这里,我们没有发送任何凭证以简化示例。正如我们在
authenticator行为中指定login为可选的,authenticator将跳过对该操作的认证检查。
-
首先,我们尝试发送没有令牌的请求到rest/data,并得到错误
Unauthorized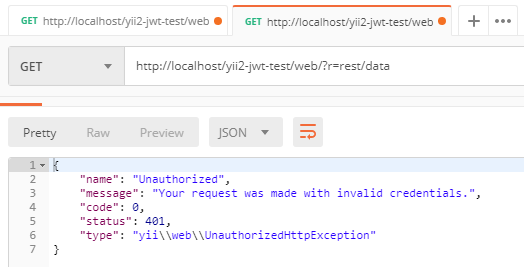
-
然后我们再次请求,但已经添加了带有我们令牌的
Authorization头