shetabit / multipay
PHP支付网关集成包
Requires
- php: >=7.2
- ext-json: *
- chillerlan/php-cache: ^4.1|^5.0
- guzzlehttp/guzzle: >=6.2
- nesbot/carbon: ^1.39|^2.0|^3.0
- ramsey/uuid: ^3.7|^3.8|^3.9|^4.0
Requires (Dev)
- phpunit/phpunit: ^8.0|^9.0
- squizlabs/php_codesniffer: ^3.5
- dev-master
- v1.54.0
- v1.53.0
- v1.52.0
- v1.51.0
- v1.50.3
- v1.50.2
- v1.50.1
- v1.50.0
- v1.49.2
- v1.49.1
- v1.49.0
- v1.48.2
- v1.48.1
- v1.48.0
- v1.47.0
- v1.46.0
- v1.45.01
- v1.45.0
- v1.44.0
- v1.43.0
- v1.42.0
- v1.41.0
- v1.40.0
- 1.39.0
- v1.38.0
- v1.37.01
- v1.37.0
- v1.36.01
- v1.36.0
- v1.35.0
- v1.34.0
- v1.33.01
- v1.33.0
- v1.32.0
- v1.31.0
- v1.30.0
- v1.29.0
- v1.28.1
- v1.28.0
- v1.27.1
- v1.27.0
- v1.26.0
- v1.25.0
- v1.24.0
- v1.23.0
- v1.22.1
- v1.22.0
- v1.21.0
- v1.20.0
- v1.19.0
- v1.18
- v1.17.1
- v1.17.0
- v1.16.0
- v1.15.0
- v1.14.0
- v1.13.1
- v1.13.0
- v1.12.0
- v1.11.0
- v1.10.2
- v1.10.1
- v1.10.0
- v1.9.0
- v1.8.4
- v1.8.3
- 1.8.2
- 1.8.1
- v1.8.0
- v1.7.1
- v1.7.0
- v1.6.4
- v1.6.3
- v1.6.2
- v1.6.1
- v1.6.0
- v1.5.1
- v1.5.0
- v1.4.2
- v1.4.1
- v1.4.0
- v1.3.0
- v1.2.0
- v1.1.6
- v1.1.5
- v1.1.4
- v1.1.3
- v1.1.2
- v1.1.1
- v1.1.0
- v1.0.9
- v1.0.8
- v1.0.7
- v1.0.6
- v1.0.5
- v1.0.4
- v1.0.3
- v1.0.2
- v1.0.1
- v1.0
This package is auto-updated.
Last update: 2024-09-22 11:26:13 UTC
README
PHP支付网关
这是一个用于支付网关集成的PHP包。本包支持PHP 7.2+。
捐赠我,如果你喜欢这个包 😎 ![]()
对于Laravel集成,你可以使用shetabit/payment包。
此包支持多个驱动程序,如果你在当前驱动程序列表(以下列表)中找不到它们,你可以创建自定义驱动程序。
目录
可用驱动程序列表
- aqayepardakht ✔️
- asanpardakht ✔️
- atipay ✔️
- azkiVam (分期付款) ✔️
- behpardakht (mellat) ✔️
- bitpay ✔️
- digipay ✔️
- etebarino (分期付款) ✔️
- fanavacard ✔️
- gooyapay ✔️
- idpay ✔️
- irandargah ✔️
- irankish ✔️
- jibit ✔️
- local ✔️
- minipay ✔️
- nextpay ✔️
- omidpay ✔️
- parsian ✔️
- parspal ✔️
- pasargad ✔️
- payfa ✔️
- payir ✔️
- paypal (将在下一个版本中添加)
- payping ✔️
- paystar ✔️
- poolam ✔️
- pna ✔️
- rayanpay ✔️
- sadad (melli) ✔️
- saman ✔️
- sep (saman electronic payment) Keshavarzi & Saderat ✔️
- sepehr (saderat) ✔️
- sepordeh ✔️
- shepa ✔️
- sizpay ✔️
- snapppay ✔️
- toman ✔️
- vandar ✔️
- walleta (Installment payment) ✔️
- yekpay ✔️
- zarinpal ✔️
- zibal ✔️
- novinopay ✔️
- 其他正在开发中。
通过创建 pull requests 帮助我添加以下网关:
- stripe
- authorize
- 2checkout
- braintree
- skrill
- payU
- amazon payments
- wepay
- payoneer
- paysimple
如果列表中不存在,您可以创建自己的自定义驱动程序,请参阅
创建自定义驱动程序部分。
安装
通过 Composer
composer require shetabit/multipay
配置
a. 将 config/payment.php 复制到您的项目中某个位置。(您也可以在 vendor/shetabit/multipay/config/payment.php 路径中找到它)。
b. 在配置文件中,您可以设置用于所有付款的 默认驱动程序,也可以在运行时更改驱动程序。
选择您在应用程序中希望使用的网关。然后将它设置为默认驱动程序,这样您就无需在每个地方指定它。但是,您也可以在项目中使用多个网关。
// Eg. if you want to use zarinpal.
'default' => 'zarinpal',
然后在驱动程序数组中填写该网关的凭据。
'drivers' => [
    'zarinpal' => [
        // Fill in the credentials here.
        'apiPurchaseUrl' => 'https://www.zarinpal.com/pg/rest/WebGate/PaymentRequest.json',
        'apiPaymentUrl' => 'https://www.zarinpal.com/pg/StartPay/',
        'apiVerificationUrl' => 'https://www.zarinpal.com/pg/rest/WebGate/PaymentVerification.json',
        'merchantId' => '',
        'callbackUrl' => 'http://yoursite.com/path/to',
        'description' => 'payment in '.config('app.name'),
    ],
    ...
]
c. 实例化 Payment 类,并将如下配置传递给它
    use Shetabit\Multipay\Payment;

    // load the config file from your project
    $paymentConfig = require('path/to/payment.php');

    $payment = new Payment($paymentConfig);
如何使用
您的 Invoice 包含付款详情,所以我们将首先介绍 Invoice 类。
与发票一起工作
在进行任何操作之前,您需要使用 Invoice 类创建发票。
在您的代码中,使用如下所示的方式
// At the top of the file.
use Shetabit\Multipay\Invoice;
...

// Create new invoice.
$invoice = new Invoice;

// Set invoice amount.
$invoice->amount(1000);

// Add invoice details: There are 4 syntax available for this.
// 1
$invoice->detail(['detailName' => 'your detail goes here']);
// 2
$invoice->detail('detailName','your detail goes here');
// 3
$invoice->detail(['name1' => 'detail1','name2' => 'detail2']);
// 4
$invoice->detail('detailName1','your detail1 goes here')
        ->detail('detailName2','your detail2 goes here');
可用方法
uuid: 设置发票的唯一 IDgetUuid: 获取发票当前的唯一 IDdetail: 将一些自定义详情附加到发票getDetails: 获取所有自定义详情amount: 设置发票金额getAmount: 获取发票金额transactionId: 设置发票付款交易 IDgetTransactionId: 获取付款交易 IDvia: 设置支付发票时使用的驱动程序getDriver: 获取驱动程序
采购发票
为了支付发票,我们需要付款交易 ID。我们购买发票以检索交易 ID
// At the top of the file.
use Shetabit\Multipay\Invoice;
use Shetabit\Multipay\Payment;
...

// load the config file from your project
$paymentConfig = require('path/to/payment.php');

$payment = new Payment($paymentConfig);


// Create new invoice.
$invoice = (new Invoice)->amount(1000);

// Purchase the given invoice.
$payment->purchase($invoice,function($driver, $transactionId) {
	// We can store $transactionId in database.
});

// Purchase method accepts a callback function.
$payment->purchase($invoice, function($driver, $transactionId) {
    // We can store $transactionId in database.
});

// You can specify callbackUrl
$payment->callbackUrl('http://yoursite.com/verify')->purchase(
    $invoice,
    function($driver, $transactionId) {
    	// We can store $transactionId in database.
	}
);
支付发票
购买发票后,我们可以将用户重定向到银行付款页面
// At the top of the file.
use Shetabit\Multipay\Invoice;
use Shetabit\Multipay\Payment;
...

// load the config file from your project
$paymentConfig = require('path/to/payment.php');

$payment = new Payment($paymentConfig);


// Create new invoice.
$invoice = (new Invoice)->amount(1000);

// Purchase and pay the given invoice.
// You should use return statement to redirect user to the bank page.
return $payment->purchase($invoice, function($driver, $transactionId) {
    // Store transactionId in database as we need it to verify payment in the future.
})->pay()->render();

// Do all things together in a single line.
return $payment->purchase(
    (new Invoice)->amount(1000),
    function($driver, $transactionId) {
    	// Store transactionId in database.
        // We need the transactionId to verify payment in the future.
	}
)->pay()->render();

// Retrieve json format of Redirection (in this case you can handle redirection to bank gateway)
return $payment->purchase(
    (new Invoice)->amount(1000),
    function($driver, $transactionId) {
    	// Store transactionId in database.
        // We need the transactionId to verify payment in the future.
	}
)->pay()->toJson();
验证支付
当用户完成付款时,银行将他们重定向到您的网站,然后您需要 验证您的付款 以确保 发票 已 支付。
// At the top of the file.
use Shetabit\Multipay\Payment;
use Shetabit\Multipay\Exceptions\InvalidPaymentException;
...

// load the config file from your project
$paymentConfig = require('path/to/payment.php');

$payment = new Payment($paymentConfig);


// You need to verify the payment to ensure the invoice has been paid successfully.
// We use transaction id to verify payments
// It is a good practice to add invoice amount as well.
try {
	$receipt = $payment->amount(1000)->transactionId($transaction_id)->verify();

    // You can show payment referenceId to the user.
    echo $receipt->getReferenceId();

    ...
} catch (InvalidPaymentException $exception) {
    /**
    	when payment is not verified, it will throw an exception.
    	We can catch the exception to handle invalid payments.
    	getMessage method, returns a suitable message that can be used in user interface.
    **/
    echo $exception->getMessage();
}
有用方法
-
callbackUrl: 可以用于在运行时更改回调 URL。// At the top of the file. use Shetabit\Multipay\Invoice; use Shetabit\Multipay\Payment; ... // load the config file from your project $paymentConfig = require('path/to/payment.php'); $payment = new Payment($paymentConfig); // Create new invoice. $invoice = (new Invoice)->amount(1000); // Purchase the given invoice. $payment->callbackUrl($url)->purchase( $invoice, function($driver, $transactionId) { // We can store $transactionId in database. } );
-
amount: 您可以直接设置发票金额// At the top of the file. use Shetabit\Multipay\Invoice; use Shetabit\Multipay\Payment; ... // load the config file from your project $paymentConfig = require('path/to/payment.php'); $payment = new Payment($paymentConfig); // Purchase (we set invoice to null). $payment->callbackUrl($url)->amount(1000)->purchase( null, function($driver, $transactionId) { // We can store $transactionId in database. } );
-
via: 动态更改驱动程序// At the top of the file. use Shetabit\Multipay\Invoice; use Shetabit\Multipay\Payment; ... // load the config file from your project $paymentConfig = require('path/to/payment.php'); $payment = new Payment($paymentConfig); // Create new invoice. $invoice = (new Invoice)->amount(1000); // Purchase the given invoice. $payment->via('driverName')->purchase( $invoice, function($driver, $transactionId) { // We can store $transactionId in database. } );
-
config: 动态设置驱动程序配置// At the top of the file. use Shetabit\Multipay\Invoice; use Shetabit\Multipay\Payment; ... // load the config file from your project $paymentConfig = require('path/to/payment.php'); $payment = new Payment($paymentConfig); // Create new invoice. $invoice = (new Invoice)->amount(1000); // Purchase the given invoice with custom driver configs. $payment->config('mechandId', 'your mechand id')->purchase( $invoice, function($driver, $transactionId) { // We can store $transactionId in database. } ); // Also we can change multiple configs at the same time. $payment->config(['key1' => 'value1', 'key2' => 'value2'])->purchase( $invoice, function($driver, $transactionId) { // We can store $transactionId in database. } );
-
custom fields: 使用网关的自定义字段(并非所有网关都支持此功能) SEP 网关支持最多 4 个自定义字段,并且可以将值设置为最多 50 个字符的字符串。这些自定义字段仅在用户面板中查看报告时显示。// At the top of the file. use Shetabit\Multipay\Invoice; ... // Create new invoice. $invoice = (new Invoice)->amount(1000); // Use invoice bag to store custom field values. $invoice->detail([ 'ResNum1' => $order->orderId, 'ResNum2' => $customer->verifiedCode, 'ResNum3' => $someValue, 'ResNum4' => $someOtherValue, ]);
创建自定义驱动程序
首先,您需要在驱动程序数组中添加您驱动程序的名称,并且您还可以指定任何您想要配置的参数。
'drivers' => [
    'zarinpal' => [...],
    'my_driver' => [
        ... // Your Config Params here.
    ]
]
现在,您需要创建一个用于支付发票的驱动程序映射类。在您的驱动程序中,您只需扩展 Shetabit\Multipay\Abstracts\Driver。
例如,您创建了一个类:App\Packages\Multipay\Driver\MyDriver。
namespace App\Packages\Multipay\Driver;

use Shetabit\Multipay\Abstracts\Driver;
use Shetabit\Multipay\Exceptions\InvalidPaymentException;
use Shetabit\Multipay\{Contracts\ReceiptInterface, Invoice, RedirectionForm, Receipt};

class MyDriver extends Driver
{
    protected $invoice; // Invoice.

    protected $settings; // Driver settings.

    public function __construct(Invoice $invoice, $settings)
    {
        $this->invoice($invoice); // Set the invoice.
        $this->settings = (object) $settings; // Set settings.
    }

    // Purchase the invoice, save its transactionId and finaly return it.
    public function purchase() {
        // Request for a payment transaction id.
        ...

        $this->invoice->transactionId($transId);

        return $transId;
    }

    // Redirect into bank using transactionId, to complete the payment.
    public function pay() : RedirectionForm {
        // It is better to set bankApiUrl in config/payment.php and retrieve it here:
        $bankUrl = $this->settings->bankApiUrl; // bankApiUrl is the config name.

        // Prepare payment url.
        $payUrl = $bankUrl.$this->invoice->getTransactionId();

        // Redirect to the bank.
        $url = $payUrl;
        $inputs = [];
        $method = 'GET';

        return $this->redirectWithForm($url, $inputs, $method);
    }

    // Verify the payment (we must verify to ensure that user has paid the invoice).
    public function verify(): ReceiptInterface {
        $verifyPayment = $this->settings->verifyApiUrl;

        $verifyUrl = $verifyPayment.$this->invoice->getTransactionId();

        ...

        /**
			Then we send a request to $verifyUrl and if payment is not valid we throw an InvalidPaymentException with a suitable message.
        **/
        throw new InvalidPaymentException('a suitable message');

        /**
        	We create a receipt for this payment if everything goes normally.
        **/
        return new Receipt('driverName', 'payment_receipt_number');
    }
}
创建该类后,您必须在 payment.php 配置文件的 map 部分中指定它。
'map' => [
    ...
    'my_driver' => App\Packages\Multipay\Driver\MyDriver::class,
]
注意:您必须确保 map 数组的键与 drivers 数组的键相同。
事件
注意1:事件监听器将全局注册到所有支付中。
注意2:如果您想让您的监听器正常工作,您必须在目标事件分发之前订阅它们。
最好在您的应用程序的入口点或主要服务提供者中订阅事件,以便在任何事件分发之前进行订阅。
您可以监听3个事件
- 购买
- 支付
- 验证.
- 购买:在发票购买成功后发生(购买发票完成后)。
// add purchase event listener
Payment::addPurchaseListener(function($driver, $invoice) {
    echo $driver;
    echo $invoice;
});
- 支付:在准备支付发票时发生。
// add pay event listener
Payment::addPayListener(function($driver, $invoice) {
    echo 'first listener';
});

// we can add multiple listeners
Payment::addPayListener(function($driver, $invoice) {
    echo 'second listener';
});
- 验证:在发票成功验证时发生。
// we can add multiple listeners and also remove them!!!

$firstListener = function($driver, $invoice) {
    echo 'first listener';
};

$secondListener = function($driver, $invoice) {
    echo 'second listener';
};

Payment::addVerifyListener($firstListener);
Payment::addVerifyListener($secondListener);

// remove first listener
Payment::removeVerifyListener($firstListener);

// if we call remove listener without any arguments, it will remove all listeners
Payment::removeVerifyListener(); // remove all verify listeners :D
本地驱动程序
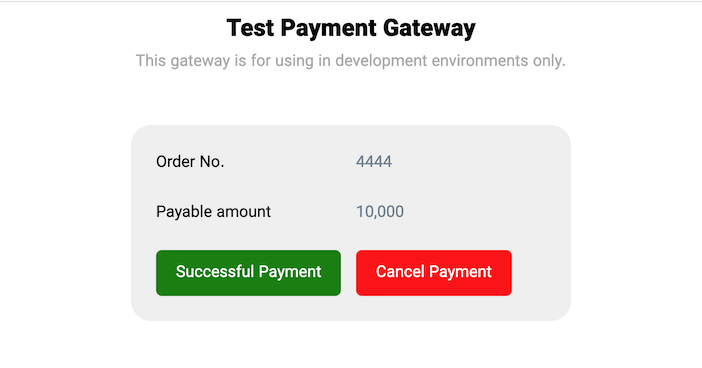
Local 驱动程序可以模拟真实网关的支付流程,用于开发目的。
支付可以像任何其他驱动程序一样启动
$invoice = (new Invoice)->amount(10000);
$payment->via('local')->purchase($invoice, function($driver, $transactionId) {
    // a fake transaction ID is generated and returned.
})->pay()->render();
调用 render() 方法将渲染一个带有 接受 和 取消 按钮的 HTML 表单,这些按钮模拟了真实支付网关相应的操作,并将重定向到指定的回调URL。返回的查询URL中始终会提供 transactionId 参数。
在收到回调请求后可以验证支付。
$receipt = $payment->via('local')->verify();
在支付成功的情况下,$receipt 将包含以下参数
[
'orderId' => // fake order number
'traceNo' => // fake trace number (this should be stored in databse)
'referenceNo' => // generated transaction ID in `purchase` method callback
'cardNo' => // fake last four digits of card
]
在支付取消的情况下,将抛出 PurchaseFailedException 来模拟网关验证失败。
可以通过 Invoice 详细信息包配置驱动程序功能。
$invoice->detail([
    // setting this value will cause `purchase` method to throw an `PurchaseFailedException`
    // to simulate when a gateway can not initialize the payment.
        'failedPurchase' => 'custom message to decribe the error',

    // Setting this parameter will be shown in payment form.
        'orderId' => 4444,
]);
支付表单的外观可以通过 payment.php 文件中 local 驱动程序的配置参数进行自定义。
'local' => [
    // default callback url of the driver
    'callbackUrl' => '/callback',

    // main title of the form
    'title' => 'Test gateway',

    // a description to show under the title for more clarification
    'description' => 'This gateway is for using in development environments only.',

    // custom label to show as order No.
    'orderLabel' => 'Order No.',

    // custom label to show as payable amount
    'amountLabel' => 'Payable amount',

    // custom label of successful payment button
    'payButton' => 'Successful Payment',

    // custom label of cancel payment button
    'cancelButton' => 'Cancel Payment',
],
变更日志
有关最近更改的更多信息,请参阅 变更日志。
贡献
安全性
如果您发现任何安全相关的问题,请通过电子邮件 khanzadimahdi@gmail.com 而不是使用问题跟踪器。
致谢
许可证
MIT许可(MIT)。有关更多信息,请参阅 许可文件。


