mohsenabrishami / stethoscope
laravel服务器监控
Requires
- php: ^8.0
- guzzlehttp/guzzle: ^7.5
Requires (Dev)
- orchestra/testbench: ^7.11
- phpunit/phpunit: ^9.5
README
 Stethoscope
用于监听您的Laravel应用服务器心跳

功能 | 安装 | 使用 | 仪表板 | 配置 | 通知 | 测试 | 变更日志 | 贡献 | 致谢 | 许可
![]()
此Laravel包允许您监控基础设施。
使用此包,您可以在任何时间检查服务器健康。
功能
-
监控CPU使用百分比
-
监控内存使用百分比
-
监控存储可用空间
-
检查网络连接状态
-
检查Web服务器状态(Nginx/Apache)
-
当CPU、内存和存储使用超过指定阈值时记录日志
-
当网络连接失败或Web服务器停止时记录日志
-
当服务器CPU、内存、存储、Web服务器和网络出现问题时发送电子邮件
需要更多选项吗?您可以为包提出问题或做出贡献
开始使用
要求
- PHP 8.0+
- Laravel 8+
- Linux操作系统(Debian、Ubuntu、mint等)
安装
此包需要PHP 8.0和Laravel 8.0或更高版本。您可以通过Composer安装此包
composer require mohsenabrishami/stethoscope
然后运行
php artisan vendor:publish --tag=stethoscope-publish-config
Stethoscope允许您将报告记录在文件和数据库中。如果您在配置文件中设置了数据库驱动程序,则必须运行迁移命令
php artisan migrate
使用
安装后,使用以下命令查看服务器健康详情
php artisan stethoscope:listen
输出将如下所示

但是,此包的工作并未止于此。您可以设置CPU、内存和存储消耗的阈值。如果CPU和内存消耗超过阈值或存储可用空间小于阈值,则从详细消耗中创建日志。此外,您还可以配置此包,以便在Web服务器停止或网络断开时创建日志。要开始监控服务器,只需运行此命令
php artisan stethoscope:monitor
您可以通过运行此命令并使用cron作业来持续监控服务器。如果服务器出现问题,您可能需要收到通知。为此,只需在配置文件中将您的电子邮件管理员设置为即可。
如果您担心日志数量增加,可以使用以下命令。此命令根据您在配置文件中定义的天数删除旧日志。
php artisan stethoscope:clean
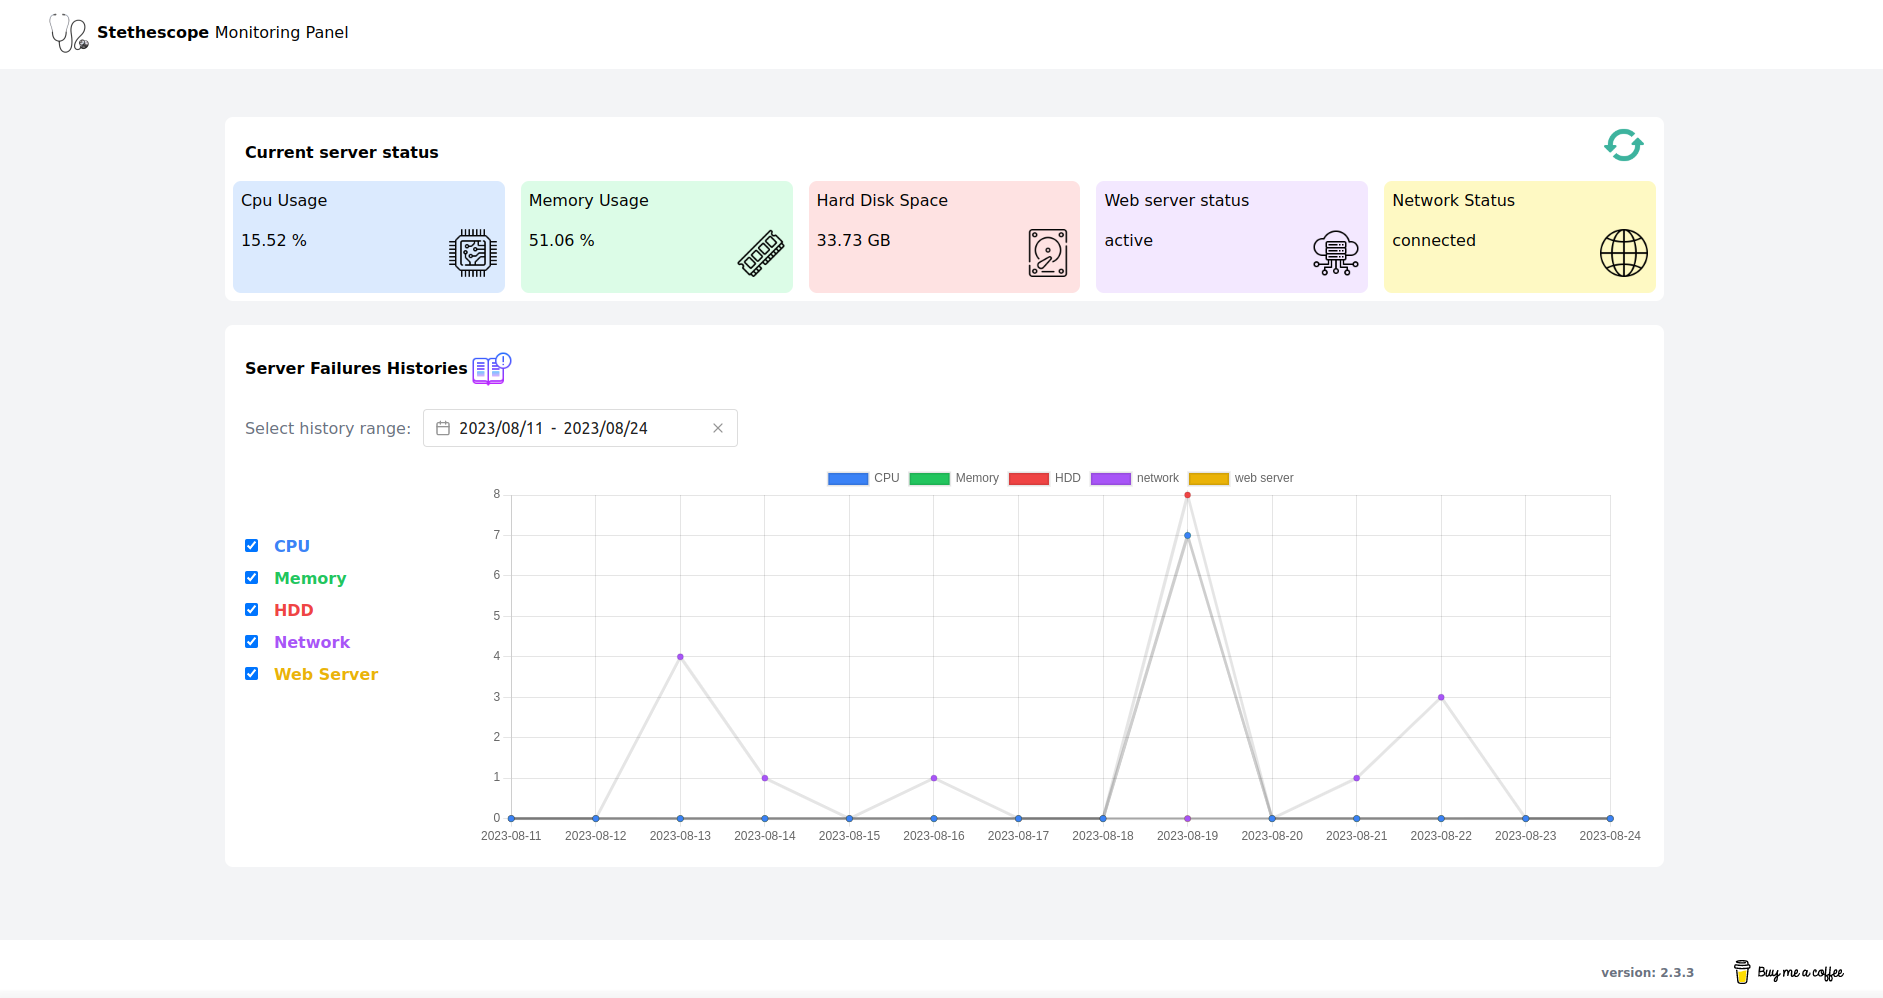
仪表板
听诊器提供仪表板,您可以在任何时间轻松查看服务器的当前状态。此外,在这个仪表板中,您还可以看到资源消耗超过限制或网络和Web服务器被禁用的历史记录。
如果您使用监控面板,则必须发布构建文件
php artisan vendor:publish --tag=stethoscope-publish-view
请记住,监控仪表板默认是禁用的。要激活,您必须在配置文件中将 monitoring_panel.status 设置为 true。此外,日志存储驱动程序必须为数据库,而不是文件。
您可以将一个密钥放入访问管理面板。如果您定义了一个密钥,只有在您在地址中输入密钥时才能访问仪表板。
您可以通过以下地址访问此面板 https://yoursite/monitoring-panel?key=sampletoken
    /*
    |--------------------------------------------------------------------------
    | Dashboard Configuration
    |--------------------------------------------------------------------------
    | Here, you can specify whether the monitoring panel is enabled and the key required to access it.
    | Also, you can customize the monitoring panel path.
    |
    */
    'monitoring_panel' => [
        'status' => false,
        'path' => 'monitoring-panel',
        'key' => env('MONITORING_PANEL_KEY'),
    ],
配置
您可以在 config/stethoscope.php 中轻松自定义此包。
在此文件中,您可以配置以下内容
-
应监控的资源。我们可以监控 CPU、内存、存储、网络连接和Web服务器状态。
-
安装在您服务器上的Web服务器。我们支持 Nginx 和 apache。
-
存储驱动程序和保存日志文件的路径。
-
资源阈值。包括最大 CPU 和内存使用率以及最小存储空间。
-
用于网络连接监控的自定义网络 URL。
-
保存资源日志的驱动程序(支持文件存储和数据库)。
-
在您的服务器出现问题时发送通知电子邮件的电子邮件地址。
-
资源日志必须保留的天数。
默认情况下,配置如下
    /*
    |--------------------------------------------------------------------------
    | Monitorable Resources
    |--------------------------------------------------------------------------
    | Here you can Define which resources should be monitored.
    | Set true if you want a resource to be monitored, otherwise false.
    |
    */

    'monitorable_resources' => [
        'cpu' => true,
        'memory' => true,
        'storage' => true,
        'network' => true,
        'web_server' => true,
    ],

    /*
    |--------------------------------------------------------------------------
    | Web Server Name
    |--------------------------------------------------------------------------
    | Here you can define what web server installed on your server.
    | Set `nginx` or `apache`
    |
    */

    'web_server_name' => 'nginx',

    /*
    |--------------------------------------------------------------------------
    | Log File Storage
    |--------------------------------------------------------------------------
    | Define storage driver and path for save log file.
    |
    */

    'log_file_storage' => [
        'driver' => 'local',
        'path' => 'stethoscope/',
    ],

    /*
    |--------------------------------------------------------------------------
    | Thresholds
    |--------------------------------------------------------------------------
    | If resource consumption exceeds these thresholds, a log will be created.
    | You may define maximum CPU and memory usage by percent.
    | You may define minimum Storage space by GB.
    |
    */

    'thresholds' => [

        'cpu' => env('CPU_MONITOR_THRESHOLD', 90),

        'memory' => env('MEMORY_MONITOR_THRESHOLD', 80),

        'storage' => env('storage_MONITOR_THRESHOLD', 10),

    ],

    /*
    |--------------------------------------------------------------------------
    | Network Monitor URL
    |--------------------------------------------------------------------------
    | Here you can define the multiple desired URL for network monitoring.
    | If an address cannot be reached, it checks other addresses to make sure that the problem is with the server network
    |
    */

    'network_monitor_url' => env('NETWORK_MONITOR_URL', ['https://1.1.1.1', 'https://www.google.com']),

    /*
    |--------------------------------------------------------------------------
    | Log Record Driver
    |--------------------------------------------------------------------------
    | Set `database` for save logs in database and `file` for record logs in file
    |
    */

    'drivers' => [
        'log_record' => env('STETHOSCOPE_LOG_DRIVER', 'file'),
    ],

    /*
    |--------------------------------------------------------------------------
    | Clean up resource logs
    |--------------------------------------------------------------------------
    | Here you define the number of days for which resource logs must be kept.
    | Older resource logs will be removed.
    |
    */
    'cleanup_resource_logs' => 7,
通知
听诊器可以通过通知向您发送服务器问题。默认情况下,支持通过电子邮件发送通知。要使用此功能,您必须在配置文件中输入管理员用户的电子邮件地址。
'mail' => [
    'to' => null,
],
添加额外的通知通道
添加额外的通知通道,如 Telegram 或原生移动推送通知等非常简单。在以下示例中,我们将添加 Telegram 推送通知通道。其他通知驱动程序可以以相同的方式添加。
1. 安装通知通道驱动程序
首先,您需要创建自己的自定义驱动程序。对于 Telegram 推送通知,您可以使用以下包
laravel-notification-channels/telegram
在 composer 拖入包后,只需遵循 包的安装说明 即可完成安装。
2. 创建自己的自定义通知
以下,您需要创建自己的通知类,如下所示
namespace App\Notifications;

use Illuminate\Bus\Queueable;
use MohsenAbrishami\Stethoscope\Notifications\LogReportNotification;
use NotificationChannels\Telegram\TelegramMessage;

class StethoscopeNotification extends LogReportNotification
{
    use Queueable;

    public function toTelegram()
    {
        $formattedMessage = "
        *Message from stethoscope:*

        *Be careful!! 💀*

        Your server has the following problems:
        " . (isset($this->logs['cpu']) ? '- Cpu usage: ' . $this->logs['cpu'] . ' %' : '') . "
        " . (isset($this->logs['memory']) ? '- Memory usage: ' . $this->logs['memory'] . ' %' : '') . "
        " . (isset($this->logs['network']) ? '- Network connection status: ' . $this->logs['network'] : '') . "
        " . (isset($this->logs['storage']) ? '- Remaining free space on the Storage:  ' . $this->logs['storage'] . ' GB' : '') . "
        " . (isset($this->logs['webServer']) ? '- Web server status:  ' . $this->logs['webServer'] : '') . "
    ";

        return TelegramMessage::create()->content($formattedMessage);
    }
}
3. 创建自己的自定义可通知对象
此外,您还应创建可通知对象。在此示例中,如您所见,应返回 Telegram 通道 ID
namespace App\Notifications;

use MohsenAbrishami\Stethoscope\Notifications\Notifiable;

class StethoscopeNotifiable extends Notifiable
{
    public function routeNotificationForTelegram()
    {
        return config('stethoscope.notifications.telegram.channel_id');
    }
}
4. 在配置文件中注册您的自定义通知
最后,您应注册通知和可通知类,并添加 Telegram 通道 ID
    /*
    |--------------------------------------------------------------------------
    | Notifications
    |--------------------------------------------------------------------------
    | You can get notified when specific events occur. you should set an email to get notifications here.
    | If you don't need to send an email notification, set null.
    |
    */
    'notifications' => [

        'notifications' => [
            App\Notifications\StethoscopeNotification::class => ['telegram'],
        ],

        'notifiable' => App\Notifications\StethoscopeNotifiable::class,

        'telegram' => [
            'channel_id' => env('TELEGRAM_CHAT_ID')
        ]

    ],
测试
使用以下命令运行测试
composer test
变更日志
有关最近更改的更多信息,请参阅 变更日志
贡献
有关详细信息,请参阅 贡献
鸣谢
许可证
MIT 许可证(MIT)。有关更多信息,请参阅 许可证文件