laynefyc / php-monitor
一款免费、灵活、强大的工具,帮助您监控 PHP 服务。
Requires
- php: ^5.6 || ^7.0
- ext-json: *
- illuminate/database: ~5.8
- illuminate/pagination: ^5.8
- jenssegers/mongodb: ^3.5
Requires (Dev)
- phpunit/phpunit: ^9.0
Suggests
- ext-mongodb: Mongo is needed to store profiler results.
- ext-pdo_mysql: pdo_mysql is needed to store profiler results.
- ext-sqlite3: sqlite3 is needed to store profiler results.
- ext-uprofiler: You need to install either xhprof or uprofiler.
- ext-xhprof: You need to install either xhprof or uprofiler.
This package is auto-updated.
Last update: 2024-09-29 05:36:00 UTC
README
一款免费、灵活、强大的工具,帮助您监控 PHP 服务和性能分析 PHP 代码。
英文 | 简体中文
✨ 特性
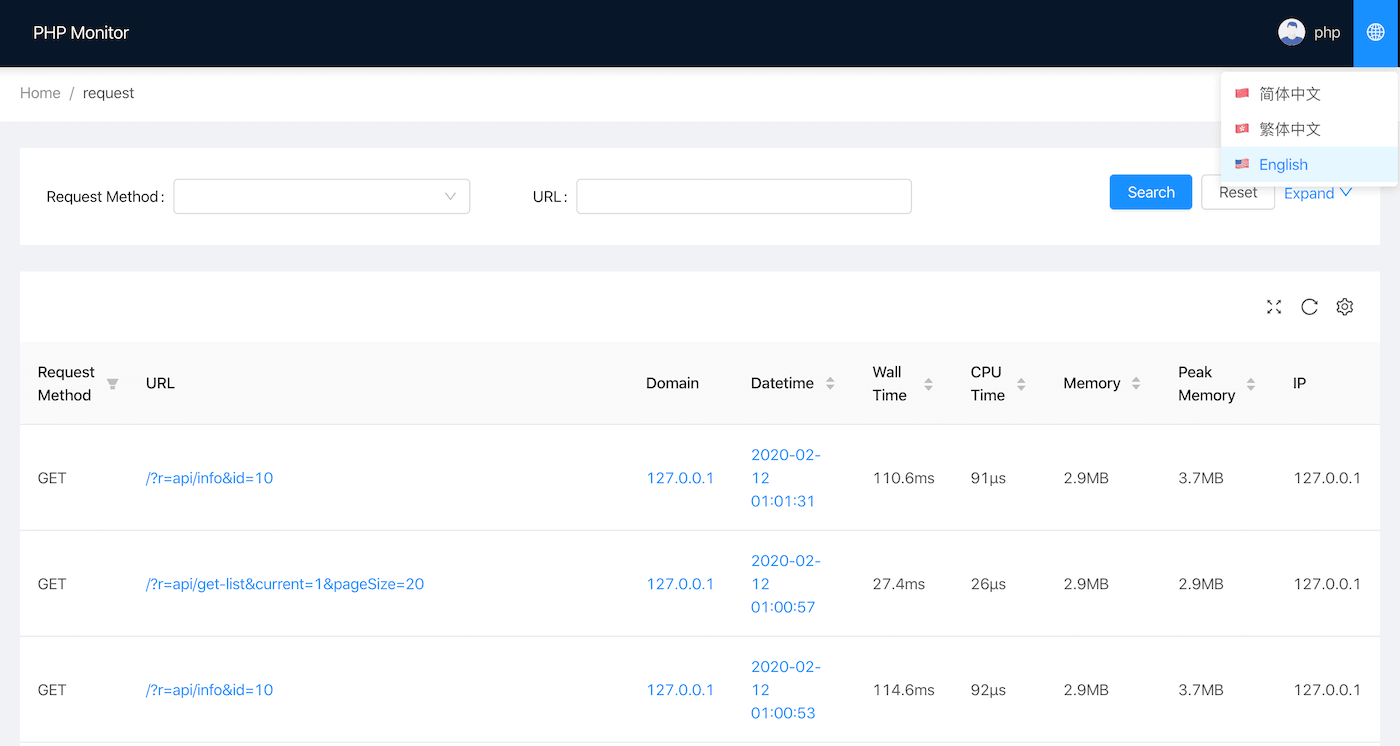
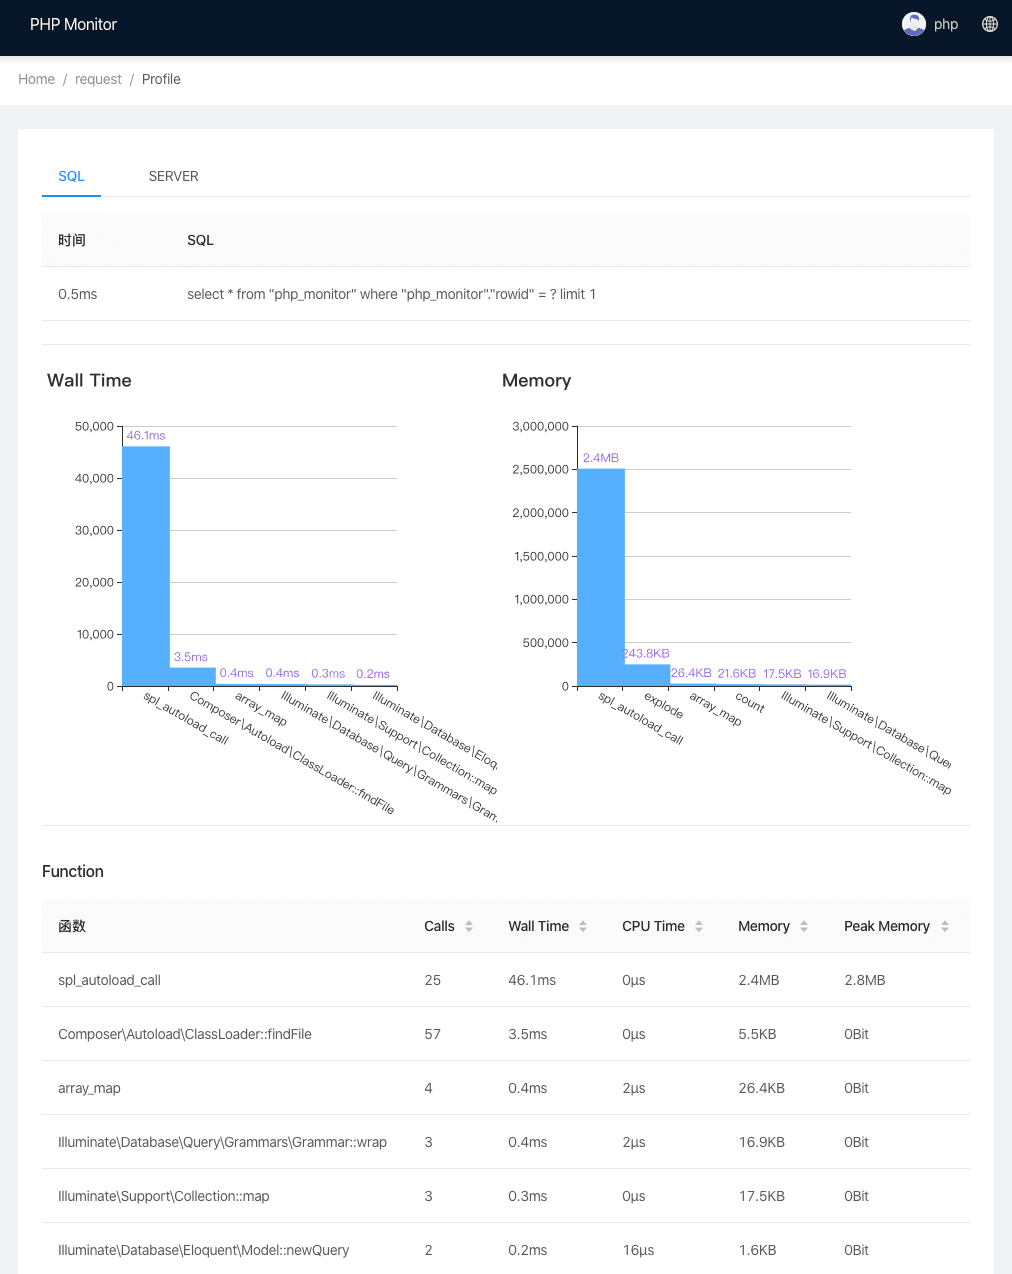
- 🌈 获取详细的 PHP 运行时数据。
- 🌍 监控生产环境耗时请求。
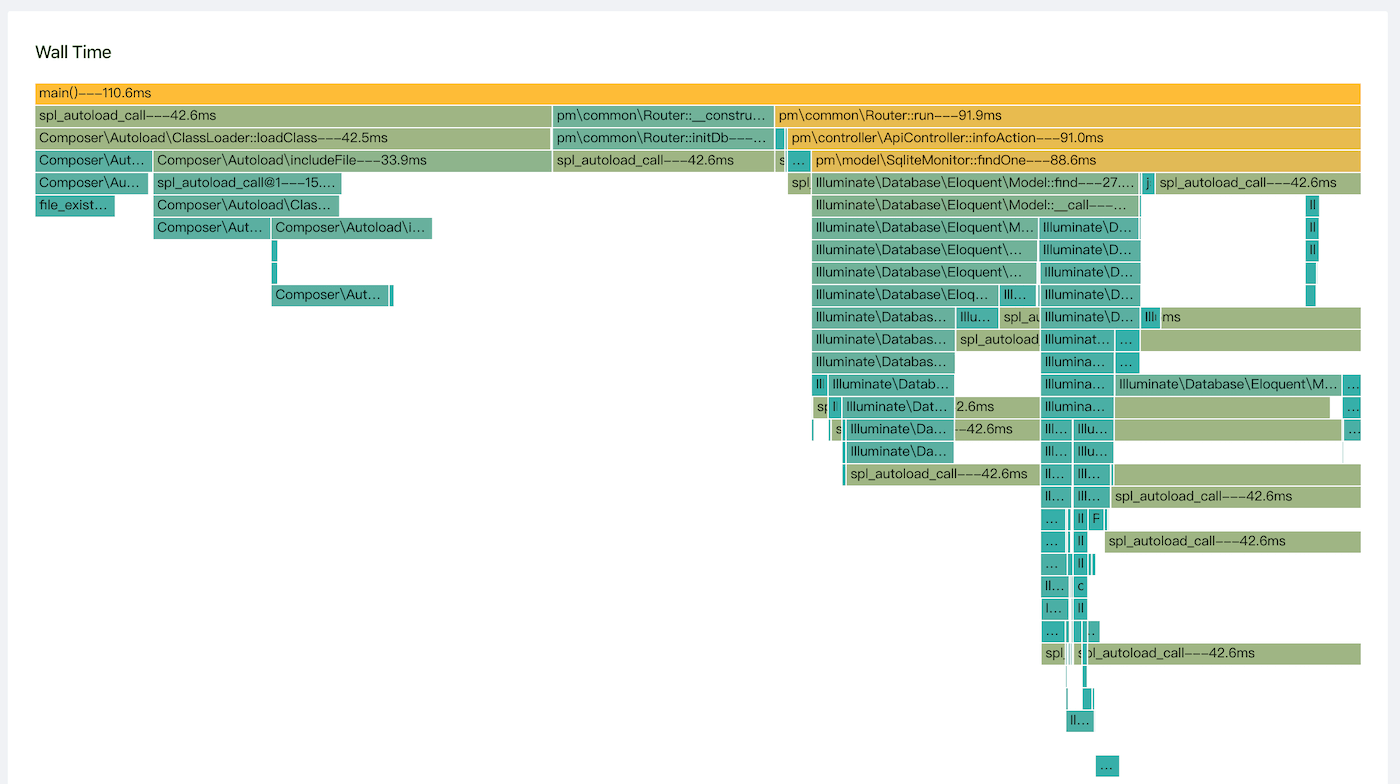
- 🛡 显示底层函数的内存和 CPU 消耗。
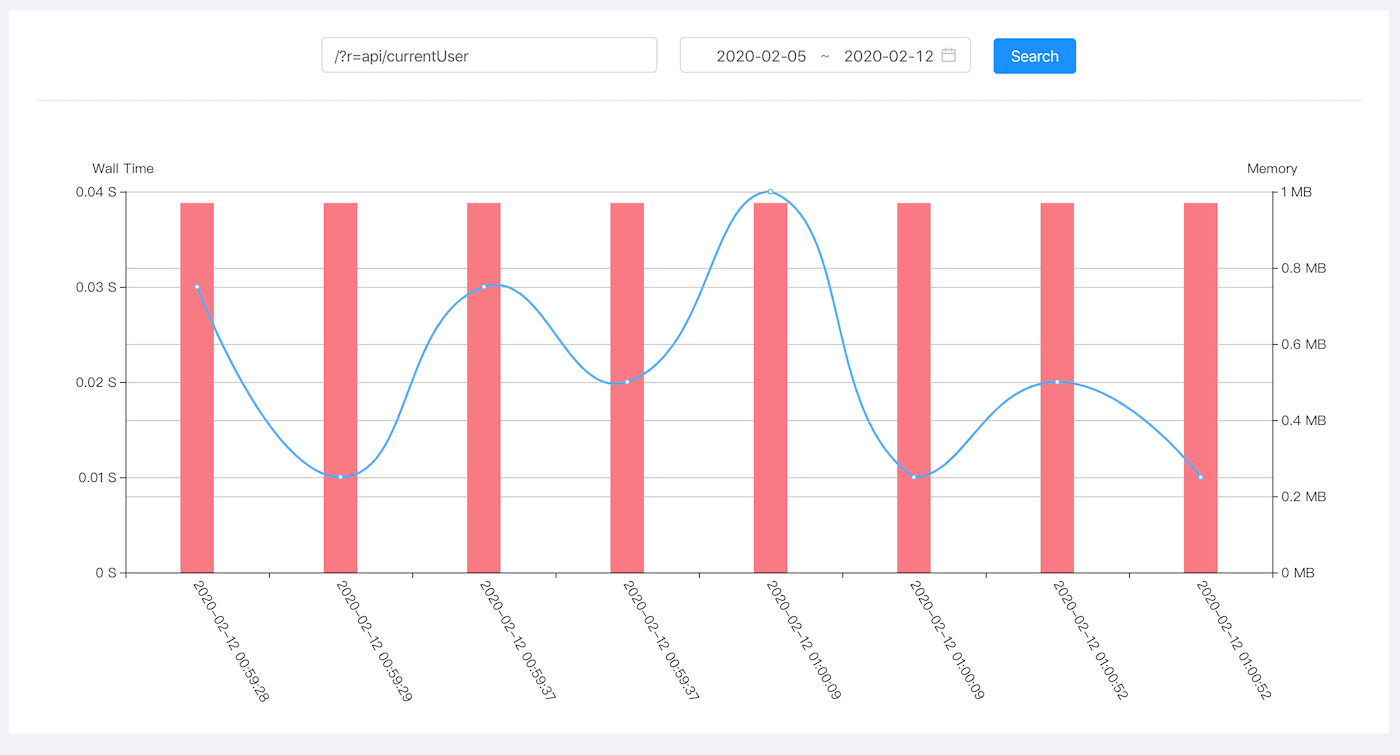
- 🎨 使用各种可视化图形显示数据。
⚙️ 系统要求
- uprofiler,xhprof,tideways php 扩展(默认 tideways)。
- composer
- PHP 5.6+
安装 tideways 扩展
PHP 5.6(下载 tideways v4.1.5) PHP 7.0+(下载 tideways v4.1.7)
wget --no-check-certificate https://github.com/tideways/php-xhprof-extension/archive/v4.1.7.tar.gz && tar zxvf v4.1.7.tar.gz && cd php-xhprof-extension-4.1.7 && phpize && ./configure && make && sudo make install
在 php.ini 中添加配置数据。您应该看到类似以下内容
extension=tideways.so
安装完成后,您可以使用以下命令进行检测
> php --ri tideways
tideways
tideways => 4.1.7
安装 php-monitor
composer create-project --prefer-dist --ignore-platform-reqs laynefyc/php-monitor php-monitor && cd php-monitor/public && php -S 127.0.0.1:8066
访问 http://127.0.0.1:8066 并输入账户和密码(php/php)。
详细安装教程
-
下载 & 更新项目
composer create-project --prefer-dist --ignore-platform-reqs laynefyc/php-monitor php-monitor
或
git clone https://github.com/laynefyc/php-monitor.git cd php-monitor composer update --ignore-platform-reqs -
项目可以设置数据存储模式,支持 MySQL、MongoDB、SQLite。在配置文件
src/config/config.php中设置,信息如下// 'save' => [ // 'driver' => 'mysql', // 'host' => '127.0.0.1:3306', // 'database' => 'php_monitor', // 'username' => '', // 'password' => 'abcd1234', // 'charset' => 'utf8mb4' // ], // 'save' => [ // 'driver' => 'mongodb', // 'host' => '127.0.0.1:27017', // 'database' => 'php_monitor', // 'username' => '', // 'password' => '' // ], 'save' => [ 'driver' => 'sqlite', 'database' => dirname(__DIR__).'/db/php_monitor.sqlite3' ],
此项目默认使用 SQLite,如果使用其他数据库,请取消注释。
如果您想使用 MySQL 运行以下表创建语句(表名不可修改)
CREATE TABLE `php_monitor` (
	`id` bigint(20) unsigned NOT NULL AUTO_INCREMENT COMMENT 'Auto-increment number ',
	`url` text CHARACTER SET utf8 COMMENT 'Request URL',
	`server_name` varchar(255) CHARACTER SET utf8 DEFAULT NULL COMMENT 'Service name',
	`get` text COMMENT 'GET parameter',
	`pmu` int(11) unsigned DEFAULT NULL COMMENT 'Memory spike',
	`wt` int(11) unsigned DEFAULT NULL COMMENT 'Total time spent in microseconds',
	`cpu` int(11) unsigned DEFAULT NULL COMMENT 'Total CPU cycle time',
	`ct` int(3) NOT NULL COMMENT 'Total calls',
	`mu` int(11) unsigned DEFAULT NULL COMMENT 'Current memory consumption',
	`request_time` int(10) unsigned NOT NULL DEFAULT '0' COMMENT 'Request time accurate to seconds',
	`request_time_micro` int(10) unsigned DEFAULT '0' COMMENT 'Request time accurate to microseconds',
	`profile` longblob NOT NULL COMMENT 'performance data,
	`server` longblob COMMENT 'SERVER parameter',
	`type` varchar(16) DEFAULT NULL COMMENT 'Request time includes GET,POST',
	`ip` varchar(16) DEFAULT NULL COMMENT 'IP address',
	PRIMARY KEY (`id`),
	KEY `idx_url` (`url`),
	KEY `idx_ip` (`ip`)
) ENGINE=MyISAM AUTO_INCREMENT=1 DEFAULT CHARSET=utf8mb4;
Mongodb 数据库将自动创建其表,但您需要自行添加索引。添加方式如下:
show dbs
use php_monitor //Please select your own database
db.php_monitor.createIndex({"url":1})
db.php_monitor.createIndex({"ip":1})
所有数据存储方法的数据表名称必须为
php_monitor,且不支持修改。 -
监控平台的操作
测试时可以直接传递以下命令:
cd php-monitor/public
php -S 127.0.0.1:8066
运行成功后,可以直接访问 http://127.0.0.1:8066。
非测试环境请使用 Nginx。配置如下:
server {
    listen       8066;
    server_name  localhost;
    root /home/www/cai/php-monitor/public;
    index  index.php index.html;
    location / {
        root /home/www/cai/php-monitor/public;
    }

    location ~ \.php$ {
        fastcgi_pass   127.0.0.1:9000;
        include        fastcgi_params;
        fastcgi_param  SCRIPT_FILENAME  $document_root/index.php;
    }
}
-
登录背景
登录账户密码可以直接在配置文件
src/config/config.php中修改。'user' => [ //login account and password ['account'=>'php','password'=>'php'], ['account'=>'admin','password'=>'abcd'] ]发布后请及时更改账户和密码。如果您需要更高等级的安全性,请扩展 Login Controller.php 文件中的登录方法。
-
将监控引入项目
项目以非侵入的方式监控,不会对运行中的服务造成任何干扰。
将监控添加到项目有两种方式。一种是通过修改 nginx 配置:
例如,要监控运行中的服务 www.site.com,您只需要在 nginx 配置文件中添加一行配置信息
fastcgi_param PHP_VALUE "auto_prepend_file={php-monitor-path}/src/autoPrepend.php";
添加配置后的效果如下(其他内容仅为演示,不是相同的 nginx 配置):
server {
  listen 80;
  server_name www.site.com;
  root your/webroot/;
  location ~ \.php$ {
      fastcgi_pass   127.0.0.1:9000;
      include        fastcgi_params;
      fastcgi_param  SCRIPT_FILENAME  $document_root/index.php;
      fastcgi_param PHP_VALUE "auto_prepend_file={php-monitor-path}/src/autoPrepend.php";
  }
}
这种方式是使用 PHP 提供的
auto_prepend_file接口,接口为 https://php.ac.cn/manual/zh/ini.core.php#ini.auto-prepend-file。添加配置后需要重启 nginx。第二种方式是将需要监控的项目入口文件直接导入,通常添加到
public/index.php中:require '/home/www/cai/php-monitor/src/autoPrepend.php';
添加配置后的效果如下(除了核心代码,其他代码仅为演示)
<?php
use pm\common\Router;

//The core code is here
require '/home/www/cai/php-monitor/src/autoPrepend.php';

include 'vendor/autoload.php';
$config = require('src/config/config.php');
(new Router($config))->run();
添加埋点后,可以在 http://127.0.0.1:8066 监控后台查看 www.site.com 项目的请求记录。
-
更多详情
- MongoDB具有最快的存储速度。如果您有高性能需求,请首先使用它。
- 修改配置文件中的profile.enable属性来修改采样频率。一般来说,没有必要存储所有请求。例如,'rand(1, 100) > 60'是将采样率设置为'40%';
- 修改配置文件中的profiler.filter_path属性来过滤您不希望收集的服务,例如一些不需要关注执行效率的内部网络服务;
-
Swoole支持
public function onReceive(\swoole_server $serv, $fd, $from_id, $dataSrc)
{
    require '/home/www/cai/php-monitor/src/autoPrepend.php';

    //your code

    \pm\common\PMonitor::shutdown($data['params']['route'],$serv->getClientInfo($fd,$from_id)['remote_ip'],'TCP');
}
待办事项
- SQLite存储模式开发;
- 完善国际化;
- 改进文档;
- CI流程访问;
- 补充单元测试;
- Composer包封装;
- 重写xhprof扩展;
- 埋点模块和显示模块的分离;
- Docker访问;
反馈
请提交您的问题。