jeffgreco13 / filament-breezy
为 Filament 定制的包,支持登录流程、个人资料和团队。
Requires
- php: ^8.1
- bacon/bacon-qr-code: ^3.0
- filament/filament: ^3.0.9
- illuminate/contracts: ^10.0|^11.0
- pragmarx/google2fa: ^7.0|^8.0
- spatie/laravel-package-tools: ^1.14.0
Requires (Dev)
- larastan/larastan: ^2.0.1
- laravel/pint: ^1.0
- nunomaduro/collision: ^7.9
- orchestra/testbench: ^8.8
- pestphp/pest: ^2.20
- pestphp/pest-plugin-arch: ^2.0
- pestphp/pest-plugin-laravel: ^2.0
- pestphp/pest-plugin-livewire: ^2.1
- phpstan/extension-installer: ^1.1
- phpstan/phpstan-deprecation-rules: ^1.0
- phpstan/phpstan-phpunit: ^1.0
- spatie/laravel-ray: ^1.26
- 2.x-dev
- v2.4.5
- v2.4.4
- v2.4.3
- v2.4.2
- v2.4.1
- v2.4.0
- v2.3.2
- v2.3.1
- v2.3.0
- v2.2.9
- v2.2.8
- v2.2.7
- v2.2.6
- v2.2.5.1
- v2.2.5
- v2.2.4
- v2.2.3
- v2.2.1.1
- v2.2.1
- v2.2.0
- v2.1.17
- v2.1.16
- v2.1.15
- v2.1.14
- v2.1.13
- v2.1.12
- v2.1.11
- v2.1.10
- v2.1.9
- v2.1.8
- v2.1.7
- v2.1.6
- v2.1.5
- v2.1.4
- v2.1.3
- v2.1.2
- v2.1.1
- v2.1.0
- v2.0.1
- v2.0.0
- v2.0.0-beta2
- v2.0.0-beta1
- v2.0.0-alpha1
- 1.x-dev
- v1.5.10
- v1.5.9
- v1.5.8
- v1.5.7
- v1.5.6
- v1.5.5
- v1.5.3
- v1.5.2
- v1.5.1
- v1.5
- v1.4.10.1
- v1.4.10
- v1.4.9
- v1.4.8
- v1.4.7
- v1.4.6
- v1.4.5
- v1.4.4
- v1.4.3
- v1.4.2
- v1.4.1.2
- v1.4.1.1
- v1.4.1
- v1.4
- v1.3.12
- v1.3.11
- v1.3.10
- v1.3.9.1
- v1.3.9
- v1.3.7
- v1.3.6
- v1.3.5
- v1.3.4
- v1.3.3
- v1.3.2
- v1.3.1
- v1.3.0
- v1.2.14
- v1.2.13
- v1.2.12
- v1.2.11
- v1.2.10
- v1.2.9
- v1.2.8
- v1.2.7
- v1.2.6
- v1.2.4
- v1.2.3
- v1.2.2
- v1.2.1
- v1.1.3
- v1.1.2
- v1.1.1
- v1.1.0
- v1.0.3
- v1.0.2
- v1.0.1
- v1.0.0
- v0.1.4rc
- v0.1.3
- v0.1.2
- v0.1.1
- v0.1.0
- dev-main
- dev-revert-309-2.x
- dev-2.x-dev
- dev-1.x-dev
This package is auto-updated.
Last update: 2024-09-17 19:37:04 UTC
README
Filament v3+ 面板的安全增强。
Filament (v3) 面板的安全增强特性。包括可定制的“我的资料”页面,支持个人资料和头像,更新密码,双因素认证,以及 Sanctum 令牌管理。安装只需几分钟!
功能 & 屏幕截图
我的资料 - 支持头像的个人资料 ![]() 带自定义验证规则更新密码
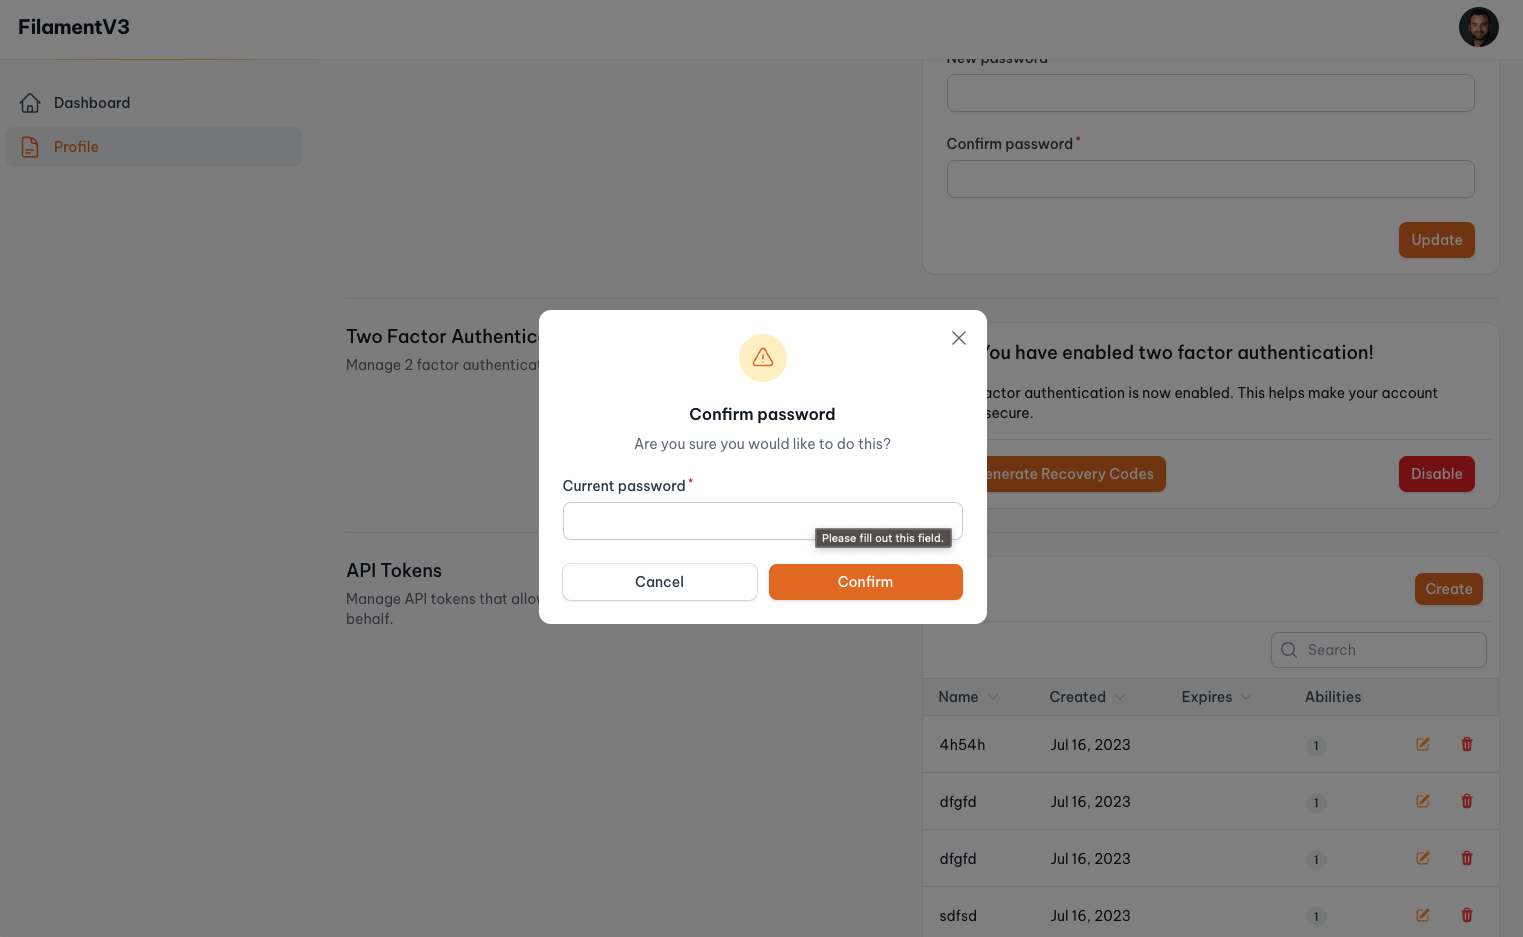
带自定义验证规则更新密码  使用密码确认模态保护敏感操作 Action
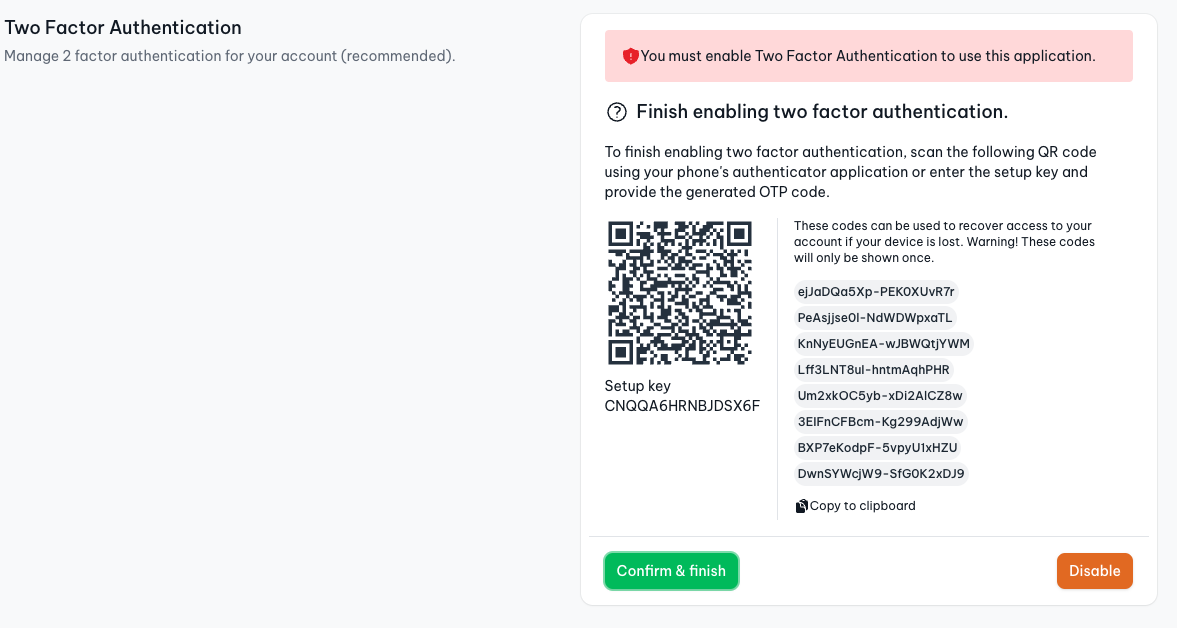
  双因素认证与恢复码
  在用户可以使用应用程序之前强制用户启用双因素认证
  创建和管理 Sanctum 个人访问令牌

安装
通过 composer 安装此包并运行安装
composer require jeffgreco13/filament-breezy
php artisan breezy:install
可选,您可以使用以下命令发布视图
php artisan vendor:publish --tag="filament-breezy-views"
使用 & 配置
您必须通过将类添加到 Filament 面板的 plugin() 或 plugins([]) 方法来启用 Breezy。
use Jeffgreco13\FilamentBreezy\BreezyCore;

class CustomersPanelProvider extends PanelProvider
{
    public function panel(Panel $panel): Panel
    {
        return $panel
            ...
            ->plugin(
                BreezyCore::make()
            )
    }
}
更新认证保护者
Breezy 将使用您创建的 Filament 面板上设置的 authGuard。您可以根据需要更新 authGuard。
use Jeffgreco13\FilamentBreezy\BreezyCore;

class CustomersPanelProvider extends PanelProvider
{
    public function panel(Panel $panel): Panel
    {
        return $panel
            ...
            ->authGuard('customers')
            ->plugin(
                BreezyCore::make()
            )
    }
}
注意:您必须确保在您的 Guard 中使用的模型扩展了 Authenticatable 类。
我的资料
启用“我的资料”页面并配置选项。
注意:如果您正在使用头像,
BreezyCore::make()
    ->myProfile(
        shouldRegisterUserMenu: true, // Sets the 'account' link in the panel User Menu (default = true)
        shouldRegisterNavigation: false, // Adds a main navigation item for the My Profile page (default = false)
        navigationGroup: 'Settings', // Sets the navigation group for the My Profile page (default = null)
        hasAvatars: false, // Enables the avatar upload form component (default = false)
        slug: 'my-profile' // Sets the slug for the profile page (default = 'my-profile')
    )
自定义我的资料页面类
您还可以通过扩展默认页面并使用插件注册来自定义“我的资料”页面类。
BreezyCore::make()
    ->myProfile()
    ->customMyProfilePage(AccountSettingsPage::class),
在面板中使用头像
有关使用自定义头像的说明,请参阅 Filament v3 文档中的 设置用户头像。
以下是一个可能的实现示例,基于文档中的示例
use Illuminate\Support\Facades\Storage;
use Filament\Models\Contracts\HasAvatar;
use Illuminate\Foundation\Auth\User as Authenticatable;

class User extends Authenticatable implements FilamentUser, HasAvatar
{
    // ...

    public function getFilamentAvatarUrl(): ?string
    {
        return $this->avatar_url ? Storage::url($this->avatar_url) : null ;
    }
}
自定义头像上传组件
use Filament\Forms\Components\FileUpload;

BreezyCore::make()
    ->avatarUploadComponent(fn($fileUpload) => $fileUpload->disableLabel())
    // OR, replace with your own component
    ->avatarUploadComponent(fn() => FileUpload::make('avatar_url')->disk('profile-photos'))
向表中添加列
如果您想拥有自己的头像,您需要在用户表上创建一个名为 avatar_url 的列。建议您为此创建一个新的迁移,并在那里添加该列
php artisan make:migration add_avatar_url_column_to_users_table
<?php

use Illuminate\Database\Migrations\Migration;
use Illuminate\Database\Schema\Blueprint;
use Illuminate\Support\Facades\Schema;

return new class extends Migration
{
    /**
     * Run the migrations.
     */
    public function up(): void
    {
        Schema::table('users', function (Blueprint $table) {
            $table->string('avatar_url')->nullable();
        });
    }

    /**
     * Reverse the migrations.
     */
    public function down(): void
    {
        Schema::table('users', function (Blueprint $table) {
            $table->dropColumn('avatar_url');
        });
    }
};
向用户模型添加列
    protected $fillable = [
        ...
        'avatar_url',
        ...
    ];
自定义密码更新
您可以通过传递一个验证字符串数组或Illuminate\Validation\Rules\Password类的实例来自定义更新密码组件的验证规则。
use Illuminate\Validation\Rules\Password;

BreezyCore::make()
    ->passwordUpdateRules(
        rules: [Password::default()->mixedCase()->uncompromised(3)], // you may pass an array of validation rules as well. (default = ['min:8'])
        requiresCurrentPassword: true, // when false, the user can update their password without entering their current password. (default = true)
        )
排除默认“我的资料”组件
如果您不想使用默认的“我的资料”页面组件,可以使用withoutMyProfileComponents辅助函数来排除它们。
BreezyCore::make()
    ->withoutMyProfileComponents([
        'update_password'
    ])
创建自定义“我的资料”组件
在Breezy v2中,您现在可以创建自定义Livewire组件用于“我的资料”页面,并轻松地附加它们。
- 使用以下方式在您的项目中创建一个新的Livewire组件
php artisan make:livewire MyCustomComponent
- 扩展Breezy附带包含的
MyProfileComponent类。该类实现了操作和表单。
use Jeffgreco13\FilamentBreezy\Livewire\MyProfileComponent;
use Filament\Forms\Components\TextInput;
use Filament\Forms\Form;

class MyCustomComponent extends MyProfileComponent
{
    protected string $view = "livewire.my-custom-component";
    public array $only = ['my_custom_field'];
    public array $data;
    public $user;
    public $userClass;

    // this example shows an additional field we want to capture and save on the user
    public function mount()
    {
        $this->user = Filament::getCurrentPanel()->auth()->user();
        $this->userClass = get_class($this->user);

        $this->form->fill($this->user->only($this->only));
    }

    public function form(Form $form): Form
    {
        return $form
            ->schema([
                TextInput::make('my_custom_field')
                    ->required()
            ])
            ->statePath('data');
    }

    // only capture the custome component field
    public function submit(): void
    {
        $data = collect($this->form->getState())->only($this->only)->all();
        $this->user->update($data);
        Notification::make()
            ->success()
            ->title(__('Custom component updated successfully'))
            ->send();
    }
}
- 在您的Livewire组件视图中,您可以使用Breezy的
grid-sectionblade组件来匹配样式
<x-filament-breezy::grid-section md=2 title="Your title" description="This is the description">
    <x-filament::card>
        <form wire:submit.prevent="submit" class="space-y-6">

            {{ $this->form }}

            <div class="text-right">
                <x-filament::button type="submit" form="submit" class="align-right">
                    Submit!
                </x-filament::button>
            </div>
        </form>
    </x-filament::card>
</x-filament-breezy::grid-section>
- 最后,将您的组件注册到Breezy中
use App\Livewire\MyCustomComponent;

BreezyCore::make()
    ->myProfileComponents([MyCustomComponent::class])
覆盖“我的资料”组件
您可以覆盖现有的“我的资料”组件,用您自己的组件替换它们。
use App\Livewire\MyCustomComponent;

BreezyCore::make()
    ->myProfileComponents([
        // 'personal_info' => ,
        'update_password' => MyCustomComponent::class, // replaces UpdatePassword component with your own.
        // 'two_factor_authentication' => ,
        // 'sanctum_tokens' =>
    ])
如果您只想自定义个人信息组件中的字段和通知,可以扩展原始的breezy组件
namespace App\Livewire;

use Filament\Forms;
use Filament\Notifications\Notification;
use Jeffgreco13\FilamentBreezy\PersonalInfo;

class CustomPersonalInfo extends PersonalInfo
{
    protected function getNameComponent(): Forms\Components\TextInput
    {
        return Forms\Components\TextInput::make('custom_name_field')
            ->required();
    }

    protected function getEmailComponent(): Forms\Components\TextInput
    {
        return Forms\Components\TextInput::make('custom_email_field')
            ->required();
    }

    protected function sendNotification(): void
    {
        Notification::make()
            ->success()
            ->title('Saved Data!')
            ->send();
    }
}
现在,如上所述,将此组件提供给BreezyCore::make()->myProfileComponents以覆盖原始组件并使用您自定义的组件。
排序“我的资料”组件
可以通过设置它们的静态$sort属性来对自定义的MyProfile组件进行排序。在任何一个服务提供程序中都可以设置现有MyProfile组件的此属性
TwoFactorAuthentication::setSort(4);
很多时候,这并不是必要的,因为默认排序顺序以10的倍数间隔,因此应该有足够多的数字来放置任何自定义组件。
双因素认证
- 将
Jeffgreco13\FilamentBreezy\Traits\TwoFactorAuthenticatable添加到您的Authenticatable模型中
use Jeffgreco13\FilamentBreezy\Traits\TwoFactorAuthenticatable;

class User extends Authenticatable
{
    use HasApiTokens, HasFactory, Notifiable, TwoFactorAuthenticatable;
    // ...

}
- 使用Breezy插件的
enableTwoFactorAuthentication()方法启用双因素认证。
BreezyCore::make()
    ->enableTwoFactorAuthentication(
        force: false, // force the user to enable 2FA before they can use the application (default = false)
        action: CustomTwoFactorPage::class // optionally, use a custom 2FA page
    )
- 调整2FA页面
Breezy 2FA页面可以被自定义实现替换(参见上面),与Filament认证页面相同。这允许定义自定义认证布局,如下所示
use Jeffgreco13\FilamentBreezy\Pages\TwoFactorPage;

class CustomTwoFactorPage extends TwoFactorPage
{
    protected static string $layout = 'custom.auth.layout.view';
}
Sanctum个人访问令牌
自Laravel 8.x起,Sanctum是Laravel的一部分,但如果没有此包,请按照此处安装说明进行操作。
启用Sanctum令牌管理组件
BreezyCore::make()
    ->enableSanctumTokens(
        permissions: ['my','custom','permissions'] // optional, customize the permissions (default = ["create", "view", "update", "delete"])
    )
密码确认按钮操作
此按钮操作将提示用户输入他们的密码以进行敏感操作(例如删除)。此操作使用与config/auth.php中相同的'password_timeout'秒数。
use Jeffgreco13\FilamentBreezy\Actions\PasswordButtonAction;

PasswordButtonAction::make('secure_action')->action('doSecureAction')

// Customize the icon, action, modalHeading and anything else.
PasswordButtonAction::make('secure_action')->label('Delete')->icon('heroicon-s-shield-check')->modalHeading('Confirmation')->action(fn()=>$this->doAction())
自定义注册表单
从Filament v3+开始,引入了处理和无缝自定义注册表单的增强功能。现在,此功能是核心Filament功能的一部分。因此,自定义注册表单的能力,在Breezy v1中可用,在v2中已被弃用,转而使用由Filament v3+提供的更全面和集成的解决方案。Laravel Daily提供了一份简洁的教程,指导用户在包含附加字段的同时创建和注册自定义注册表单。在此查看教程以获取逐步说明。
常见问题解答
2FA会话如何在多个面板之间工作?
默认情况下,Breezy使用在您的面板上定义的相同守卫。默认为'web'。只有已注册BreezyCore插件的面板才能访问2FA。如果多个面板使用2FA并且共享相同的守卫,则用户只需在会话期间输入一次OTP。
2FA如何与MustVerifyEmail交互?
当2FA正确配置时,用户在电子邮件验证之前将被提示输入OTP代码。
2FA会话有多长时间?
2FA会话与Laravel会话生命周期相同。一旦用户注销或会话过期,他们将需要再次输入OTP代码。
测试
composer test
变更日志
请参阅变更日志以获取有关最近变更的更多信息。
贡献
请参阅贡献指南以获取详细信息。
安全漏洞
请查阅我们的安全策略了解如何报告安全漏洞。
鸣谢
许可协议
MIT 许可协议 (MIT)。请参阅许可文件以获取更多信息。

