通过  搜索
搜索
gromovfjodor / yii2-multiple-input
用于处理Yii2框架模型属性的多输入小部件
3.5.0
2019-02-26 08:00 UTC
Requires
- php: >=5.4.0
- yiisoft/yii2: >=2.0.13
Requires (Dev)
- phpunit/phpunit: 5.7.*
This package is auto-updated.
Last update: 2024-09-26 21:01:20 UTC
README
为模型属性处理多个输入的Yii2小部件,以及用于模型批次的表格输入。
最新版本
本扩展的最新稳定版本为v2.19.0。请按照升级说明从旧版本升级
安装
安装此扩展的首选方式是通过 composer。
运行以下命令
php composer.phar require gromovfjodor/yii2-multiple-input "~2.0"
或者
"gromovfjodor/yii2-multiple-input": "~2.0"
将以下内容添加到您的 composer.json 文件的 require 部分。
基本用法

例如,您想在个人资料页面上允许用户输入多个电子邮件地址。在这种情况下,您可以使用如下代码中的 yii2-multiple-input 小部件
use gromovfjodor\multipleinput\MultipleInput;

...

<?php
    echo $form->field($model, 'emails')->widget(MultipleInput::className(), [
        'max'               => 6,
        'min'               => 2, // should be at least 2 rows
        'allowEmptyList'    => false,
        'enableGuessTitle'  => true,
        'addButtonPosition' => MultipleInput::POS_HEADER, // show add button in the header
    ])
    ->label(false);
?>
更多关于单列用法请参阅 这里
高级用法
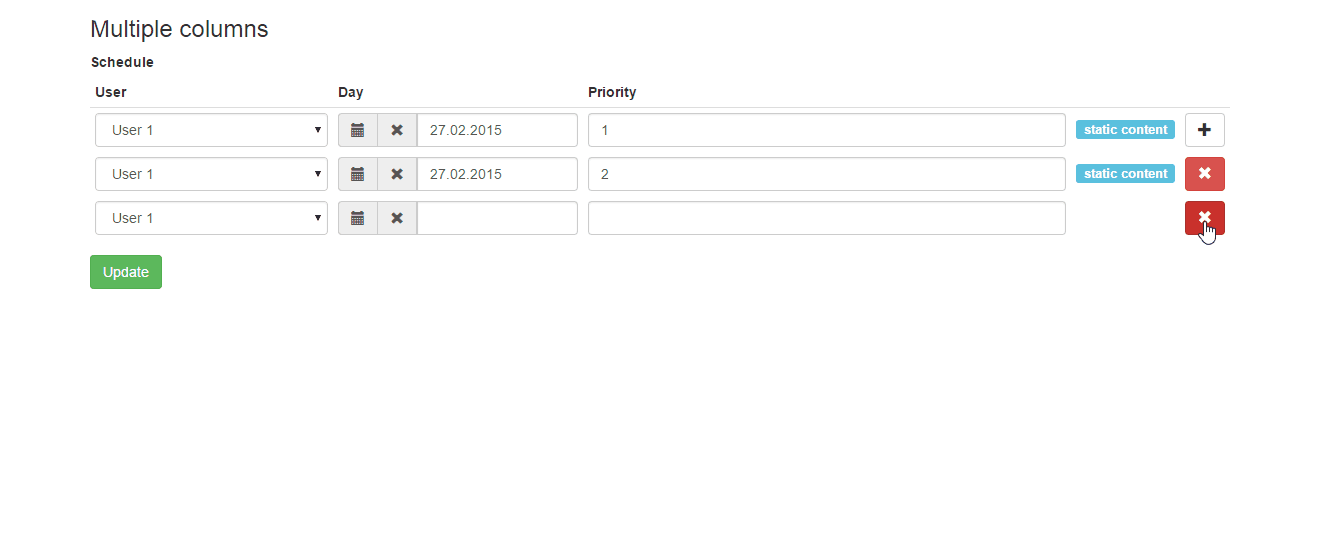
例如,您想有一个管理用户日程的界面。为了简单起见,我们将日程存储为json字符串。在这种情况下,您可以使用如下代码中的 yii2-multiple-input 小部件
use gromovfjodor\multipleinput\MultipleInput;

...

<?= $form->field($model, 'schedule')->widget(MultipleInput::className(), [
    'max' => 4,
    'columns' => [
        [
            'name'  => 'user_id',
            'type'  => 'dropDownList',
            'title' => 'User',
            'defaultValue' => 1,
            'items' => [
                1 => 'User 1',
                2 => 'User 2'
            ]
        ],
        [
            'name'  => 'day',
            'type'  => \kartik\date\DatePicker::className(),
            'title' => 'Day',
            'value' => function($data) {
                return $data['day'];
            },
            'items' => [
                '0' => 'Saturday',
                '1' => 'Monday'
            ],
            'options' => [
                'pluginOptions' => [
                    'format' => 'dd.mm.yyyy',
                    'todayHighlight' => true
                ]
            ]
        ],
        [
            'name'  => 'priority',
            'title' => 'Priority',
            'enableError' => true,
            'options' => [
                'class' => 'input-priority'
            ]
        ]
    ]
 ]);
?>
更多关于多列用法请参阅 这里
克隆填充的行
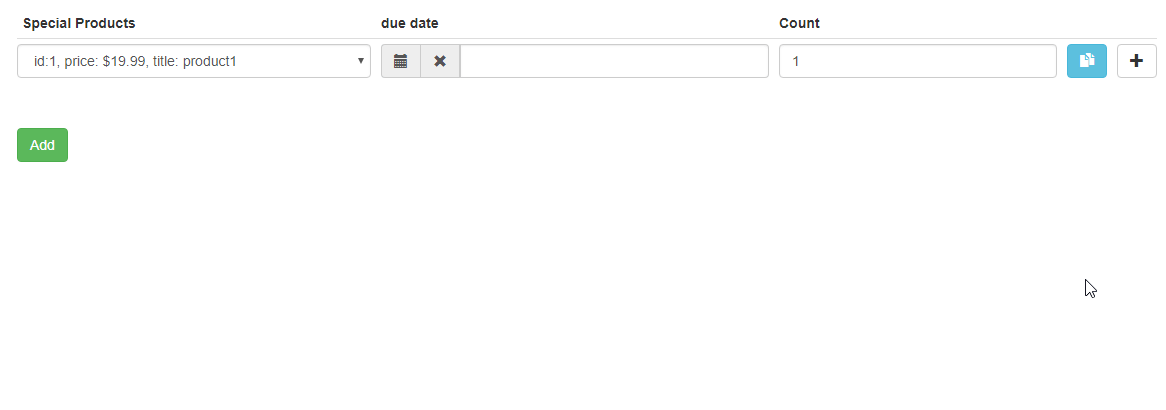
use gromovfjodor\multipleinput\MultipleInput;

...

<?= $form->field($model, 'products')->widget(MultipleInput::className(), [
    'max' => 10,
    'cloneButton' => true,
    'columns' => [
        [
            'name'  => 'product_id',
            'type'  => 'dropDownList',
            'title' => 'Special Products',
            'defaultValue' => 1,
            'items' => [
                1 => 'id: 1, price: $19.99, title: product1',
                2 => 'id: 2, price: $29.99, title: product2',
                3 => 'id: 3, price: $39.99, title: product3',
                4 => 'id: 4, price: $49.99, title: product4',
                5 => 'id: 5, price: $59.99, title: product5',
            ],
        ],
        [
            'name'  => 'time',
            'type'  => DateTimePicker::className(),
            'title' => 'due date',
            'defaultValue' => date('d-m-Y h:i')
        ],
        [
            'name'  => 'count',
            'title' => 'Count',
            'defaultValue' => 1,
            'enableError' => true,
            'options' => [
                'type' => 'number',
                'class' => 'input-priority',
            ]
        ]
    ]
])->label(false);
使用其他图标库
多个输入和表格输入小部件现在支持FontAwesome以及其他您选择的任何图标库。
要利用这一点,请按照以下步骤操作
- 将首选的图标库包含到您的项目中。如果您想使用fontAwesome,可以使用包含的FontAwesomeAsset,它将集成来自他们CDN的免费fa;
- 如果您首选的图标库不在小部件的 iconMap 数组中,添加映射,如下所示;
public $iconMap = [
    'glyphicons' => [
        'drag-handle' => 'glyphicon glyphicon-menu-hamburger',
        'remove' => 'glyphicon glyphicon-remove',
        'add' => 'glyphicon glyphicon-plus',
        'clone' => 'glyphicon glyphicon-duplicate',
    ],
    'fa' => [
        'drag-handle' => 'fa fa-bars',
        'remove' => 'fa fa-times',
        'add' => 'fa fa-plus',
        'clone' => 'fa fa-files-o',
    ],
    'my-amazing-icons' => [
        'drag-handle' => 'my my-bars',
        'remove' => 'my my-times',
        'add' => 'my my-plus',
        'clone' => 'my my-files',
    ]
];
- 设置首选图标源
public $iconSource = 'my-amazing-icons';
如果您没有做以上任何一项,将保留默认行为,这假设您正在使用glyphicons。
文档
您可以在 wiki 中找到完整的文档。
许可证
yii2-multiple-input 在 BSD 3-Clause 许可证下发布。有关详细信息,请参阅附带的 LICENSE.md。