danieldewit / lighthouse-sanctum
Laravel Lighthouse 的 Laravel Sanctum 支持。
Requires
- php: ^8.1
- illuminate/auth: ^9 || ^10 || ^11
- illuminate/contracts: ^9 || ^10 || ^11
- illuminate/database: ^9 || ^10 || ^11
- illuminate/routing: ^9 || ^10 || ^11
- illuminate/support: ^9 || ^10 || ^11
- laravel/sanctum: ^3.0 || ^4.0
- nuwave/lighthouse: ^6.0
Requires (Dev)
- friendsofphp/php-cs-fixer: ^3.0
- kubawerlos/php-cs-fixer-custom-fixers: ^3.14
- mockery/mockery: ^1.5
- nunomaduro/larastan: ^2.0
- orchestra/testbench: ^8.0
- orchestra/testbench-core: ^8.0
- phpstan/phpstan-mockery: ^1.0
- phpstan/phpstan-phpunit: ^1.0
- phpunit/phpunit: ^10.0
- rector/rector: ^0.15.25
README
为 Laravel Sanctum 添加对 Lighthouse 的支持
要求
安装
1. 使用 composer 安装
composer require daniel-de-wit/lighthouse-sanctum
2. 发布配置和模式
php artisan vendor:publish --tag=lighthouse-sanctum
3. 将发布模式导入您的主 GraphQL 模式(./graphql/schema.graphql)
type Query
type Mutation

#import sanctum.graphql
4. HasApiTokens
将 Laravel\Sanctum\HasApiTokens 特性应用到您的 Authenticatable 模型,如 Laravel Sanctum 文档中所述。
use Illuminate\Auth\Authenticatable;
use Laravel\Sanctum\Contracts\HasApiTokens as HasApiTokensContract;
use Laravel\Sanctum\HasApiTokens;

class User extends Authenticatable implements HasApiTokensContract
{
    use HasApiTokens;
}
5. 配置
本软件包依赖于 API Token Authentication,它使用无状态的 Bearer 令牌来验证请求。
默认情况下,Laravel Sanctum 假设来自本地主机的请求应使用有状态的 Spa Authentication。要禁用此行为,请删除 sanctum 配置中状态部分内的任何行。
// File: ./config/sanctum.php

    /*
    |--------------------------------------------------------------------------
    | Stateful Domains
    |--------------------------------------------------------------------------
    |
    | Requests from the following domains / hosts will receive stateful API
    | authentication cookies. Typically, these should include your local
    | and production domains which access your API via a frontend SPA.
    |
    */

    'stateful' => [
        // Remove entries here
    ],
确保为 Lighthouse 启用以下中间件
// File: ./config/lighthouse.php
    'middleware' => [
        ...

        \Nuwave\Lighthouse\Support\Http\Middleware\AttemptAuthentication::class,

        ...
    ],
将 Lighthouse 配置为使用 Sanctum 守护者
// File: ./config/lighthouse.php
    /*
    |--------------------------------------------------------------------------
    | Authentication Guard
    |--------------------------------------------------------------------------
    |
    | The guard to use for authenticating GraphQL requests, if needed.
    | This setting is used whenever Lighthouse looks for an authenticated user, for example in directives
    | such as `@guard` and when applying the `AttemptAuthentication` middleware.
    |
    */

    'guard' => 'sanctum',
使用
登录
验证用户以获取 Bearer 令牌。
mutation {
    login(input: {
        email: "john.doe@gmail.com"
        password: "secret"
    }) {
        token
    }
}
在后续调用中使用令牌应用授权头
"Authorization": "Bearer 1|lJo1cMhrW9tIUuGwlV1EPjKnvfZKzvgpGgplbwX9"
(未使用电子邮件?请参阅 自定义身份验证)
登出
撤销当前令牌。
mutation {
    logout {
        status
        message
    }
}
注册
成功注册用户将立即产生 Bearer 令牌(除非需要电子邮件验证)。
mutation {
    register(input: {
        name: "John Doe"
        email: "john.doe@gmail.com"
        password: "secret"
        password_confirmation: "secret"
    }) {
        token
        status
    }
}
☝️ 想要禁用密码确认吗? 更新您的模式

当与 MustVerifyEmail 合同一起注册用户时,您可以定义电子邮件验证的 URL。两者 __ID__ 和 __HASH__ 都将替换为适当的值。当配置中启用了 use_signed_email_verification_url 时,占位符 __EXPIRES__ 和 __SIGNATURE__ 也将被替换。
mutation {
    register(input: {
        name: "John Doe"
        email: "john.doe@gmail.com"
        password: "secret"
        password_confirmation: "secret"
        verification_url: {
            url: "https://my-front-end.com/verify-email?id=__ID__&token=__HASH__"
# Signed:   url: "https://my-front-end.com/verify-email?id=__ID__&token=__HASH__&expires=__EXPIRES__&signature=__SIGNATURE__"
        }
    }) {
        token
        status
    }
}
电子邮件验证
在 register 或 resendEmailVerification 中提供的验证_url 包含突变 id 和 hash
mutation {
  verifyEmail(input: {
    id: "1"
    hash: "af269947ed80d4a7bc3f78a6dfd05ec369373f9d"
  }) {
    status
  }
}
当配置中启用了 use_signed_email_verification_url 时,输入需要两个额外的字段。
mutation {
  verifyEmail(input: {
    id: "1"
    hash: "af269947ed80d4a7bc3f78a6dfd05ec369373f9d"
    expires: 1619775828
    signature: "e923636f1093c414aab39f846e9d7a372beefa7b628b28179197e539c56aa0f0"
  }) {
    status
  }
}
重新发送电子邮件验证链接
使用默认的 Laravel 电子邮件验证通知。
mutation {
    resendEmailVerification(input: {
        email: "john.doe@gmail.com",
    }) {
        status
    }
}
或使用自定义验证流程,通过取消注释 ResendEmailVerificationInput 中的 verification_url 参数
input ResendEmailVerificationInput {
    email: String! @rules(apply: ["email"])
    verification_url: VerificationUrlInput!
}
示例突变
mutation {
    resendEmailVerification(input: {
        email: "john.doe@gmail.com",
         verification_url: {
             url: "https://my-front-end.com/verify-email?id=__ID__&token=__HASH__"
             # or use signed url:
             # url: "https://my-front-end.com/verify-email?id=__ID__&token=__HASH__&expires=__EXPIRES__&signature=__SIGNATURE__"
        }
    }) {
        status
    }
}
忘记密码
发送重置密码通知。
可选地使用使用 __EMAIL__ 和 __TOKEN__ 占位符的自定义重置 URL。
mutation {
    forgotPassword(input: {
        email: "john.doe@gmail.com"
        reset_password_url: {
            url: "https://my-front-end.com/reset-password?email=__EMAIL__&token=__TOKEN__"
        }
    }) {
        status
        message
    }
}
重置密码
重置用户的密码。
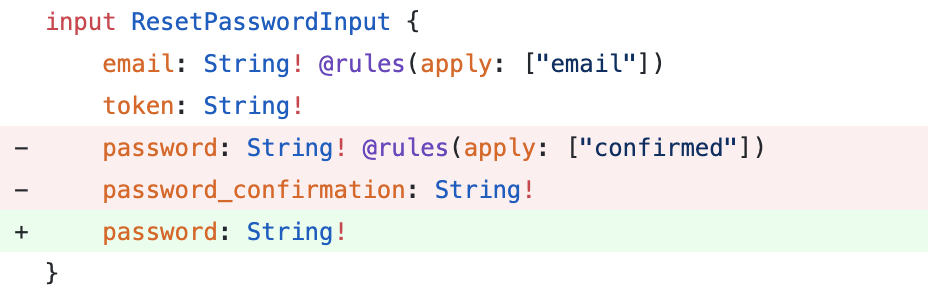
mutation {
    resetPassword(input: {
        email: "john.doe@gmail.com",
        token: "af269947ed80d4a7bc3f78a6dfd05ec369373f9d"
        password: "secret"
        password_confirmation: "secret"
    }) {
        status
        message
    }
}
☝️ 想要禁用密码确认吗? 更新您的模式
更新密码
更新当前用户的密码。
mutation {
    updatePassword(input: {
        current_password: "mypass",
        password: "secret",
        password_confirmation: "secret"
    }) {
        status
    }
}
自定义身份验证
您可以根据需要自定义用于用户验证的字段。
例如,使用 username 代替默认的 email。
/*
|--------------------------------------------------------------------------
| Identification
|--------------------------------------------------------------------------
|
| Configure the credential fields by which the user will be identified.
| Default: email
*/

'user_identifier_field_name' => 'username',
相应地更新 GraphQL 模式
input LoginInput {
    username: String! @rules(apply: ["required"])
}
Docker
在本地使用 Docker 及 Docker Compose 进行开发。
设置
这将构建Docker镜像并准备容器。
make setup
- 命令行界面:
make app - 销毁:
make destroy
命令行界面
使用shell进入容器以开始开发。
make app
销毁
关闭并移除容器。
make app
测试
composer test
覆盖率
composer coverage
静态分析
composer analyze
贡献
请参阅CONTRIBUTING以获取详细信息。
致谢
许可证
MIT许可证(MIT)。请参阅许可证文件以获取更多信息。