aroutinr / laravel-invoice
为您的Laravel应用中的任何模型创建发票
Requires
- php: ^8.0|^8.1|^8.2
- illuminate/support: ^8.0|^9.0|^10.0
Requires (Dev)
- laravel/legacy-factories: ^1.1
- orchestra/testbench: >=4.0
- phpunit/phpunit: >=8.5
README
Laravel包,允许您创建发票、管理支付并从模型中跟踪它们!
<?php

use AroutinR\Inovoice\Facades\CreateInvoice;

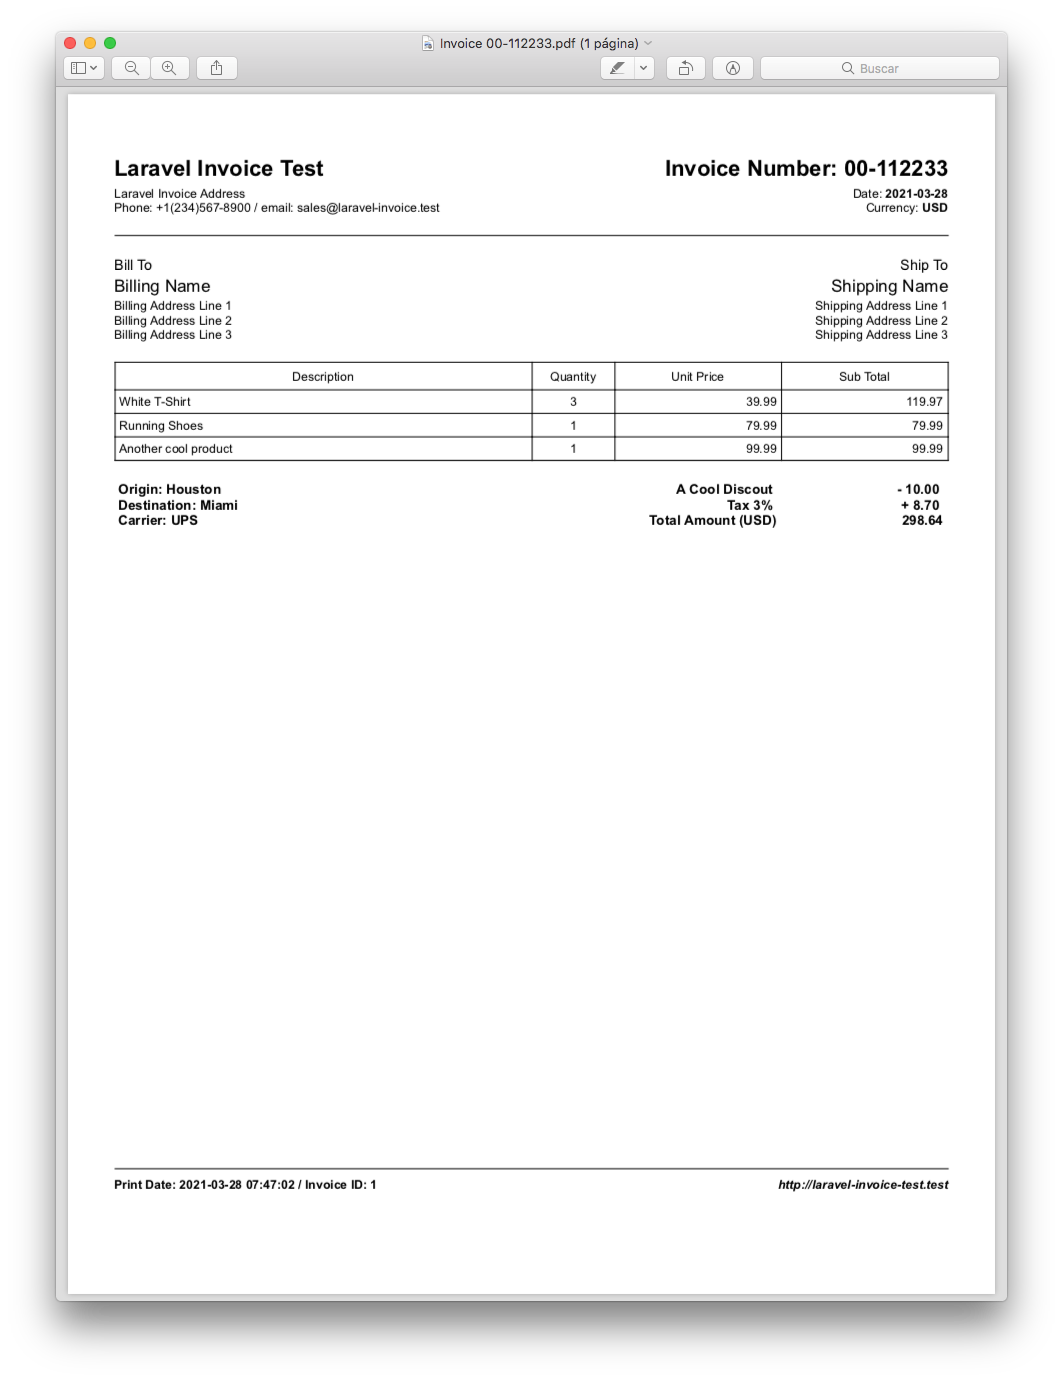
return CreateInvoice::for($customer, $invoiceable)
	->billingAddress([
		'name' => 'Billing Name',
		'line_1' => 'Billing Address Line 1',
		'line_2' => 'Billing Address Line 2',
		'line_3' => 'Billing Address Line 3',
	])
	->shippingAddress([
		'name' => 'Shipping Name',
		'line_1' => 'Shipping Address Line 1',
		'line_2' => 'Shipping Address Line 2',
		'line_3' => 'Shipping Address Line 3',
	])
	->invoiceNumber('00-112233')
	->invoiceLine('White T-Shirt', 3, 3999)
	->invoiceLine('Running Shoes', 1, 7999)
	->invoiceLine('Another cool product', 1, 9999)
	->fixedDiscountLine('A Cool Discount', 1000)
	->taxLine('Tax 3%', 300)
	->customField('Origin', 'Houston')
	->customField('Destination', 'Miami')
	->customField('Carrier', 'UPS')
	->saveAndView();
这将返回一个简单且可完全定制的发票格式的视图。
要求
- PHP >=7.3
- Laravel 6 | 7 | 8
安装
通过Composer安装。
$ composer require aroutinr/laravel-invoice
发布迁移。
$ php artisan vendor:publish --provider="AroutinR\Invoice\InvoiceServiceProvider" --tag="migrations"
然后运行迁移。
$ php artisan migrate
此外,您还可以发布invoice.php配置文件。从这里您可以定义包操作的各种选项。您可以自由更改任何需要更改的内容,例如默认货币、发票抬头名称、地址和联系方式等。
$ php artisan vendor:publish --provider="AroutinR\Invoice\InvoiceServiceProvider" --tag="config"
如果您想更改发票或支付收据的外观,可以发布blade视图
$ php artisan vendor:publish --provider="AroutinR\Invoice\InvoiceServiceProvider" --tag="views"
它们将被保存在 <project_root>/resources/views/vendor/laravel-invoice/
使用方法
重要:金额以分表示!
该包具有跟踪已发放发票的特质。第一个是 CustomerHasInvoice,这个特质必须添加到User或Company模型中,例如,这将定义与发票关联的客户。在此同一模型中,您可以添加
// 'app/User.php' or 'app/Models/User.php'

namespace App;

use AroutinR\Invoice\Traits\CustomerHasInvoice;
use AroutinR\Invoice\Traits\HasAddresses;
use Illuminate\Database\Eloquent\Model;

class User extends Model
{
    use CustomerHasInvoice, HasAddresses;

    // This traits enable the following Eloquent relationship:
    //
    // CustomerHasInvoice:
    // ->invoices() This will fetch all the invoices related with the model
    //
    // HasAddresses
    // ->addresses() This will fetch all the addresses related with the model
    // ->billingAddress() This will fetch the billing addresses related with the model
    // ->shippingAddress() This will fetch the shipping addresses related with the model
}

// 'app/Order.php' or 'app/Models/Order.php'

namespace App;

use AroutinR\Invoice\Traits\HasInvoice;
use Illuminate\Database\Eloquent\Model;

class Order extends Model
{
    use HasInvoice;

    // This traits enable the following Eloquent relationship:
    //
    // ->invoices() This will fetch all the invoices related with the model
}
要创建新的发票,您只需要获取一个客户模型、一个可开票模型并使用CreateInvoice Facade。
// 'app/Http/Controllers/HomeController'

namespace App\Http\Controllers;

use App\User;
use App\Order;
use AroutinR\Invoice\Facade\CreateInvoice;

class HomeController extends Controller
{
    public function index()
    {
    	$customer = User::find(1); // Grab a Customer model
    	$invoiceable = Order::find(1); // Grab a Invoiceable model

    	$invoice = CreateInvoice::for($customer, $invoiceable)

    		// Use the billingAddress() and shippingAddress() methods to add this information to the invoice.
    		// It is required to pass name and at least line_1 to the method.
    		// These methods accept an array in the following format:
			->billingAddress([
				'name' => 'Billing Name', // required
				'line_1' => 'Billing Line 1', // required
				'line_2' => 'Billing Line 2',
				'line_3' => 'Billing Line 3',
			]) // Optional
			->shippingAddress([
				'name' => 'Shipping Name', // required
				'line_1' => 'Shipping Line 1', // required
				'line_2' => 'Shipping Line 2',
				'line_3' => 'Shipping Line 3',
			]) // Optional

    		// invoiceLine() needs trhee arguments.
    		// The first argument you need a description for the line.
    		// The second argument is the quantity (for example 2, for 2 T-shirts)
    		// And the third argument is the Unit price.
    		// You can add as many lines as you need
			->invoiceLine('Some description', 1, 10000) // Required

			// Also, you can use the invoceLines() method (note the "s" at the end).
			// This method accepts an array to enter multiple lines at the same time.
			->invoiceLines([
				[
					'quantity' => 1,
					'amount' => 10000,
					'description' => 'Some description',
				],
				[
					'quantity' => 1,
					'amount' => 20000,
					'description' => 'Another description'
				],
				[
					'quantity' => 2,
					'amount' => 30000,
					'description' => 'Final description'
				]
			]) // Optional if invoiceLine() is used

			// You can add a fixed discount to the invoice with the fixedDiscountLine() method
			// This method needs a description as firt argument and the discount amount as the second argument
			// You can also add a percentage-based discount by using the percentDiscountLine() method.
			// This method use the same arguments as the fixedDiscountLine()
			->fixedDiscountLine('A Cool Discout', 5000) // Optional

			// To add a percentage value for the tax, use the taxLine() method.
			// This method requires a description and the value of the tax.
			->taxLine('Tax 3%', 300) // Optional

			// Use the customField() method to add any additional information to the invoice,
			// such as payment terms, warranty information, and so on.
			// This method takes two arguments, the custom field name and the description.
			// By default you can enter up to 4 custom fields, this can be changed in config/invoice.php file
			->customField('Invoice Terms', 'Due on receipt') // Optional
			->customField('Origin', 'Houston') // Optional
			->customField('Destination', 'Miami') // Optional
			->customField('Carrier', 'UPS') // Optional

			// Finally, use the save() method to create the invoice and store it in the database
			// or saveAndView() to store and return the invoice format for printing.
			->save(); // or ->saveAndView();
    }
}
要创建对发票的支付,您只需要使用CreatePayment Facade并传入一个发票。
// 'app/Http/Controllers/HomeController'

namespace App\Http\Controllers;

use AroutinR\Invoice\Facade\CreatePayment;

class HomeController extends Controller
{
    public function index()
    {
    	$invoice = AroutinR\Invoice\Models\Invoice::find(1)

    	$payment = CreatePayment::for($invoice)

    		// Use the method paymentAmount() to especify the amount of the payment
    		// It can be a partial or full payment of the invoice.
			->paymentAmount(10000) // Required

			// This method is used to specify the number of the payment receipt.
			->paymentNumber('PAYMENT-123') // Optional

			// Define the payment method for this payment.
			// The config file has an array where you can specify the different methods you need
			// and then you can use this configuration variable in your blade forms where you will
			// enter the payment information, for excample:
			// @foreach (config('invoice.payment_methods') as $method)
			->paymentMethod('Check') // Optional

			// Use this method to specify the Payment reference or some relevant information
			->paymentReference('Check # 001122') // Optional

			// Finally, use the save() method to create the invoice and store it in the database
			// or saveAndView() to store and return the invoice format for printing.
			->save(); // or ->saveAndView();
    }
}
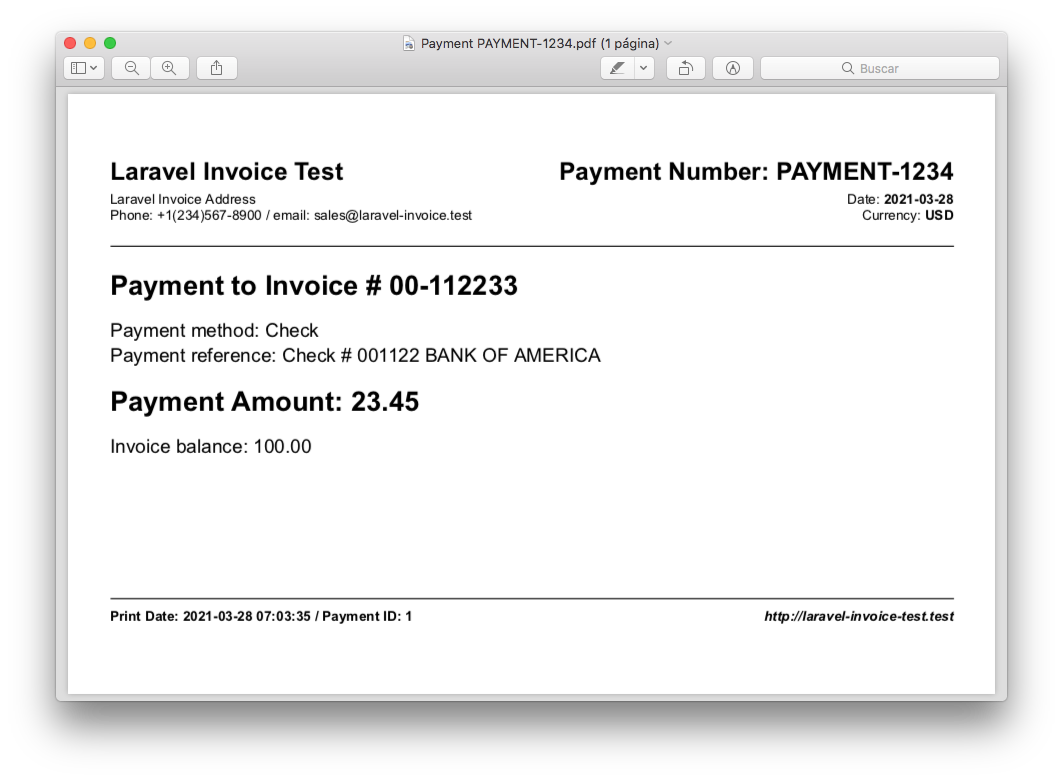
这是支付收据的示例。
以下列表中将找到每个Facades中可用的所有方法。
AroutinR\Invoice\Facades\CreateInvoice
AroutinR\Invoice\Facades\CreatePayment
贡献
请自由为此项目做出贡献。任何纠正或改进都受欢迎。
测试
使用PHPUnit运行测试
vendor/bin/phpunit
安全
如果您发现任何与安全相关的问题,请通过电子邮件r.aroutin@gmail.com与我联系,而不是使用问题跟踪器。
许可证
MIT许可证(MIT)。有关更多信息,请参阅许可证文件。


