academe / omnipay-authorizenetapi
用于 Omnipay 3.x 支付处理库的 Authorize.Net 支付网关驱动程序
Requires
- academe/authorizenet-objects: ~0.7
- omnipay/common: ^3
- symfony/property-access: ^3.2 || ^4.0
Requires (Dev)
README
目录
Omnipay-AuthorizeNetApi
Omnipay 3.x 对 Authorize.Net API 的实现
安装
composer require "academe/omnipay-authorizenetapi: ~3.0"
Authorize.Net API
Authorize.Net API 驱动程序处理服务器到服务器的请求。它用于直接卡支付(尽管检查 PCI 要求)以及使用客户端生成的卡令牌创建交易。
API 授权/购买(信用卡)
以下示例是一个简单的授权,提供卡详细信息。 出于 PCI 合规性原因,您通常会避免在您的商户网站后端允许卡详细信息,而是提供标记化的卡参考(参见后面的部分)。
<?php

include 'vendor/autoload.php';

$gateway = Omnipay\Omnipay::create('AuthorizeNetApi_Api');

$gateway->setAuthName('XXXXXxxxxxx');
$gateway->setTransactionKey('XXXXX99999xxxxx');
$gateway->setTestMode(true);

$creditCard = new Omnipay\Common\CreditCard([
    // Swiped tracks can be provided instead, if the card is present.
    'number' => '4000123412341234',
    'expiryMonth' => '12',
    'expiryYear' => '2020',
    'cvv' => '123',
    // Billing and shipping details can be added here.
]);

// Generate a unique merchant site transaction ID.
$transactionId = rand(100000000, 999999999);

$response = $gateway->authorize([
    'amount' => '7.99',
    'currency' => 'USD',
    'transactionId' => $transactionId,
    'card' => $creditCard,
    // Additional optional attributes:
    'customerId' => '123456',
    'customerType' => \Academe\AuthorizeNet\Request\Model\Customer::CUSTOMER_TYPE_INDIVIDUAL,
    'customerDriversLicense' => [
        'number' => '123456',
        'state' => 'NY',
        'dateOfBirth' => '1967-01-01',
    ],
    'customerTaxId' => 'TAX456',
])->send();

// Or use $gateway->purchase() to immediately capture.

var_dump($response->isSuccessful());
// bool(true)

var_dump($response->getCode());
// string(1) "1"

var_dump($response->getMessage());
// string(35) "This transaction has been approved."

var_dump($response->getTransactionReference());
// string(11) "60103474871"
API 捕获
一旦授权,金额可以被捕获
// Captured from the authorization response.
$transactionReference = $response->getTransactionReference();

$response = $gateway->capture([
    'amount' => '7.99',
    'currency' => 'USD',
    'transactionReference' => $transactionReference,
])->send();
API 授权/购买(不透明数据)
这里的“不透明数据”是一个标记化的信用卡或借记卡。Authorize.Net 可以通过多种方式标记化卡,其中一种是通过前端上的 accept.js 包。它的工作方式如下
您在页面上构建一个支付表单。除了像下面那样硬编码它之外,网关还提供了一个您可以使用的方法来动态生成它。
<form id="paymentForm"
    method="POST"
    action="https://your-site.example.com/authorize">
    <input type="text" id="cardNumber" placeholder="cardNumber"/>
    <input type="text" id="expMonth" placeholder="expMonth"/>
    <input type="text" id="expYear" placeholder="expYear"/>
    <input type="text" id="cardCode" placeholder="cardCode"/>
    <input type="hidden" name="opaqueDataValue" id="opaqueDataValue" />
    <input type="hidden" name="opaqueDataDescriptor" id="opaqueDataDescriptor" />
    <button>Pay Now</button>
</form>
注意卡详细信息元素没有名称,因此不会提交到您的网站。这对于 PCI 原因非常重要。定义了两个隐藏字段来携带不透明数据到您的网站。您可以在同一表单中包含尽可能多的其他字段,这些字段可能包括姓名和地址。
在支付表单之后,您将需要 accept.js JavaScript
    <script type="text/javascript"
        src="https://jstest.authorize.net/v1/Accept.js"
        charset="utf-8">\
    </script>
对于生产环境,使用 https://js.authorize.net/v1/Accept.js URL。
您需要捕获“立即付款”提交并将其发送到处理卡详细信息的函数。可以使用 onclick 属性或 jQuery 事件。例如
<button type="button" onclick="sendPaymentDataToAnet()">Pay</button>
sendPaymentDataToAnet 函数处理标记化。
<script type="text/javascript">
function sendPaymentDataToAnet() {
    // Set up authorisation to access the gateway.
    var authData = {};
        authData.clientKey = "YOUR PUBLIC CLIENT KEY";
        authData.apiLoginID = "YOUR API LOGIN ID";

    // Capture the card details from the payment form.
    // The cardCode is the CVV.
    // You can include fullName and zip fields too, for added security.
    // You can pick up bank account fields in a similar way, if using
    // that payment method.
    var cardData = {};
        cardData.cardNumber = document.getElementById("cardNumber").value;
        cardData.month = document.getElementById("expMonth").value;
        cardData.year = document.getElementById("expYear").value;
        cardData.cardCode = document.getElementById("cardCode").value;

    // Now send the card data to the gateway for tokenisation.
    // The responseHandler function will handle the response.
    var secureData = {};
        secureData.authData = authData;
        secureData.cardData = cardData;
        Accept.dispatchData(secureData, responseHandler);
}
</script>
响应处理程序能够提供在尝试标记化卡时可能生成的错误。但如果一切顺利,它将使用不透明数据更新支付表单(另一个函数 paymentFormUpdate)
function responseHandler(response) {
    if (response.messages.resultCode === "Error") {
        var i = 0;
        while (i < response.messages.message.length) {
            console.log(
                response.messages.message[i].code + ": " +
                response.messages.message[i].text
            );
            i = i + 1;
        }
    } else {
        paymentFormUpdate(response.opaqueData);
    }
}
填写不透明数据隐藏表单项,然后最终提交表单
function paymentFormUpdate(opaqueData) {
    document.getElementById("opaqueDataDescriptor").value = opaqueData.dataDescriptor;
    document.getElementById("opaqueDataValue").value = opaqueData.dataValue;
    document.getElementById("paymentForm").submit();
}
回到服务器,您将有两个不透明数据字段要捕获
- opaqueDataDescriptor
- opaqueDataValue
在后面一节中描述的 backend 上启动一个 authorize() 或 purchase()。在 creditCard 对象中,留下卡详情为空,不设置。相反,发送不透明数据
$request = $gateway->authorize([
    ...
    'opaqueDataDescriptor' => $opaqueDataDescriptor,
    'opaqueDataValue' => $opaqueDataValue,
]);
或
$request->setOpaqueData($opaqueDataDescriptor, $opaqueDataValue);
或使用冒号(:)连接以作为卡令牌处理
$request->setToken($opaqueDataDescriptor . ':' . $opaqueDataValue);
授权或购买应该像直接提供卡详细信息一样进行。在结果中,卡的最后四位将可用,以防需要执行退款。
更多详细信息可以在官方文档中找到。
注意,不透明数据也用于其他支付来源,例如银行账户和 PayPal。
API 取消授权
授权的交易可以被取消
// Captured from the authorization response.
$transactionReference = $response->getTransactionReference();

$response = $gateway->void([
    'transactionReference' => $transactionReference,
])->send();
API 退款
给定原始交易参考、原始金额和信用卡的最后四位数字,可以退款到已结算的信用卡支付
$response = $gateway->refund([
    'amount' => '7.99',
    'currency' => 'USD',
    'transactionReference' => $transactionReference,
    'numberLastFour' => '1234',
])->send();
API 获取交易
根据其 transactionReference,可以从网关获取现有交易。
$response = $gateway->fetchTransaction([
    'transactionReference' => $transactionReference,
])->send();
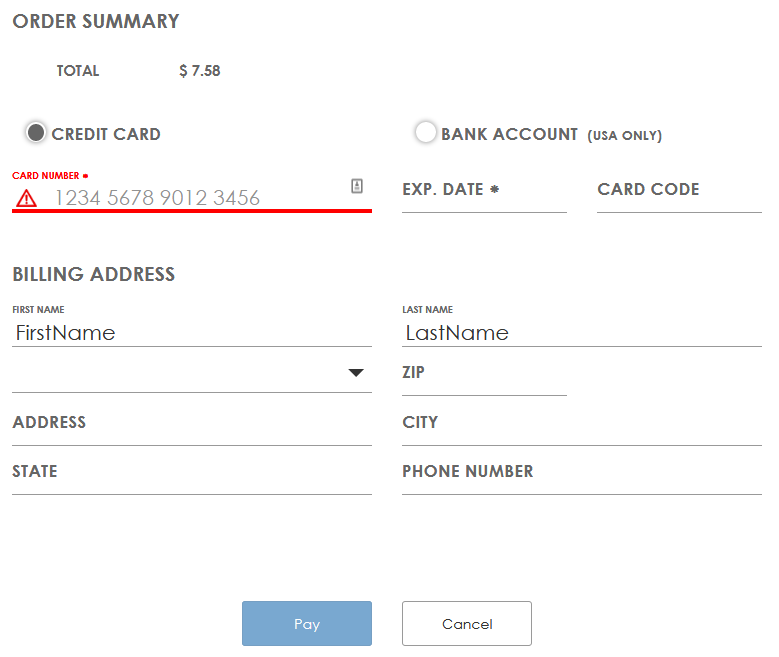
托管支付页面将在网关上托管支付表单。该表单可以以全页重定向或iframe的形式向用户展示。
托管支付页面
托管支付页面是不同的网关。
$gateway = Omnipay\Omnipay::create('AuthorizeNetApi_HostedPage');
网关的配置方式与直接API网关相同,授权/购买请求的创建方式也相同,只是增加了 return 和 cancel URL。
托管支付页面授权/购买
$request = $gateway->authorize([
    'amount' => $amount,
    // etc.
    'returnUrl' => 'return URL after the transaction is approved or rejected',
    'cancelUrl' => 'URL to use if the user cancels the transaction',
]);
响应将进行重定向,以下详细信息将用于在商户网站上构建重定向。
$response = $request->send();

$response->getRedirectMethod();
// Usually "POST"

$response->getRedirectUrl();
// The redirect URL or POST form action.

$response->getRedirectData()
// Array of name/value elements used to construct hidden fields
// in the POST form.
一个简单的“立即支付”POST按钮可能看起来像以下表单。
$method = $response->getRedirectMethod();
$action = $response->getRedirectUrl();

echo "<form method='$method' action='$action'>";
foreach ($response->getRedirectData() as $name => $value) {
    $dataName = htmlspecialchars($name);
    $dataValue = htmlspecialchars($value);

    echo "<input type='hidden' name='$dataName' value='$dataValue' />";
}
echo "<button type='submit'>Pay Now</button>";
echo "</form>";
这将用户带到网关支付页面,默认情况下看起来像这样。
账单详情将预先填充在 $gateway->authorize() 中提供的卡详情。用户可以更改和/或看到的内容,可以通过账户中的选项或配置进行更改。
以 hostedPaymentPaymentOptions 为例,这是如何设置选项的。
文档 列出 hostedPaymentPaymentOptions 支持以下选项: {"cardCodeRequired": false, "showCreditCard": true, "showBankAccount": true}
要设置任何选项,请从选项名称中删除 hostedPayment 前缀,然后附加您想要设置的特定选项,并将结果用作参数,保持名称为 camelCase。因此,上述选项组由以下参数支持
- paymentOptionsCardCodeRequired
- paymentOptionsShowCreditCard
- paymentOptionsShowBankAccount
您可以在 authorize() 阶段设置这些
$request = $gateway->authorize([
    ...
    // Hide the bank account form but show the credit card form.
    'paymentOptionsShowCreditCard' => true,
    'paymentOptionsShowBankAccount' => false,
    // Change the "Pay" buton text.
    'buttonOptionsText' => 'Pay now',
]);
或使用 set*() 表单做同样的事情
$request->setPaymentOptionsShowBankAccount(false);
Webhook 通知
Authorize.Net 网关提供了一组丰富的webhooks来通知商户网站(和/或其他后端系统)有关客户或支付的事件。当前的文档可以在此处找到:https://developer.authorize.net/api/reference/features/webhooks.html。
对于某些API方法,例如托管支付页面,webhooks是操作所必需的。对于其他API方法,它们提供了额外的信息。
可以在Authorize.Net账户设置页面中配置webhooks。它们也可以通过REST API完全管理,以便商户网站可以注册所有需要的webhooks。请注意,此处尚未实现webhook管理RESTful API。
您的通知处理程序在webhook端点设置如下
$gateway = Omnipay::create('AuthorizeNetApi_Api');

$gateway->setAuthName($authName);
$gateway->setTransactionKey($authKey);
$gateway->setSignatureKey($signatureKey); // HMAC-256
$gateway->setTestMode(true); // for false

$notification = $gateway->acceptNotification();
这将读取并解析webhook POST 数据。原始嵌套数组数据可以在以下位置找到
$notification->getData();
解析后的 Notification 值对象可以在以下位置找到
$notification->getParsedData();
一些描述通知性质的详细信息
// The main target: payment or customer
$notification->getEventTarget();

// The event subtarget. e.g. capture, fraud, void, subscription
$notification->getEventSubtarget();

// The event action. e.g. created, updated, deleted, held, approved, declined
$notification->getEventMethod();
有关目标、子目标和动作的完整列表,请参阅此处:https://github.com/academe/authorizenet-objects/blob/master/src/ServerRequest/Notification.php#L24
对于包含 transactionReference 的通知,这可以获取
$notification->getTransactionReference();
对于不涉及交易的通知,这将返回 null。请注意,webhook不包含商户的 transactionId,因此无法将支付webhook与托管页面请求关联起来。在这种情况下,您可以在创建托管支付页面数据时,在 notifyUrl 上作为查询参数提供 transactionId。但是,请注意,此ID将可见于监控浏览器流量的最终用户,并且(作为URL的一部分)不会包含在通知签名中,因此可能被伪造。这不太可能,但请注意,这是一个潜在的攻击向量,因此也许也应该对URL进行自签名。
网关可以使用 signatureKey 对通知进行签名。默认情况下,此通知处理程序将验证 signature,并在获取交易结果时如果验证失败将抛出异常。
可以使用手动检查签名
$notification->isSignatureValid()
如果签名有效,将返回true,如果验证过程中的任何部分失败,则返回false。
如果需要,可以禁用签名的验证。
$gateway->setDisableWebhookSignature(true);
为了与其他Omipay驱动程序保持一致,此驱动程序可能会根据如何处理其他人的方式对如何将transactionId传递给通知处理器做出有偏见的决定,但仅在研究过其他人是如何处理它之后。有一种通过iframe在客户端实现它的方式,但在我看来这似乎容易受到用户操作。

