visol / cloudinary
TYPO3 中的 Cloudinary 集成。使用自动断点生成图像。
Requires
- php: ~8.0 || ~8.1
- ext-json: *
- cloudinary/cloudinary_php: ^1.15
- typo3/cms-backend: ^11.5
- typo3/cms-extbase: ^11.5
Requires (Dev)
- phpstan/phpstan: ^1.8
- dev-master
- v11.x-dev
- 4.1.1
- 4.1.0
- 4.0.1
- 4.0.0
- 3.0.2
- 3.0.1
- 3.0.0
- 2.3.4
- 2.3.3
- 2.3.2
- 2.3.1
- v0.x-dev
- 0.4.0
- 0.3.0
- 0.2.0
- dev-feature/v12
- dev-dependabot/composer/cloudinary/cloudinary_php-tw-2.14
- dev-feature/image-processing
- dev-task/update-cloudinary-to-version-2
- dev-feature/video-thumbnails
- dev-bugfix/JB-1203-user-defined-cropping
- dev-feature/use-identifier-hash
- dev-fix/cloudinary-scan-service-full-table-scan-v1
- dev-feature/addCnameConfig
- dev-feature/web-hook
- dev-feature/force-auto-format
- dev-fix/cloudinary-within-irre-elements
- dev-bugfix/cloudinaryScanCommand
- dev-task/php81
- dev-development
- dev-feature/svgFiles
- dev-feature/private-cloudinary
This package is auto-updated.
Last update: 2024-09-12 21:46:46 UTC
README
一个连接 TYPO3 与 Cloudinary 服务的 TYPO3 扩展,通过 Cloudinary Driver for FAL 实现。该扩展还提供各种视图辅助器以在前端渲染图像。Cloudinary 是一个处理图像和视频的服务提供商。它提供了各种服务,包括
- CDN 以快速传输图像和视频
- 图像和视频的编辑,如裁剪、缩放等...
- 数字资产管理功能,其中图像可以添加标签并编辑元数据
兼容性和维护
当前维护以下版本的包
安装
应通过 Composer 进行扩展
composer require visol/cloudinary
请注意,该扩展需要库 cloudinary/cloudinary_php 并自动下载到 vendor 目录。
配置
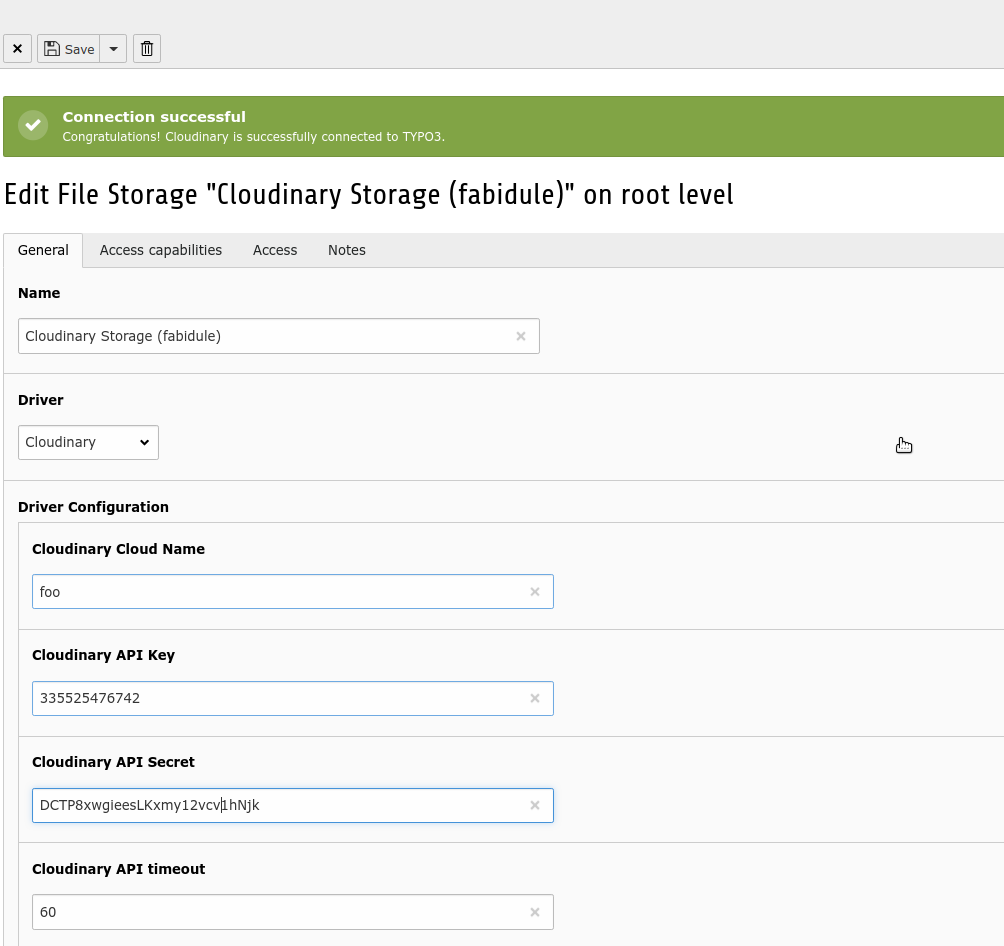
首先,在 Cloudinary 上创建一个账户。一旦扩展安装完成,我们应该创建一个 文件存储。
对于一个新的 "文件存储" 记录,然后
- 在驱动器下拉菜单中选择 Cloudinary 驱动器。
- 填写所需字段。密码和密钥可以从 Cloudinary 控制台 获取。
记录保存后,您应看到一个消息告知连接成功建立。现在您可以前往文件模块列表。请注意,第一次点击文件列表模块中的文件夹时,可能需要一些时间,因为必须从云端获取图像并将其放入 Cloudinary 缓存。
请注意,您还可以使用环境变量来配置存储。环境变量应被百分号包围。例如 %env(BUCKET_NAME%)
日志记录
为了调试目的,Cloudinary API 调用被记录以更好地跟踪和理解 API 调用的方式和时间。在 BE 中响应时间慢时检查日志文件可能很有用。
tail -f public/typo3temp/var/logs/cloudinary.log
决定:我们现在有日志级别 INFO。我们可能需要考虑将级别 "提高" 到 "DEBUG"。
注意事项和故障排除
- 免费 Cloudinary 账户每天允许 500 次API请求
- 此 cloudinary FAL 驱动程序目前 仅限于图像。
视图助手
该扩展提供了可按如下方式使用的视图助手
- 输出图像及其源集。
<html xmlns:c="http://typo3.org/ns/Visol/Cloudinary/ViewHelpers">
    <c:cloudinaryImage image="{file}"/>
</html>
这将产生以下输出
<img sizes="(max-width: 768px) 100vw, 768px"
     srcset="https://res.cloudinary.com/fabidule/image/upload/f_auto,fl_lossy,q_auto,c_crop/c_scale,w_768/v1570098754/sample/animals/cat.jpg 768w,
            https://res.cloudinary.com/fabidule/image/upload/f_auto,fl_lossy,q_auto,c_crop/c_scale,w_553/v1570098754/sample/animals/cat.jpg 553w,
            https://res.cloudinary.com/fabidule/image/upload/f_auto,fl_lossy,q_auto,c_crop/c_scale,w_100/v1570098754/sample/animals/cat.jpg 100w"
    src="https://res.cloudinary.com/fabidule/image/upload/v1570098754/sample/animals/cat.jpg" />
- 生成一个可以迭代的变体数组。
<html xmlns:c="http://typo3.org/ns/Visol/Cloudinary/ViewHelpers">
    <c:cloudinaryImageData image="{file}">
        <f:debug>{responsiveImageData}</f:debug>
    </c:cloudinaryImageData>
</html>
CLI 命令
将大量图像从本地存储移动到 Cloudinary 存储。
小心!
- 移动意味着:我们 "手动" 上传文件(跳过 FAL API)到 Cloudinary 存储,并从本地存储中删除(rm -f FILE)。然后我们将
sys_file.storage value更改为 Cloudinary 存储。文件 uid 将保留!
./vendor/bin/typo3 cloudinary:move 1 2
# param 1: the source storage uid (local)
# param 2: the target storage uid (cloudinary)

# Will all parameters
./vendor/bin/typo3 cloudinary:move 1 2 --base-url=https://domain.tld/fileadmin --folder-filter=folderFilter

# --base-url: the base URL where to download files (the file will be downloaded directly from the remote)
# --filter: a possible filter, ex. %.youtube, /foo/bar/%
# --filter-file-type: add a possible filter for file type as defined by FAL (e.g 1,2,3,4,5)
# --limit: add a possible offset, limit to restrain the number of files. (eg. 0,100)
# --yes: do not ask question. Just do it!
# --silent: be quiet!
在“移动”文件后,您应该通过运行以下命令来修复Cloudinary存储的jpeg扩展名。值得一提的是,Cloudinary移除了图片的文件扩展名。例如,在Cloudinary上上传的文件image.jpg或image.jpeg将被存储为image,不带文件扩展名。通过检查文件,我们会看到Cloudinary只考虑“jpg”扩展名。因此,image.jpeg将被作为image.jpg提供服务。这对我们来说有影响。来自表sys_file的记录必须调整,文件标识符或文件名中的jpeg出现次数必须更改为jpg以保持一致性。
./vendor/bin/typo3 cloudinary:fix 2
# where "2" is the target storage uid (cloudinary)
提示:要同步/上传大量文件,您可以使用Cloudinary CLI,它可以方便地一次性上传许多资源。
cld sync --push localFolder remoteFolder
此扩展还提供了一个工具,可以从一个存储复制大量文件(限于图片)到另一个存储。可以通过以下命令实现:
./vendor/bin/typo3 cloudinary:copy 1 2
# where 1 is the source storage (local)
# and 2 is the target storage (cloudinary)

# Ouptut:
Copying 64 files from storage "fileadmin/ (auto-created)" (1) to "Cloudinary Storage (fabidule)" (2)
Copying /introduction/images/typo3-book-backend-login.png
Copying /introduction/images/content/content-quote.png
...
Number of file copied: 64
为了您的信息,已经实施了一组验收测试,以验证驱动程序的功能。
./vendor/bin/typo3 cloudinary:tests fabidule:1234:ABCD
开发工具
在扩展的源目录中输入命令make,以显示与代码格式化相关的实用命令。
Usage:
 make [target]

Available targets:
 help:            Help
 lint:           Display formatting issues in detail
 lint-summary:   Display a summary of formatting issues
 lint-fix:       Automatically fix code formatting issues
Web Hook
无论何时通过Cloudinary Manager上传或编辑文件,您都可以配置一个URL作为Web Hook,以调用以使TYPO3中的缓存失效。强烈建议这样做,以保持Cloudinary和TYPO3之间的数据一致性。
https://domain.tld/?type=1573555440
注意:不要在Cloudinary媒体库中重命名、移动或删除文件。TYPO3将不知道这些更改。我们可能需要实现Web Hook。目前,必须在后端的文件模块中执行这些操作。
灵感来源
league php flysystem的Cloudinary适配器


