sylvainjule / annotator
在结构字段同步的图像上放置标记/定义区域
Requires
README
此插件允许您通过将图像固定到特定坐标/区域来添加注释。兼容Kirby 3和4。

概览
此插件完全免费,并按照MIT许可证发布。但是,如果您正在将其用于商业项目并希望帮助我维护,请考虑捐款或通过我的联盟链接购买您的许可证。
TLDR – 快速开始 👀
1. 安装
如果您想使用Kirby 2中的此字段,请切换到
kirby-2分支。
下载并将此存储库复制到/site/plugins/annotator
或者,您可以使用Composer安装它:composer require sylvainjule/annotator
2. 蓝图使用
注解器是一个不存储任何信息的部分。它提供了一个接口来操作来自其他字段的内容。以下是插件在您的蓝图中的基本设置。
2.1. 基本示例
columns:
  - width: 2/3
    sections:
      annotator:
        type: annotator
        storage:
          src: src
          markers: markers

  - width: 1/3
    sections:
      myfields:
        type: fields
        fields:
          src:
            type: files
            max: 1
          markers:
            type: structure
            fields:
              (...)
2.2. 完整示例
设置所有默认选项
columns:
  - width: 2/3
    sections:
      annotator:
        type: annotator
        tools:
          - pin
          - rect
          - circle
        colors:
          - orange
          - yellow
          - green
          - blue
          - purple
          - pink
        theme: light
        debug: false
        max: false
        storage:
          color: color
          src: src
          markers: markers

  - width: 1/3
    sections:
      myfields:
        type: fields
        fields:
          color:
            type: text
          src:
            type: files
            max: 1
          markers:
            type: structure
            fields:
              (...)
注意,如果您将颜色存储字段设置为
disabled: true,如前例所示,那么值将不再更新。您需要从自定义面板CSS中禁用它(例如opacity: .35; pointer-events: none;)。
2.3. 在文件页面中使用
您可以使用此插件在文件页面中使用,但需要在storage设置中跳过上述的src选项。插件将自动检测给定页面的图像。
3. 选项
3.1. 显示选项
参见上面的完整示例,了解如何使用它们。
• 工具
类型:
array,默认: 以上列出的所有工具
您有3种工具可供选择:pin、rect和circle。所有这些默认都可见,至少应提供一种。
• 颜色
类型:
array,默认: 以上列出的所有颜色
您有6种预定义颜色可供选择。所有这些默认都可见,至少应提供一种。如果没有指定颜色存储,则将使用列表中的第一种颜色。
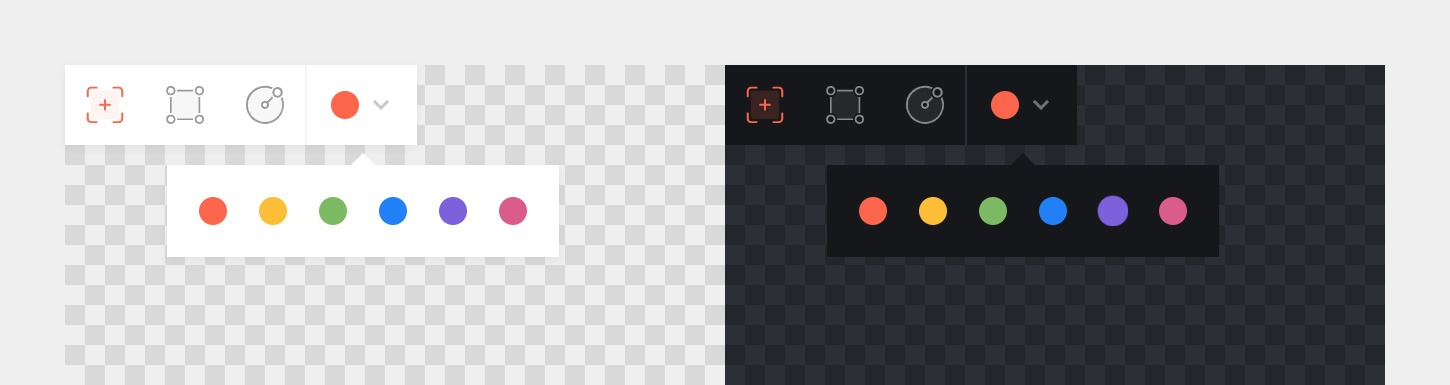
• 主题
类型:
string,默认:light
您有两种主题可供选择,一个暗色和一个亮色。
• 缩放
类型:
boolean,默认:false
当设置为true时,工具栏中将显示一个缩放按钮。单击时,它将切换图像的全尺寸,允许您更精确地设置标记(仅在桌面版上)。
• 双击
类型:
boolean,默认:false
当设置为true时,只有在双击图像时才会添加标记,以防止意外添加标记。请注意,此选项仅在使用pin工具时起作用。
• 调试
类型:
boolean,默认:false
当设置为true时,鼠标坐标将在工具栏中实时显示。除非您尝试扩展某些功能,否则不需要。

3.2. 存储选项
• 图片文件
此部分需要与返回图片URL的字段同步才能正常工作。
理论上,使用select字段可能可行,但我强烈建议使用files字段,并限制为单个文件。这不仅看起来更美观,而且更重要的是它返回文件的绝对URL。
# annotator section
storage:
  src: src

# fields section
src:
  type: files
  max: 1
注意:您无需显式设置
max值,尽管这样可能更清晰。当遇到包含多个文件的文件字段时,插件始终使用第一个。
• 标记结构
插件需要一个关联的结构字段来存储标记信息。它有5个预留字段,不应用于任何其他目的:type、x、y、w和h。这些字段将自动设置,除非您想在面板中显示它们,否则无需显式指定。

# annotator section
storage:
  markers: markers

# fields section
markers:
  type: structure
  fields:
    type:
      label: 'Type'
      type: text
    x:
      label: 'x'
      type: number
    y:
      label: 'y'
      type: number
    w:
      label: 'w'
      type: number
    h:
      label: 'h'
      type: number
否则,您可以直接开始添加您想与其同步内容的字段。

# annotator section
storage:
  markers: markers

# fields section
markers:
  type: structure
  fields:
    mynote:
      label: 'Note'
      type: text
• 最小/最大
您可以通过设置max选项(在注释器部分的选项中)来限制标记的数量。
如果您想设置最小标记数量,请设置结构字段选项中的min选项。
sections:
  annotator:
    type: annotator
    max: 4

...

fields:
  markers:
    type: structure
    min: 2
• 翻译
如果您不希望在翻译页面上移动图钉,您可以使用translate选项。请注意,您的关联结构字段仍然可编辑,除非您设置了其自己的translate选项。
sections:
  annotator:
    type: annotator
    translate: false
• 颜色
如果没有关联的color字段,插件将不会记住在编辑器中使用过的最后一种颜色,并且在加载组件时始终回退到第一种颜色。设置颜色存储相当简单。
# annotator section
storage:
  color: color

# fields section
color:
  type: text
  disabled: true
请注意,插件需要访问面板视图中的字段元素来实时更新颜色,因此它不能是
type: hidden。如果您想从视觉上隐藏它,您需要通过自定义面板CSS来实现。
• 结构字段CSS
如果您想确保结构字段仅包含标记,您可以隐藏字段的Add +按钮。这样,除了注释器部分外,没有其他方法可以填充它。
在自定义panel.css中添加以下内容
.k-field-mymarkersfield .k-field-header button {
    display: none;
}
4. 模板使用
标记存储在结构字段中,这意味着我们需要使用toStructure()方法创建一个集合。以下示例中我将引用名为$marker的变量,这就是我们获取它的方式
foreach($page->markers()->toStructure() as $marker) {
    // now we have a $marker variable
}
4.1. 信息如何存储?
每个标记都有一组坐标,与图像成比例。
这些坐标限制为4位小数,并返回介于0和1之间的值。Kirby可能会将它们作为字符串返回,所以请记住在处理之前始终确保您得到的是一个数字。
echo $marker->x()->toFloat()
每个标记还有一个指定的类型,作为字符串,可以是pin、rect或circle。
• 图钉
这是您预期的输出类型
type: 'pin'
x: 0.50 #(if 50% from the left)
y: 0.50 #(if 50% from the top)
w: 0
y: 0
• 矩形
这是您预期的输出类型
type: 'rect'
x: 0.50 #(if 50% from the left)
y: 0.50 #(if 50% from the top)
w: 0.25 #(if 25% of the width)
y: 0.25 #(if 25% of the height)
• 圆形
请注意以下两点
-
x和y坐标是圆的中心坐标。这意味着您需要通过w和h移动标记元素。transform: translate(-50%, -50%);
-
w和h是根据椭圆是完美的圆来计算的。这意味着如果图像是正方形的,它们将匹配;如果图像不是正方形的,它们将不同,以补偿宽度和高度之间的比例差异。因此,您可以在元素上设置border-radius: 50%;
这是您预期的输出类型
type: 'circle'
x: 0.50 #(center is 50% from the left)
y: 0.50 #(center is 50% from the top)
w: 0.25 #(diameter is 25% of the width)
y: 0.3275 #(diameter is still the same, but adjusted to match the image ratio)
4.2. 方法与函数
• 检查标记的类型
// Check if the marker is a [pin / rect / circle].
// Returns true or false.
$marker->type()->isPin()
$marker->type()->isRect()
$marker->type()->isCircle()

// Check if the marker is not a [pin / rect / circle].
// Returns true or false.
$marker->type()->isNotPin()
$marker->type()->isNotRect()
$marker->type()->isNotCircle()
• 使用百分比
// Convert the value to a float and multiply it by 100.
// Returns a number.
$marker->x()->toPercent() // returns 50

// Convert the value to a float, multiply it by 100 and append a '%'.
// Returns a string.
$marker->x()->toPercentString() // returns '50%'
• 格式化内联样式
返回一个根据标记类型的正确格式化内联样式。
echo markerStyle($marker);

// if $marker is a pin
returns 'left:50%; top:50%;'
// if $marker is a rectangle
returns 'left:50%; top:50%; width:25%; height:25%;'
// if $marker is a circle
returns 'left:50%; top:50%; width:25%; height:32.75%; border-radius:50%; transform:translate(-50%, -50%);'
4.3. 基本用法示例
<?php if($image = $page->src()->toFile()): ?>
<div>
    <?php foreach($page->markers()->toStructure() as $marker): ?>
        <div class="marker" style="<?php echo markerStyle($marker); ?>"></div>
    <?php endforeach; ?>
    <img src="<?php echo $image->url() ?>">
</div>
<?php endif; ?>
在您的CSS中
.marker {
    position: absolute;
}
5. 许可证
MIT
6.致谢
- 字段同步已从@rasteiner的地图部分获取。🙏