ping-xiong / idoc
从您的Laravel应用程序生成漂亮的API文档
Requires
- php: >=7.0.0
- fakerphp/faker: ^1.12
- illuminate/console: 5.5.* || 5.6.* || 5.7.* || 5.8.* || ^6.0 || ^7.0 || ^8.0
- illuminate/routing: 5.5.* || 5.6.* || 5.7.* || 5.8.* || ^6.0 || ^7.0 || ^8.0
- illuminate/support: 5.5.* || 5.6.* || 5.7.* || 5.8.* || ^6.0 || ^7.0 || ^8.0
- mpociot/reflection-docblock: ^1.0.1
- ramsey/uuid: ^3.8 || ^4.0
Requires (Dev)
- dingo/api: 2.0.0-alpha1
- league/fractal: ^0.17.0
- mockery/mockery: ^1.2.0
- orchestra/testbench: 3.5.* || 3.6.* || 3.7.* || 5.1.* || ^6.0
- phpunit/phpunit: ^6.0.0 || ^7.4.0 || ^9.0
This package is auto-updated.
Last update: 2024-09-11 18:09:18 UTC
README
              Follow me anywhere @ovac4u                         | GitHub
              _________                          _________       | Twitter
             |   ___   |.-----.--.--.---.-.----.|  |  |.--.--.   | Facboook
             |  |  _   ||  _  |  |  |  _  |  __||__    |  |  |   | Instagram
             |  |______||_____|\___/|___._|____|   |__||_____|   | Github + @ovac
             |_________|                        www.ovac4u.com   | Facebook + @ovacposts
Laravel IDoc - API文档生成器
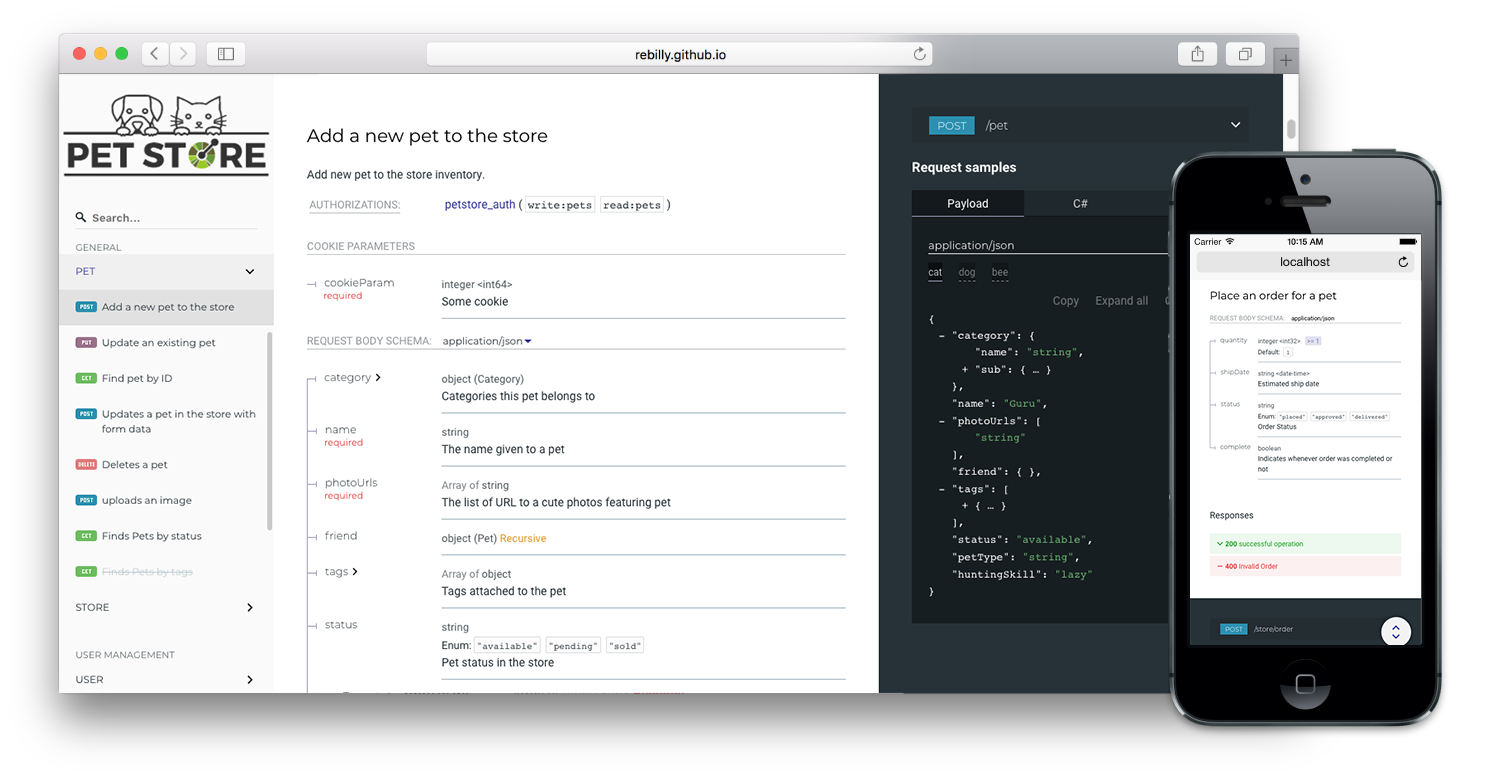
自动从现有Laravel路由生成交互式API文档。查看示例文档。受Laravel Api Documentation Generator启发
介绍。
Laravel IDoc生成器(交互式文档生成器)是一个无缝且完整的插件,用于从您的Laravel代码库生成API文档。它受laravel-apidoc-generator、ReDoc和Swagger的Open API倡议启发。IDoc已构建为可扩展,以便它能够轻松适应您的用例。
功能
- 极其容易部署
- 服务器端渲染就绪
- 最广泛支持OpenAPI v2.0功能
 {.inline}
 - 支持OpenAPI 3.0
- 整齐的交互式文档,用于嵌套对象
 {.inline}
 - 自动支持代码示例
 {.inline}
 - 响应式三面板设计,菜单/滚动同步
- 将API介绍集成到侧菜单中。
- 在侧菜单中进行高级分组。
- 品牌/自定义。


安装
注意:PHP 7和Laravel 5.5或更高版本是最低依赖项。
$ composer require ovac/idoc
Laravel
运行以下命令发布配置文件
php artisan vendor:publish --tag=idoc-config
这将创建一个在您的config文件夹中的idoc.php文件。
Lumen
- 在您的
bootstrap/app.php中注册服务提供者
$app->register(\OVAC\IDoc\IDocServiceProvider::class);
- 将配置文件从
vendor/ovac/idoc/config/idoc.php复制到您的项目中的config/idoc.php。然后将其添加到您的bootstrap/app.php
$app->configure('idoc');
使用方法
$ php artisan idoc:generate
配置
在您生成文档之前,您需要在您的config/idoc.php中配置一些内容。
path这将用于注册包所需的必要路由。
'path' => 'idoc',
logo您可以指定要在生成的文档上使用的自定义logo。指向logo图像的相对或绝对URL。
'logo' => 'https://res.cloudinary.com/ovac/image/upload/h_300,w_380,c_fill,r_30,bo_20px_solid_white/aboust_ey5v1v.jpg',
title在这里,您可以指定放置在文档页面上的标题。
'title' => 'iDoc API Reference',
description这将在文档顶部放置一个描述。
'description' => 'iDoc Api secification and documentation.',
-
version文档版本号。 -
terms_of_service这是使用您的API的条款和条件的URL。 -
contact您可以在这里配置用于支持的联系方式。
'contact' => [
        'name' => 'API Support',
        'email' => 'iamovac@gmail.com',
        'url' => 'http://www.ovac4u.com'
],
license简短且简单的许可协议,仅要求保留版权和许可通知
'license' => [
        'name' => 'MIT',
        'url' => 'https://github.com/ovac/idoc/blob/master/LICENSE.md'
],
-
output此包可以自动为您的路由生成Open-API 3.0规范文件以及文档。这是生成的文档将被写入的文件路径。默认:public/docs -
hide_download_button此部分是您可以配置是否在文档上显示下载按钮的地方。 -
router处理路由时使用的路由器(可以是Laravel或Dingo。默认为 Laravel) -
servers服务器数组可以用于在文档中添加多个端点,以便用户可以在端点之间切换。例如,这可以是测试服务器和直播服务器。
'servers' => [
   [
       'url' => 'https://www.ovac4u.com',
       'description' => 'App live server.',
   ],
   [
       'url' => 'https://test.ovac4u.com',
       'description' => 'App test server.',
   ],
],
-
tag_groups此数组用于在侧菜单中分离您定义的小节中的组。如果您想使用它,请确保添加所有组,因为未添加的组将不会显示。 -
language-tabs您可以在此处设置用于编写请求示例的语言。数组中的每个项目都用于为特定语言生成请求模板。之后可以添加新语言并修改现有语言。您可以通过发布视图文件并编辑它们或添加自定义视图文件来添加或编辑新的语言选项卡。
'resources/views/vendor/idoc/languages/LANGUAGE.blade.php',
security此处指定身份验证和授权方案,默认情况下使用基于Bearer的HTTP身份验证方案,但您可以修改它、添加其他方案或根据项目需求将其设置为null。有关更多信息,请访问 Swagger身份验证。
'security' => [
       'BearerAuth' => [
           'type' => 'http',
           'scheme' => 'bearer',
           'bearerFormat' => 'JWT',
       ],
   ],
routes此处指定应生成哪些规则的文档。您通过定义路由应满足的条件和生成文档时应应用的规则来指定要解析的路线。这些条件和规则在组中指定,允许您将不同的规则应用于不同的路由。
例如,假设您的配置如下
return [
     //...,

     /*
     * The routes for which documentation should be generated.
     * Each group contains rules defining which routes should be included ('match', 'include' and 'exclude' sections)
     * and rules which should be applied to them ('apply' section).
     */
    'routes' => [
        [
            /*
             * Specify conditions to determine what routes will be parsed in this group.
             * A route must fulfill ALL conditions to pass.
             */
            'match' => [

                /*
                 * Match only routes whose domains match this pattern (use * as a wildcard to match any characters).
                 */
                'domains' => [
                    '*',
                    // 'domain1.*',
                ],

                /*
                 * Match only routes whose paths match this pattern (use * as a wildcard to match any characters).
                 */
                'prefixes' => [
                    'api/*',
                ],

                /*
                 * Match only routes registered under this version. This option is ignored for Laravel router.
                 * Note that wildcards are not supported.
                 */
                'versions' => [
                    'v1',
                ],
            ],

            //...
        ],
    ],
这意味着将为所有域的路由生成文档('*'是一个通配符,表示“任何字符”),这些路由匹配以下任何一种模式‘api/*’或‘v2-api/*’,排除‘users.create’路由以及任何以admin.开头的路由,包括‘users.index’路由以及任何以healthcheck.开头的路由。(除非您使用Dingo路由器,否则忽略versions键)。此外,在生成的文档中,这些路由将添加到示例请求中的头‘Authorization: Bearer: {token}’。
您还可以将路由分开到不同的组中,为它们应用不同的规则。
<?php
return [
     //...,

     'routes' => [
          [
              'match' => [
                  'domains' => ['v1.*'],
                  'prefixes' => ['*'],
              ],
              'include' => [],
              'exclude' => [],
              'apply' => [
                  'headers' => [
                      'Token' => '{token}',
                      'Version' => 'v1',
                  ],
              ],
          ],
          [
              'match' => [
                  'domains' => ['v2.*'],
                  'prefixes' => ['*'],
              ],
              'include' => [],
              'exclude' => [],
              'apply' => [
                  'headers' => [
                      'Authorization' => 'Bearer: {token}',
                      'Api-Version' => 'v2',
                  ],
              ],
          ],
];
在上面的配置中,v1.*域的路由将应用Token和Version头,而v2.*域的路由将应用Authorization和Api-Version头。
注意:
include和exclude项是路由名称的数组。支持通配符*。注意:如果您使用DIngo路由器,则每个路由组都需要versions参数。此参数不支持通配符。每个版本必须明确列出。
要生成您的API文档,请使用idoc:generate artisan命令。
$ php artisan idoc:generate
它将使用您指定的配置生成文档。
记录您的API
此包使用这些资源生成API文档
分组端点
此包使用HTTP控制器文档块创建目录表并显示API方法的描述。
在控制器文档块中使用@group创建API文档中的组。该控制器处理的任何路由都将在此侧边栏的此组下分组。在@group之后的简短描述应该是唯一的,以便允许锚点标签导航到此部分。还可以包含更长的描述。还支持自定义格式化和<aside>标签。(请参阅Documentarian文档)
注意:使用
@group是可选的。未分组的路由将放置在“常规”组中。
在您希望包含在API文档中的控制器方法上方,您应该有一个文档块。这应该包括一个独特的简短描述作为第一个条目。可以添加一个可选的第二条目,包含更多信息。这两个描述将以不同的格式出现在API文档中,如下所示。您还可以在单个方法上指定 @group 来覆盖控制器级别的组。
/**
 * @group User management
 *
 * APIs for managing users
 */
class UserController extends Controller
{

	/**
	 * Create a user
	 *
	 * [Insert optional longer description of the API endpoint here.]
	 *
	 */
	 public function createUser()
	 {

	 }

	/**
	 * @group Account management
	 *
	 */
	 public function changePassword()
	 {

	 }
}
指定请求参数
要指定API路由接受的参数列表,请使用 @bodyParam、@queryParam 和 @pathParam 注释。
@bodyParam注释包含参数名称、其类型、可选的 "required" 标签以及其描述。@queryParam注释包含参数名称、可选的 "required" 标签以及其描述。@pathParam注释包含参数名称、可选的 "required" 标签以及其描述。
/**
 * @group Items
 */
class ItemController extends Controller
{

    /**
     * List items
     *
     * Get a list of items.
     *
     * @authenticated
     * @responseFile responses/items.index.json
     *
     * @return \Illuminate\Http\Response
     */
    public function index()
    {
        //...
    }

    /**
     * Store item
     *
     * Add a new item to the items collection.
     *
     * @bodyParam name string required
     * The name of the item. Example: Samsung Galaxy s10
     *
     * @bodyParam price number required
     * The price of the item. Example: 100.00
     *
     * @authenticated
     * @response {
     *      "status": 200,
     *      "success": true,
     *      "data": {
     *          "id": 10,
     *          "price": 100.00,
     *          "name": "Samsung Galaxy s10"
     *      }
     * }
     *
     * @param  \Illuminate\Http\Request  $request
     * @return \Illuminate\Http\Response
     */
    public function store(Request $request)
    {
        //...
    }


    /**
     * Get item
     *
     * Get item by it's unique ID.
     *
     * @pathParam item integer required
     * The ID of the item to retrieve. Example: 10
     *
     * @response {
     *      "status": 200,
     *      "success": true,
     *      "data": {
     *          "id": 10,
     *          "price": 100.00,
     *          "name": "Samsung Galaxy s10"
     *      }
     * }
     * @authenticated
     *
     * @param  \App\Item  $item
     * @return \Illuminate\Http\Response
     */
    public function show(Item $item)
    {
        //...
    }
它们将包含在生成的文档文本和示例请求中。
结果:
注意:示例请求中每个参数的值将使用随机值。如果您想指定示例值,可以在描述的末尾添加 示例:your-example。例如
    /**
     * @pathParam location_id required The id of the location.
     * @queryParam user_id required The id of the user. Example: me
     * @queryParam page required The page number. Example: 4
     * @bodyParam user_id int required The id of the user. Example: 9
     * @bodyParam room_id string The id of the room.
     * @bodyParam forever boolean Whether to ban the user forever. Example: false
     */
注意:您还可以将 @bodyParam 注释添加到 \Illuminate\Foundation\Http\FormRequest 子类
/**
 * @bodyParam title string required The title of the post.
 * @bodyParam body string required The title of the post.
 * @bodyParam type string The type of post to create. Defaults to 'textophonious'.
 * @bodyParam author_id int the ID of the author
 * @bodyParam thumbnail image This is required if the post type is 'imagelicious'.
 */
class MyRequest extends \Illuminate\Foundation\Http\FormRequest
{

}

public function createPost(MyRequest $request)
{
    // ...
}
指示认证状态
您可以在方法上使用 @authenticated 注释来指示端点是否已认证。将在交互式文档中提供一个用于认证令牌的字段,并将其标记为必填。
提供示例响应
您可以为路由提供一个示例响应。这将在示例部分显示。有多种方式可以实现这一点。
@response
您可以使用包含有效JSON的 @response 注释为路由提供示例响应。
/**
 * @response {
 *  "id": 4,
 *  "name": "Jessica Jones",
 *  "roles": ["admin"]
 * }
 */
public function show($id)
{
    return User::find($id);
}
此外,您还可以定义多个 @response 标签以及与特定响应相关的HTTP状态码(如果没有设置状态码,则返回 200)。
/**
 * @response {
 *  "id": 4,
 *  "name": "Jessica Jones",
 *  "roles": ["admin"]
 * }
 * @response 404 {
 *  "message": "No query results for model [\App\User]"
 * }
 */
public function show($id)
{
    return User::findOrFail($id);
}
@transformer, @transformerCollection, 和 @transformerModel
您可以使用 @transformer 标签(如果路由返回列表,则为 @transformerCollection)来定义用于路由结果的转换器。该包将尝试使用以下步骤生成要转换的模型实例,并在第一个成功的地方停止
- 检查是否有
@transformerModel标签来定义正在转换的模型。如果没有,则使用转换器的transform()方法的第一个参数的类。 - 从Eloquent模型工厂获取模型的实例
- 如果参数是Eloquent模型,则从数据库加载第一个。
- 使用
new创建实例。
最后,它将模型传递给转换器,并显示转换的结果作为示例响应。
例如
/**
 * @transformercollection \App\Transformers\UserTransformer
 * @transformerModel \App\User
 */
public function listUsers()
{
    //...
}

/**
 * @transformer \App\Transformers\UserTransformer
 */
public function showUser(User $user)
{
    //...
}

/**
 * @transformer \App\Transformers\UserTransformer
 * @transformerModel \App\User
 */
public function showUser(int $id)
{
    // ...
}
对于上面的第一个路由,此包将生成一组两个用户,然后通过转换器传递。对于最后两个,它将生成单个用户,然后通过转换器传递。
注意:为了支持转换器,您需要安装 league/fractal 包
composer require league/fractal
@responseFile
对于大的响应体,您可能希望使用实际响应的转储。您可以将此响应作为一个JSON字符串放入您的Laravel存储目录的文件中,并链接到它。例如,我们可以将此响应放在storage/responses目录下的名为users.get.json的文件中。
{"id":5,"name":"Jessica Jones","gender":"female"}
然后在您的控制器中,通过以下方式链接到它:
/**
 * @responseFile responses/users.get.json
 */
public function getUser(int $id)
{
  // ...
}
该包将解析此响应,并在该路由的示例中显示。
与@response标签类似,您可以提供多个@responseFile标签以及响应的HTTP状态码。
/**
 * @responseFile responses/users.get.json
 * @responseFile 404 responses/model.not.found.json
 */
public function getUser(int $id)
{
  // ...
}
自动生成响应
如果您没有使用上述任何方式指定示例响应,此包将尝试通过向路由发出请求(称为“响应调用”)来获取响应。
关于响应调用的几点注意事项:
- 它们在数据库事务中完成,并在之后回滚更改。
- 响应调用的配置位于
config/idoc.php。它们在['apply']['response_calls']部分中为每个路由组进行配置,允许您为不同的一组路由应用不同的设置。 - 默认情况下,响应调用仅针对GET路由进行,但您可以进行配置。将
methods键设置为方法数组或设置为'*'以表示所有方法。将其留为空数组以关闭该路由组的响应调用。 - URL中的参数(例如:
/users/{user},/orders/{id?})默认将替换为'1'。但是,您可以进行配置。将参数名称(包括花括号和问号)作为键,它们的替换值作为值放入bindings键。 - 您可以配置环境变量(这对于防止触发外部服务(如通知)很有用)。默认情况下,APP_ENV设置为'documentation'。您可以在
env键中添加更多变量。 - 默认情况下,该包将为您的文档化正文和查询参数生成虚拟值并发送请求。(如果您使用
@bodyParam或@queryParam指定了示例值,则将使用这些值。)您可以配置在请求时发送哪些头信息和额外的查询和参数(分别使用headers、query和body键)。 - 默认情况下,所有中间件都启用,但您可以设置
without_middleware数组以指定您希望禁用的中间件,您甚至可以使用['*']来禁用所有中间件。
Open-API 3.0规范文件
生成器会自动创建一个Open-API 3.0规范文件,您可以将它导入到任何外部API应用程序中使用。
添加到规范文件的默认基本URL将在您的Laravel config/app.php文件中找到。这可能是https://。如果您希望更改此设置,您可以直接更新URL或将此配置值链接到您的环境文件以使其更灵活(如下所示)
'url' => env('APP_URL', 'http://yourappdefault.app'),
如果您引用的是上述环境设置,那么您应该确保您已更新您的.env文件以设置APP_URL值。否则,在您的规范文件中,将使用默认值(http://yourappdefault.app)。
APP_URL=http://yourapp.app
进一步修改
视图文件夹中的info文件可以进一步修改以添加介绍和进一步文档。
鸣谢
此软件使用以下开源包
您可能还喜欢...
- Laravel Api Documentation Generator - 一个Laravel API文档生成器。
许可
MIT