neos / form-builder
Flow 表单框架集成到 Neos CMS
- dev-master
- 2.3.5
- 2.3.4
- 2.3.3
- 2.3.2
- 2.3.1
- 2.3.0
- 2.2.0
- 2.1.0
- 2.0.0
- 1.3.x-dev
- 1.3.0
- 1.2.x-dev
- 1.2.2
- 1.2.1
- 1.2.0
- 1.1.1
- 1.1.0
- 1.0.x-dev
- 1.0.5
- 1.0.4
- 1.0.3
- 1.0.2
- 1.0.1
- 1.0.0
- dev-dependabot/npm_and_yarn/Resources/Private/Styles/qs-6.5.3
- dev-dependabot/npm_and_yarn/Resources/Private/PlaceholderInsert/qs-6.11.0
- dev-dependabot/npm_and_yarn/Resources/Private/PlaceholderInsert/decode-uri-component-0.2.2
- dev-dependabot/npm_and_yarn/Resources/Private/PlaceholderInsert/loader-utils-1.4.2
- dev-dependabot/npm_and_yarn/Resources/Private/PlaceholderInsert/terser-4.8.1
- dev-dependabot/npm_and_yarn/Resources/Private/PlaceholderInsert/shell-quote-1.7.3
- dev-dependabot/npm_and_yarn/Resources/Private/PlaceholderInsert/async-2.6.4
- dev-dependabot/npm_and_yarn/Resources/Private/PlaceholderInsert/url-parse-1.5.10
- dev-dependabot/npm_and_yarn/Resources/Private/PlaceholderInsert/ajv-6.12.6
- dev-dependabot/npm_and_yarn/Resources/Private/Styles/ajv-6.12.6
- dev-dependabot/npm_and_yarn/Resources/Private/Styles/node-sass-7.0.0
- dev-dependabot/npm_and_yarn/Resources/Private/PlaceholderInsert/mout-1.2.3
- dev-dependabot/npm_and_yarn/Resources/Private/PlaceholderInsert/shelljs-0.8.5
- dev-dependabot/npm_and_yarn/Resources/Private/PlaceholderInsert/tar-4.4.19
- dev-dependabot/npm_and_yarn/Resources/Private/PlaceholderInsert/path-parse-1.0.7
- dev-dependabot/npm_and_yarn/Resources/Private/PlaceholderInsert/browserslist-4.16.6
- dev-dependabot/npm_and_yarn/Resources/Private/PlaceholderInsert/hosted-git-info-2.8.9
- dev-dependabot/npm_and_yarn/Resources/Private/PlaceholderInsert/lodash-4.17.21
- dev-dependabot/npm_and_yarn/Resources/Private/Styles/hosted-git-info-2.8.9
- dev-dependabot/npm_and_yarn/Resources/Private/Styles/lodash-4.17.21
- dev-dependabot/npm_and_yarn/Resources/Private/PlaceholderInsert/ssri-6.0.2
- dev-dependabot/npm_and_yarn/Resources/Private/PlaceholderInsert/y18n-4.0.1
- dev-dependabot/npm_and_yarn/Resources/Private/Styles/y18n-3.2.2
- dev-dependabot/npm_and_yarn/Resources/Private/PlaceholderInsert/ini-1.3.8
- dev-dependabot/npm_and_yarn/Resources/Private/PlaceholderInsert/elliptic-6.5.4
- dev-dependabot/npm_and_yarn/Resources/Private/Styles/yargs-parser-5.0.1
This package is auto-updated.
Last update: 2024-09-03 08:04:02 UTC
README
此包向 Neos CMS 后端添加了 Flow 表单框架 的构建器。它还包含 Fusion 原型,允许进行基于 Fusion 的动态表单定义。
相关包
请确保查看其他 Flow 表单框架 相关包
用法
使用 composer 安装此包
composer require neos/form-builder
注意:此包需要版本 3.1 或更高版本的
neos/neos包
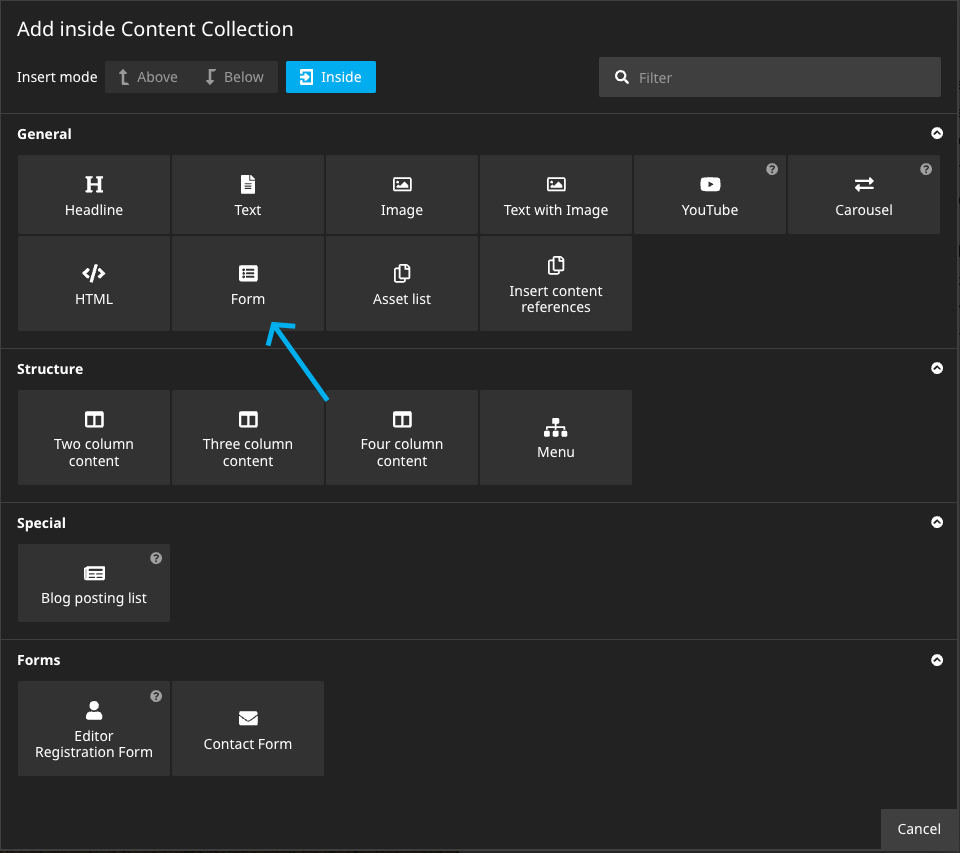
在 Neos 后端中现在有一个新的内容元素类型可供使用
注意:如果您已安装
Neos.NodeTypes包,则可以插入两种类型的表单。以下代码片段可以添加到站点的NodeTypes.yaml中,以禁用 Neos.NodeTypes 表单
'Neos.NodeTypes:Form': ~
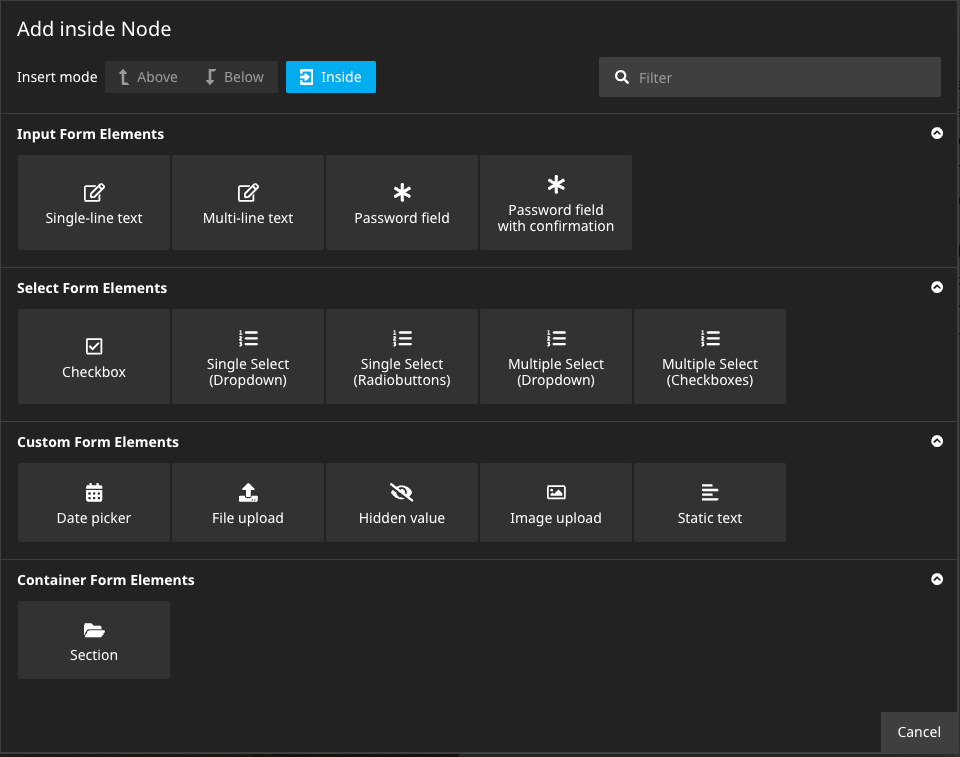
现在,可以将 表单元素 添加到表单中
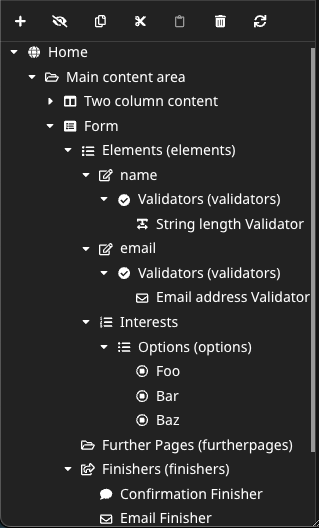
可以为每个表单元素添加 验证器,某些元素允许创建子表单元素或 选择选项。此外,每个表单都可以创建包含元素本身的 更多表单页面。当然,还可以向表单添加 表单完成器。
因此,存在很多内容集合,它们很容易混淆。一个解决方案是在处理复杂表单时使用 结构树
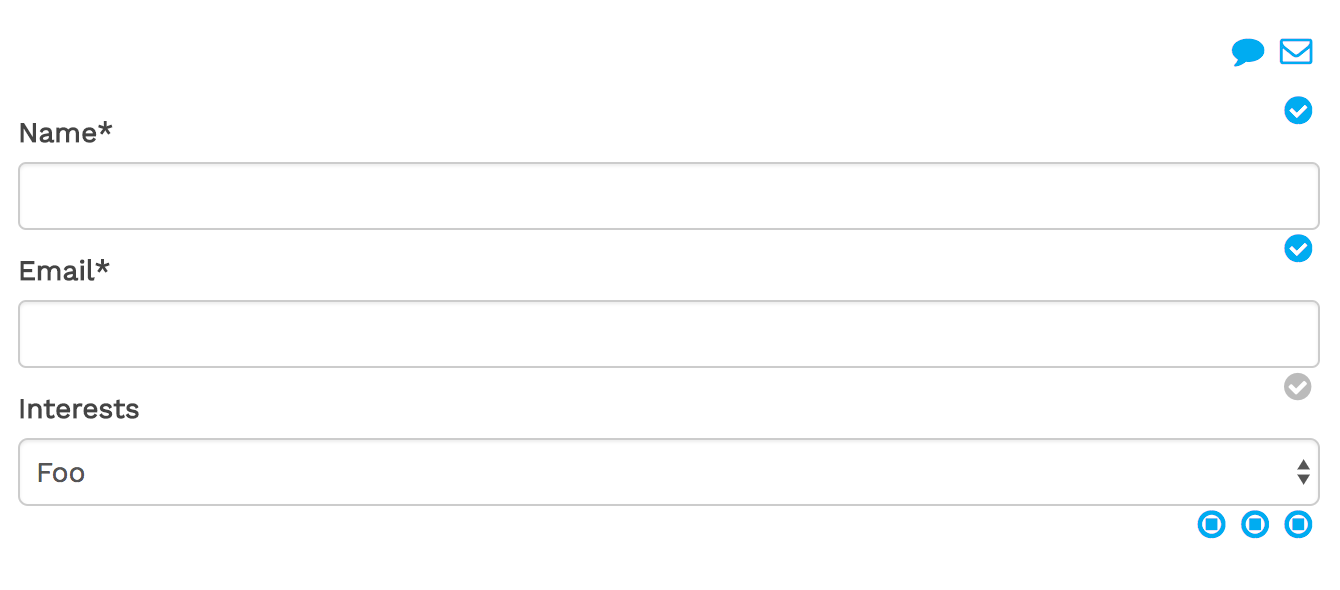
此外,此包还包含一些自定义 StyleSheet,应使表单构建器更容易访问
调整表单构建器的外观
此包提供了一些 CSS,可以包含在内,以调整 Neos 后端中表单构建器的样式。以下 Fusion 片段可以添加,以便在 Neos 后端中包含自定义 CSS(只要页面 Fusion 原型扩展自 Neos.Neos:Page)
prototype(Neos.Neos:Page) {
    head.formBuilderStyles = Neos.Fusion:Tag {
        tagName = 'link'
        attributes {
            rel = 'stylesheet'
            href = Neos.Fusion:ResourceUri {
                path = 'resource://Neos.Form.Builder/Public/Styles/Backend.css'
            }
        }
        @position = 'end'
        @if.isInBackend = ${documentNode.context.inBackend}
    }
}
结果,表单在后端看起来如下
使用 Fusion 构建表单
此包的主要目的是将其集成到 Neos 后端,使用内容存储库节点来表示表单的定义。但在某些情况下,使用纯 Fusion 定义表单非常有用
prototype(Some.Package:ContactForm) < prototype(Neos.Form.Builder:Form) {
    presetName = 'default'
    firstPage {
        elements {
            name = Neos.Form.Builder:SingleLineText.Definition {
                label = 'Name'
                validators {
                    stringLength = Neos.Form.Builder:StringLengthValidator.Definition {
                        options.minimum = 5
                    }
                }
                properties.placeholder = 'Your name'
            }
            email = Neos.Form.Builder:SingleLineText.Definition {
                label = 'Email'
                validators {
                    emailAddress = Neos.Form.Builder:EmailAddressValidator.Definition
                }
                properties.placeholder = 'Your email address'
            }
            interests = Neos.Form.Builder:MultipleSelectCheckboxes.Definition {
                label = 'Interests'
                required = ${false}
                properties.options {
                    neos = 'Neos CMS'
                    flow = 'Neos Flow'
                    chicken = 'Chickens'
                }
            }
            comment = Neos.Form.Builder:MultiLineText.Definition {
                label = 'Message'
                properties.placeholder = 'Your Comment'
            }
        }
    }
    finishers {
        confirmationFinisher = Neos.Form.Builder:ConfirmationFinisher.Definition {
            options {
                message = 'Thank you for your comment, {name}!'
            }
        }
    }
}
要创建多页表单,可以使用 furtherPages 字段
prototype(Some.Package:ContactForm) < prototype(Neos.Form.Builder:Form) {
    // ...
    furtherPages {
        page2 = Neos.Form.Builder:FormPage.Definition {
            elements {
                elementOnPage2 = Neos.Form.Builder:SingleLineText.Definition {
                    label = 'Element on page 2'
                }
            }
        }
        preview = Neos.Form.Builder:PreviewPage.Definition
    }
}
现在,可以使用 Some.Package:ContactForm 原型,就像任何其他内容元素(或甚至文档)一样。
在这种情况下,结果是静态联系表单,因此与基于 YAML 的表单定义没有太大区别。但显然可以使用所有 Fusion 和 Eel 功能来创建动态表单。例如,表单字段可以预先填充已验证用户的数据
// ...
    someFormField = Neos.Form.Builder:SingleLineText.Definition {
        defaultValue = ${Security.account.accountIdentifier}
        // ...
为了根据当前 Fusion 上下文设置选项,必须显式将值添加到表单上下文中,以便在元素/完成器配置中可用
prototype(Some.ContactForm:Contact) < prototype(Neos.Form.Builder:Form) {

    // Redirect to the first child node of type "Some.Target:NodeType" upon form submission
    @context.redirectUri = Neos.Neos:NodeUri {
        node = ${q(documentNode).children('[instanceof Some.Target:NodeType]').get(0)}
    }

    // ...

    finishers {
        redirectFinisher = Neos.Form.Builder:RedirectFinisher.Definition {
            options {
                uri = ${redirectUri}
            }
        }
    }
}
缓存
默认情况下,所有 Neos.Form.Builder:Form 实现都未 缓存。这样做是为了避免假设其他情况时的讨厌的错误。
为了优化性能,可以将此行为更改为单个表单(部分)缓存。例如,上面的静态表单可以更改为以下内容
prototype(Some.Package:ContactForm) < prototype(Neos.Form.Builder:Form) {
    @cache {
        mode = 'dynamic'
        entryIdentifier {
            node = ${node}
        }
        entryTags {
            1 = ${Neos.Caching.nodeTag(node)}
        }
        entryDiscriminator = ${request.httpRequest.methodSafe ? 'static' : false}
        context {
            1 = 'node'
            2 = 'documentNode'
        }
    }
    // ...
设置完成后,表单的初始渲染将被缓存,并在提交表单(即不安全请求)时将模式更改为“未缓存”。
注意:动态缓存模式仅在 Neos 版本 2.3.15+ 和 3.1.5+ 中可靠地工作。
自定义表单元素
在 default 预设中定义的表单元素(并在本包中可用)旨在作为简单表单的快速入门。Flow 表单框架的主要优势在于其易于创建自定义表单元素、验证器和完成器(请参阅文档)。
要允许在表单构建器中使用自定义表单元素,必须定义相应的 NodeType。
'Some.Package:SomeFormElementNodeType':
  superTypes:
    'Neos.Form.Builder:FormElement': TRUE
  ui:
    label: 'Some label'
    # add the new item in the "Custom Form Elements" section. Other options are form.elements, form.select and form.container
    group: 'form.custom'
表单元素映射
对于表单元素节点,假设名为 <NodeType>.Definition 的相应 Fusion 模型定义了表单元素。(使用 .Definition 后缀是为了防止与渲染表单元素的模型发生命名冲突)。
上述节点类型的相应 Fusion 模型可能看起来像这样
prototype(Some.Package:SomeFormElementNodeType.Definition) < prototype(Neos.Form.Builder:FormElement.Definition) {
    formElementType = 'Some.Package:SomeFormElement'
}
或者,如果不需要自定义 Fusion 模型,可以通过在节点类型配置中指定 options.form.formElementType 设置来指定到表单元素类型的映射
'Some.Package:SomeFormElementNodeType':
  // ...

  options:
    form:
      formElementType: 'Some.Package:SomeFormElement'
如果设置了此选项,则将使用常规的 Neos.Form.Builder:FormElement.Definition Fusion 模型来评估该表单元素的定义。
无论如何,该表单元素必须存在于配置的表单预设中,才能正确渲染。
示例:自定义“标题”选择器
标题选择器是联系表单的常见需求。我们不是添加一个通用的选择元素并手动为每个实例添加选项,而是可以轻松创建一个自定义元素。
首先,需要一个新节点类型
NodeTypes.yaml:
'Some.Package:Title':
  superTypes:
    'Neos.Form.Builder:FormElement': TRUE
  ui:
    label: 'Title'
    group: 'form.custom'
相应的 Fusion 映射表单元素并指定可选择的选项
Title.fusion:
prototype(Some.Package:Title.Definition) < prototype(Neos.Form.Builder:FormElement.Definition) {
    # we map this to the existing SingleSelectDropdown Form Element
    formElementType = 'Neos.Form:SingleSelectDropdown'
    properties {
        options = Neos.Form.Builder:SelectOptionCollection {
            mrs = 'Mrs.'
            mr = 'Mr.'
            miss = 'Miss'
            ms = 'Ms.'
            dr = 'Dr.'
            prof = 'Prof.'
        }
    }
}
注意:在这种情况下,我们将新元素映射到 Neos.Form 包中的
SingleSelectDropdown表单元素。我们也可以使用SingleSelectRadioButtons,或者将其映射到自定义元素。或者像以下示例那样进行动态映射
示例:具有动态表单元素类型映射的自定义选择器
在这个例子中,我们创建了一个用于新闻通讯类别的选择器。它与前面的例子非常相似。但在这个例子中,我们希望给编辑器更多的控制权,并允许他们指定是否可以选择 多个 类别。因此,我们创建具有属性 multiple 的节点类型
NodeTypes.yaml:
'Some.Package:NewsletterCategories':
  superTypes:
    'Neos.Form.Builder:FormElement': TRUE
    'Neos.Form.Builder:DefaultValueMixin': FALSE
  ui:
    label: 'Newsletter Category Selector'
    group: 'form.select'
  properties:
    'multiple':
      type: boolean
      ui:
        label: 'Allow multiple'
        inspector:
          group: 'formElement'
并在 Fusion 模型中根据该属性映射表单元素
NewsletterCategories.fusion:
prototype(Some.Package:NewsletterCategories.Definition) < prototype(Neos.Form.Builder:FormElement.Definition) {
    # depending on the "multiple" property this will render checkboxes or radio buttons
    formElementType = ${this.properties.multiple ? 'Neos.Form:MultipleSelectCheckboxes' : 'Neos.Form:SingleSelectRadiobuttons'}
    properties {
        options = Neos.Form.Builder:SelectOptionCollection {
            events = 'Events'
            corporate = 'Corporate'
            marketing = 'Marketing'
        }
    }
}
动态选项
我们不是在融合原型中硬编码选项,而是可以使用 FlowQuery 从内容存储库检索它们。以下示例将使任何 NewsletterCategory 节点可选取
NewsletterCategories.fusion:
    // ...
    properties {
        options = Neos.Form.Builder:SelectOptionCollection {
            collection = ${q(site).children('[instanceof Some.Package:NewsletterCategory]')}
            # we use the node identifier as value, we could use "name" or "label" instead for example
            valuePropertyPath = 'identifier'
        }
    }


