markocupic / contao-bundle-creator-bundle
此扩展为Contao 4.*提供捆绑制作器。在您在Contao后端定义了一些参数后,该扩展将创建一个完全工作的后端模块或/和前端模块。
Requires
- php: ^8.1
- ext-json: *
- contao/core-bundle: ^4.13 || ^5.0
- markocupic/zip-bundle: ^1.1
Requires (Dev)
- contao/manager-plugin: ^2.12
- dev-master
- 1.8.5
- 1.8.4
- 1.8.3
- 1.8.2
- 1.8.1
- 1.7.2
- 1.7.1
- 1.7.0
- 1.6.0
- 1.5.6
- 1.5.5
- 1.5.4
- 1.5.3
- 1.5.2
- 1.5.1
- 1.5.0
- 1.4.22
- 1.4.21
- 1.4.20
- 1.4.19
- 1.4.18
- 1.4.17
- 1.4.16
- 1.4.15
- 1.4.14
- 1.4.13
- 1.4.12
- 1.4.11
- 1.4.10
- 1.4.9
- 1.4.8
- 1.4.7
- 1.4.6
- 1.4.5
- 1.4.4
- 1.4.3
- 1.4.2
- 1.4.1
- 1.4.0
- 1.3.10
- 1.3.9
- 1.3.8
- 1.3.7
- 1.3.6
- 1.3.5
- 1.3.4
- 1.3.3
- 1.3.2
- 1.3.1
- 1.3.0
- 1.2.30
- 1.2.29
- 1.2.28
- 1.2.27
- 1.2.26
- 1.2.25
- 1.2.24
- 1.2.23
- 1.2.22
- 1.2.21
- 1.2.20
- 1.2.19
- 1.2.18
- 1.2.17
- 1.2.16
- 1.2.15
- 1.2.14
- 1.2.13
- 1.2.12
- 1.2.11
- 1.2.10
- 1.2.9
- 1.2.8
- 1.2.7
- 1.2.6
- 1.2.5
- 1.2.4
- 1.2.3
- 1.2.2
- 1.2.1
- 1.2.0
- 1.1.0
- 1.0.40
- 1.0.39
- 1.0.38
- 1.0.37
- 1.0.36
- 1.0.35
- 1.0.34
- 1.0.33
- 1.0.32
- 1.0.31
- 1.0.29
- 1.0.28
- 1.0.27
- 1.0.26
- 1.0.25
- 1.0.24
- 1.0.23
- 1.0.22
- 1.0.21
- 1.0.20
- 1.0.19
- 1.0.18
- 1.0.17
- 1.0.16
- 1.0.15
- 1.0.14
- 1.0.13
- 1.0.12
- 1.0.11
- 1.0.10
- 1.0.9
- 1.0.8
- 1.0.7
- 1.0.6
- 1.0.5
- 1.0.4
- 1.0.3
- 1.0.2
- 1.0.1
- 1.0.0
This package is auto-updated.
Last update: 2024-09-18 13:19:57 UTC
README
Contao Bundle Creator (Boilerplate für eigene Erweiterungen)
该模块面向开发人员,输入一些参数后,会生成一个Contao 4 Bundle的基础框架(Boilerplate/Skeleton)。
可以...
- 生成前端模块。
- 生成后端模块。
- 生成内容元素。
- 生成自定义路由(例如:https://myhostname.ch/my_custom)。
- 生成自定义会话包。
- 生成一个带有自定义根密钥的基类,用于友好的配置。
所有必要的配置数据都将自动创建。
如果需要,也会在根composer.json中自动创建运行所需的设置。生成后,只需
- 在Contao Manager中启动更新循环,并使用安装工具更新数据库
- 或通过控制台执行
php composer update和php vendor/bin/contao-console contao:migrate命令
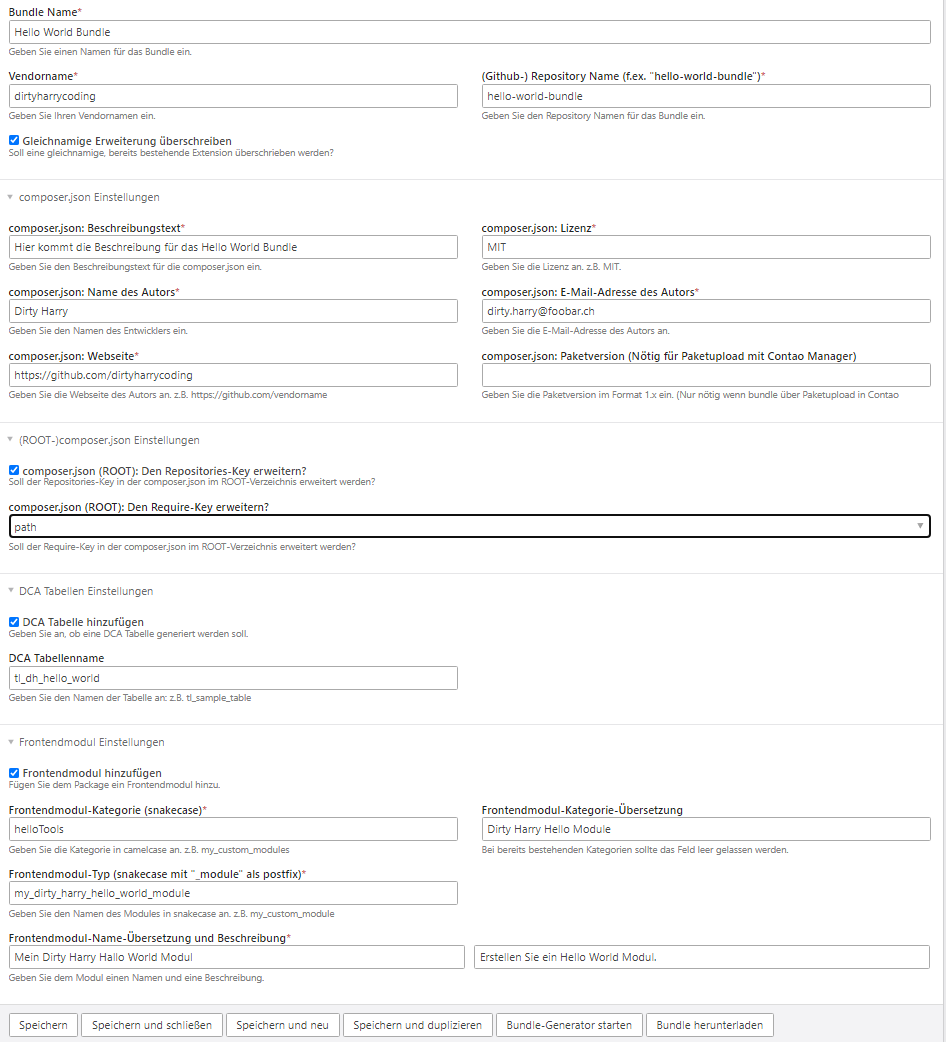
通过Contao后端配置Bundle
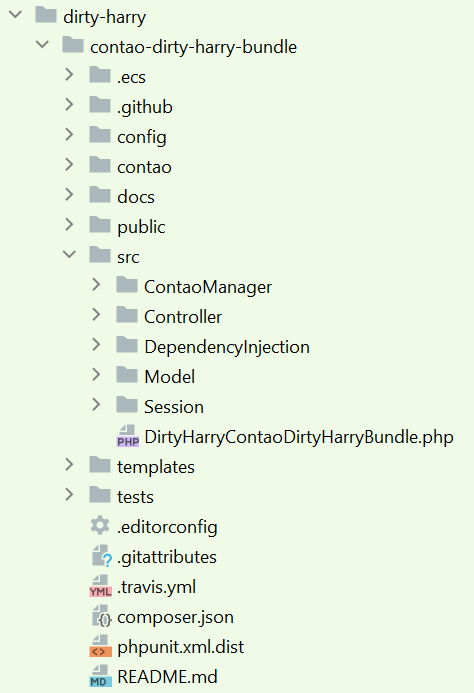
目录结构
在vendor目录中创建以下目录结构(不包括Resources目录)。
Bundle部署
在完成所有后端输入后,只需按按钮生成Bundle。扩展应已创建在“vendor”目录中,也可以作为ZIP文件下载。
变体A(即使没有自己的GitHub账户也可以使用)
在composer.json中添加以下两个条目
"repositories": [
    {
      "type": "path",
      "url": "/home/myhosting/public_html/dirtyharryproductions.com/vendor/dirtyharrycoding/hello-world-bundle"
    }
  ],
在composer.json中指定到vendor目录中Bundle的绝对路径。此步骤可以由扩展自动完成。
  "require": {
    ....
    ....
    "dirtyharrycoding/hello-world-bundle": "dev-main"
  },
在require部分注册新创建的Bundle。此步骤可以由扩展自动完成。
之后,通过Contao Manager执行完整更新并调用安装工具。完成!
变体B
将扩展上传到github.com,并在composer.json中添加以下两个条目。
"repositories": [
    {
      "type": "vcs",
      "url": "https://github.com/dirtyharrycoding/hello-world-bundle"
    }
  ],
在composer.json中指定到GitHub仓库的路径。
  "require": {
    ....
    ....
    "dirtyharrycoding/hello-world-bundle": "dev-main"
  },
在require部分注册新创建的Bundle。
之后,通过Contao Manager执行完整更新并调用安装工具。完成!
在变体B中,github.com可能会拒绝连接请求。创建一个Oauth-Access-Tokens可以解决这个问题。然后,需要在composer.json的根目录的config section中放置Access Token。 生成Github Oauth-Access-Token
   "config": {
     "github-oauth": {
       "github.com": "43dfdfxxxxxxxxxxxxxxxxxxx5645rtzrfhgfe9"
     }
   },
变体C
通过“下载Bundle”按钮在后台下载扩展,然后将其作为包导入到Contao Manager中。调用安装工具。完成!
变体D
将扩展通过GitHub上传到packagist.org,然后通过Contao Manager进行安装。调用安装工具。完成!
备注
- 如果设置在创建Bundle时脚本还调整root composer.json,则脚本将安全地备份composer.json到system/tmp。
- 在创建捆绑包时,除了在system/tmp目录下,还会额外放置一个包含生成的捆绑包的zip包。可以通过点击按钮来下载此包。
安全更新模板
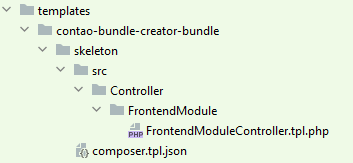
如果想要修改bundle-maker需要的默认模板来生成PHP类、配置文件等,可以在templates/contao-bundle-creator-bundle/skeleton目录下放置自己的模板。
使用easy-coding-standard进行代码修复
如果需要,可以将"contao/easy-coding-standard"作为依赖项安装。在安装过程中,配置文件将放置在"vendor/my-custom-bundle/tools/ecs"目录下。现在可以通过终端调用修复器。
在Windows上(使用反斜杠作为目录分隔符)
# /src fixer
php vendor\bin\ecs check vendor/markocupic/contao-bundle-creator-bundle/src --fix --config vendor/markocupic/contao-bundle-creator-bundle/tools/ecs/config.php

# /contao
php vendor\bin\ecs check vendor/markocupic/contao-bundle-creator-bundle/contao --fix --config vendor/markocupic/contao-bundle-creator-bundle/tools/ecs/config.php

# /config
php vendor\bin\ecs check vendor/markocupic/contao-bundle-creator-bundle/config --fix --config vendor/markocupic/contao-bundle-creator-bundle/tools/ecs/config.php

# /templates
php vendor\bin\ecs check vendor/markocupic/contao-bundle-creator-bundle/templates --fix --config vendor/markocupic/contao-bundle-creator-bundle/tools/ecs/config.php

# tests
php vendor\bin\ecs check vendor/markocupic/contao-bundle-creator-bundle/tests --fix --config vendor/markocupic/contao-bundle-creator-bundle/tools/ecs/config.php
扩展应用
在这个应用中,捆绑包文件通过所谓的"Maker"被添加到新创建的捆绑包中。通过EventSubscriber可以添加更多的Maker类。只需创建一个EventSubscriber类即可。
最后但同样重要的是
用户应该知道自己在做什么 ;-)
在最坏的情况下,会覆盖现有的扩展并损坏安装。


