macocci7 / php-histogram
它易于使用,可以创建直方图。
Requires
- php: >=8.1
- fakerphp/faker: ^1.23
- intervention/image: ^3.7
- macocci7/php-frequency-table: ^1.3
- macocci7/php-plotter2d: ^0.1
- nette/neon: ^3.4
Requires (Dev)
- php-parallel-lint/php-parallel-lint: ^1.4
- phpmd/phpmd: ^2.15
- phpstan/phpstan: ^1.11
- phpunit/phpunit: ^10.5
- squizlabs/php_codesniffer: ^3.7
README
1. 特性
PHP-Histogram 是一个易于使用的 PHP 库,用于创建直方图。
您只需设置 class range、data 和 filepath 以保存,就可以创建一个简单的直方图。

支持 Frequency Polygon、Cumulative Frequency Polygon、Cumulative Relative Frequency Polygon 和绘制 Frequency。

支持更改其他属性,例如 Caption、X Label、Y Label、各种 Color、Canvas Size、Frame Ratio 和各种 Width。

也支持透明背景。

2. 内容
3. 要求
- PHP 8.1 或更高版本
- Imagick PHP 扩展
- Composer
4. 安装
composer require macocci7/php-histogram
5. 使用
5.1. 基本使用
-
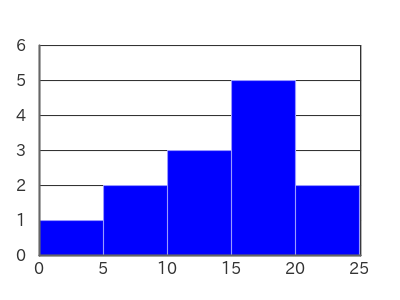
<?php

require_once __DIR__ . '/../vendor/autoload.php';

use Macocci7\PhpHistogram\Histogram;

$hg = new Histogram();
$hg->setClassRange(5)
->setData([ 0, 5, 8, 10, 12, 13, 15, 16, 17, 18, 19, 20, 24, ])
->create('img/HistogramBasicUsage.png');
-
结果
-
详细信息
- 导入自动加载器:
require_once __DIR__ . '/../vendor/autoload.php' - 声明:
use Macocci7\PhpHistogram\Histogram - 实例化:
new Histogram()或new Histogram($width, $height)$width:画布宽度,类型为int,必须为50 <= $width,默认为400px。$height:画布高度,类型为int,必须为50 <= $height,默认为300px。
- 设置类范围:
setClassRange($classRange)$classRange:类型为正int|float。
- 设置数据:
setData($data)$data:类型为array<int|string, int|float>。
- 创建:
create($path2Save)$path2Save:类型为string。
- 导入自动加载器:
5.2. 通过方法更改属性
您可以像以下这样更改直方图的属性。
-
PHP: examples/ChangePropsByMethods.php
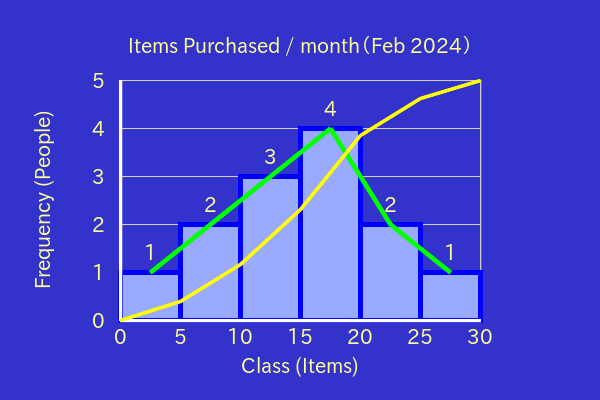
<?php

require_once __DIR__ . '/../vendor/autoload.php';

use Macocci7\PhpHistogram\Histogram;

// Initialization
$hg = new Histogram();
$hg->setClassRange(5)
    ->setData([1, 5, 6, 10, 12, 14, 15, 16, 17, 18, 20, 24, 25])

    // Changing Props By Methods

    // Canvas Size: ($width, $height) / Deafult: (400, 300)
    // 50 <= $width / 50 <= $height
    ->resize(600, 400)

    ->plotarea( // this takes precedence over 'frame()'
        offset: [120, 80],   // [x, y] in pix, default=[]
        width: 360, // width in pix, default=0
        height: 240, // height in pix, default=0
        backgroundColor: null, // null as transparent, default=null
    )

    // Ratio of the size of the plot area to the Canvas Size
    // frame($width, $height) / Default: (0.8, 0.7)
    // 0 < $width <= 1.0 / 0 < $height <= 1.0
    ->frame(0.6, 0.6)

    // Canvas Background Color
    // only #rgb and #rrggbb formats are supported.
    ->bgcolor('#3333cc')

    // Axis: width in pix and color
    ->axis(3, '#ffffff')

    // Grid: width in pix and color
    ->grid(1, '#cccccc')

    // Color of bars
    ->color('#99aaff')

    // Border of bars: width in pix and color
    ->border(4, '#0000ff')

    // Frequency Polygon: width in pix and color
    ->fp(4, '#00ff00')

    // Cumulative Relative Frequency Polygon
    ->crfp(3, '#ffff00')

    // Font Path
    // Note: Set the real path to the true type font (*.ttf)
    //       on your system.
    ->fontPath('/usr/share/fonts/opentype/ipafont-gothic/ipagp.ttf')

    // Font Size in pix
    ->fontSize(20)

    // Font Color
    ->fontColor('#ffff99')

    // Visibility of Histogram bars. barOff() is also available
    ->barOn()

    // Visibility of frequency polygon. fpOff() is also available
    ->fpOn()

    // Visibility of cumulative frequency polygon. crfpOff() is also available
    ->crfpOn()

    // Visibility of frequency. frequencyOff() is also available
    ->frequencyOn()

    // X Label
    ->labelX('Class (Items)')

    // Y Label
    ->labelY('Frequency (People)')

    // Caption
    ->caption('Items Purchased / month(Feb 2024)')

    // Save
    ->create('img/ChangePropsByMethods.png');
-
结果: examples/img/ChangePropsByMethods.png
5.3. 通过 Neon 文件更改属性
您可以像以下这样更改直方图的属性。
首先,创建一个 Neon 文件。
-
Neon 文件: examples/ChangePropsByNeon.neon
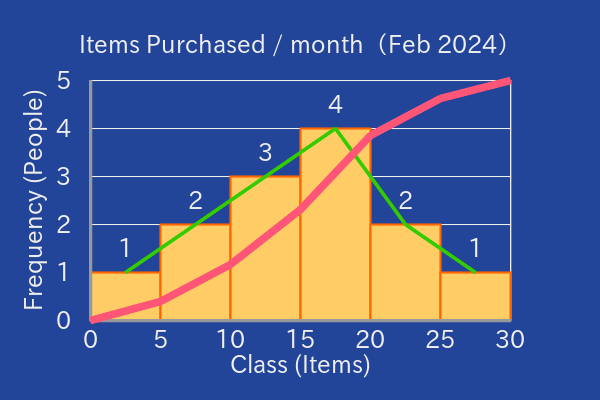
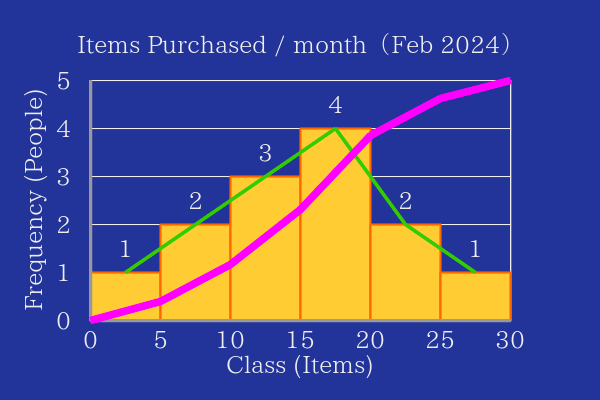
canvasWidth: 600
canvasHeight: 400
canvasBackgroundColor: '#223399'
plotarea:
    backgroundColor:    # `null` as transparent
frameXRatio: 0.7
frameYRatio: 0.6
axisColor: '#999'
axisWidth: 3
gridColor: '#eee'
gridWidth: 1
gridHeightPitch: 1
barBackgroundColor: '#ffcc33'
barBorderColor: '#ff6600'
barBorderWidth: 2
frequencyPolygonColor: '#33cc00'
frequencyPolygonWidth: 3
cumulativeRelativeFrequencyPolygonColor: '#ff00ff'
cumulativeRelativeFrequencyPolygonWidth: 7
fontPath: 'fonts/ipaexm.ttf'
fontSize: 24
fontColor: '#eeeeee'
showBar: true
showFrequencyPolygon: true
showCumulativeRelativeFrequencyPolygon: true
showFrequency: true
labelX: 'Class (Items)'
labelXOffsetX: 0
labelXOffsetY: 0
labelY: 'Frequency (People)'
labelYOffsetX: 0
labelYOffsetY: 0
caption: 'Items Purchased / month(Feb 2024)'
captionOffsetX: 0
captionOffsetY: 0
其次,按照以下方式编写 PHP 代码。
-
PHP: examples/ChangePropsByNeon.php
<?php

require_once __DIR__ . '/../vendor/autoload.php';

use Macocci7\PhpHistogram\Histogram;

$hg = new Histogram();
$hg->setClassRange(5)
   ->setData([1, 5, 6, 10, 12, 14, 15, 16, 17, 18, 20, 24, 25])
   ->config('ChangePropsByNeon.neon')
   ->create('img/ChangePropsByNeon.png');
然后,运行 PHP 代码并查看结果。

5.4. 通过数组更改属性
您可以像以下这样更改直方图的属性。
-
PHP
<?php

require_once __DIR__ . '/../vendor/autoload.php';

use Macocci7\PhpHistogram\Histogram;

$props = [
    'canvasWidth' => 600,
    'canvasHeight' => 400,
    'canvasBackgroundColor' => '#224499',
    'plotarea' => [
        'offset' => [90, 80],
        'width' => 420, // 'width' takes precedence over 'frameXRatio'
        'height' => 240, // 'height' takes precedence over 'frameYRatio'
        'backgroundColor' => null,
    ],
    'frameXRatio' => 0.8,
    'frameYRatio' => 0.7,
    'axisColor' => '#999',
    'axisWidth' => 3,
    'gridColor' => '#eee',
    'gridWidth' => 1,
    'gridHeightPitch' => 1,
    'barBackgroundColor' => '#ffcc66',
    'barBorderColor' => '#ff6600',
    'barBorderWidth' => 2,
    'frequencyPolygonColor' => '#33cc00',
    'frequencyPolygonWidth' => 3,
    'cumulativeRelativeFrequencyPolygonColor' => '#ff5577',
    'cumulativeRelativeFrequencyPolygonWidth' => 7,
    'fontPath' => 'fonts/ipaexg.ttf',
    'fontSize' => 24,
    'fontColor' => '#eeeeee',
    'showBar' => true,
    'showFrequencyPolygon' => true,
    'showCumulativeRelativeFrequencyPolygon' => true,
    'showFrequency' => true,
    'labelX' => 'Class (Items)',
    'labelXOffsetX' => 0,
    'labelXOffsetY' => 0,
    'labelY' => 'Frequency (People)',
    'labelYOffsetX' => 0,
    'labelYOffsetY' => 0,
    'caption' => 'Items Purchased / month(Feb 2024)',
    'captionOffsetX' => 0,
    'captionOffsetY' => 0,
];

$hg = new Histogram();
$hg->setClassRange(5)
   ->setData([1, 5, 6, 10, 12, 14, 15, 16, 17, 18, 20, 24, 25])
   ->config($props)
   ->create('img/ChangePropsByArray.png');
-
结果: examples/img/ChangePropsByArray.png

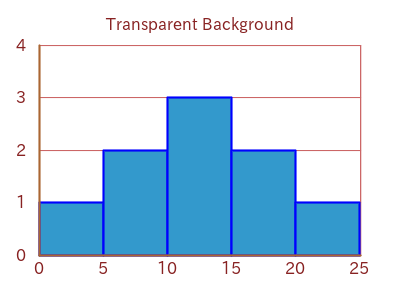
5.5. 透明背景
支持将颜色设置为透明。
例如,
-
PHP: examples/TransparentBackground.php
<?php

require_once __DIR__ . '/../vendor/autoload.php';

use Macocci7\PhpHistogram\Histogram;

$hg = new Histogram();
$hg->config([
        'canvasBackgroundColor' => null,
        'barBackgroundColor' => '#ccccff',
        'barBorderColor' => '#0000ff',
        'barBorderWidth' => 2,
        'gridColor' => '#cc6666',
        'gridWidth' => 1,
        'axisColor' => '#aa6633',
        'fontColor' => '#882222',
        'caption' => 'Transparent Background',
   ])
   ->setClassRange(5)
   ->setData([ 1, 5, 8, 10, 11, 14, 16, 19, 20, ])
   ->create('img/TransparentBackground.png');
-
结果: examples/img/TransparentBackground.png
使用 HTML 检查图像是否具有透明背景
6. 示例
-
BasicUsage.php >> 结果为
-
ChangePropsByMethods.php >> 结果为
-
ChangePropsByNeon.php >> 结果为
-
ChangePropsByArray.php >> 结果为
-
TransparentBackground.php >> 结果为
-
OhtaniShoheiHistogram2023.php >> 结果为 OhtaniShoheiHistogram2023.md
-
PopulationInJapanHistogram2022.php >> 结果为 PopulationInJapanHistogram2022.md
7. 许可证
文档创建日期:2023/05/28
文档更新日期:2024/07/05
版权所有 2023-2024 macocci7