loffel / laravel-rabbitmq
Laravel 的简单 RabbitMQ 集成
Requires
- php: 7.*|8.*
- php-amqplib/php-amqplib: >=2.7|3.*
Requires (Dev)
- phpmd/phpmd: @stable
- phpunit/phpunit: 9.*
- squizlabs/php_codesniffer: 2.*
This package is auto-updated.
Last update: 2024-09-11 12:04:36 UTC
README
Laravel RabbitMQ
一个基于发布-订阅模式的简单 RabbitMQ 库,其中订阅者是消费者。
目录
1. 安装
运行
composer require needle-project/laravel-rabbitmq
对于 5.5 或更高版本的 Laravel,库应该通过 包发现 自动加载。
对于低于 5.5 版本的 Laravel,您需要将服务提供者添加到 app.php
<?php

return [
    // ...
    'providers' => [
        // ...
        NeedleProject\LaravelRabbitMq\Providers\ServiceProvider::class,
    ],
    // ...
];
2. 配置
- 在您的 Laravel 配置目录内创建一个名为
laravel_rabbitmq.php的新文件。(或者使用artisan vendor:publish- 更多信息 在这里) - 根据您的需求填写配置。
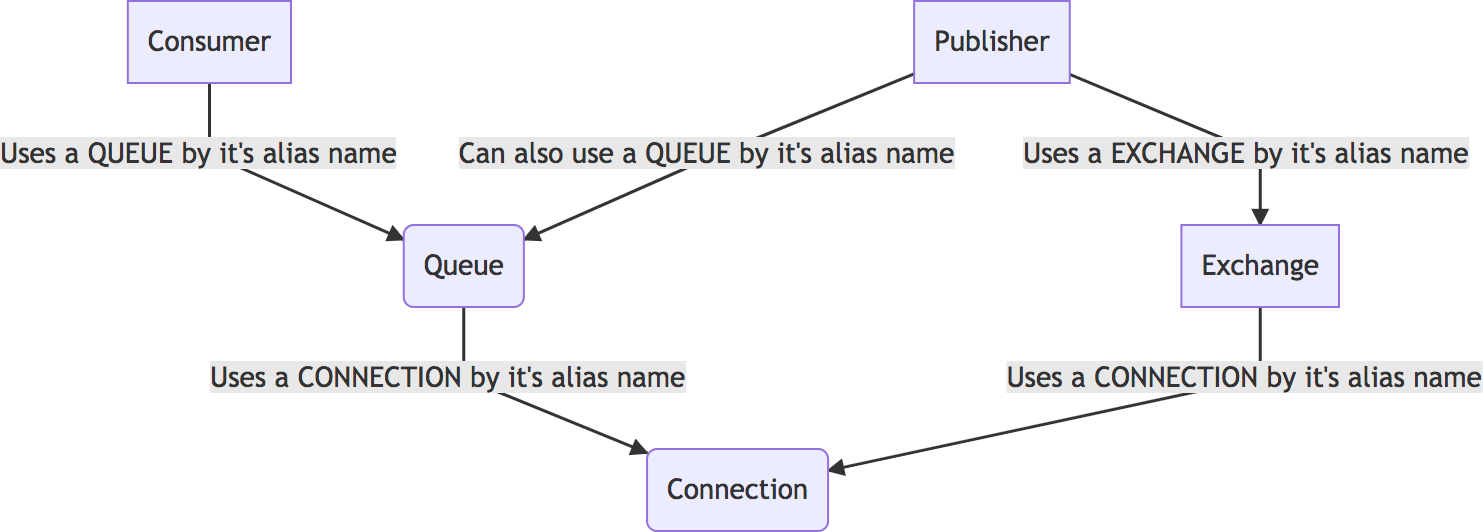
配置文件包含 5 个主要节点:连接、交换机、队列、发布者、消费者。
示例配置
return [
    'connections' => [
        'connectionA' => [/** Connection A attributes */],
        'connectionB' => [/** Connection B attributes */],
    ],
    'exchanges' => [
        'exchangeA' => [
            // Tells that the exchange will use the connection A
            'connection' => 'connectionA',
            /** Exchange A Attributes */
        ],
        'exchangeB' => [
            // Tells that the exchange will use the connection B
            'connection' => 'connectionB',
            /** Exchange B Attributes */
        ]
    ],
    'queues' => [
        'queueA' => [
            // Tells that the queue will use the connection alias A
            'connection' => 'connectionA',
            /** Queue A Attributes */
        ]
    ],
    'publishers' => [
        'aPublisherName' => /** will publish to exchange defined by alias */ 'exchangeA'
    ],
    'consumers' => [
        'aConsumerName' => [
            // will read messages from
            'queue' => 'queueA',
            // and will send the for processing to an "NeedleProject\LaravelRabbitMq\Processor\MessageProcessorInterface"
            'message_processor' => \NeedleProject\LaravelRabbitMq\Processor\CliOutputProcessor::class
        ]
    ]
]
2.1. 连接
连接属性
- 所有属性都是可选的,如果未定义,则使用默认值。
2.2. 队列
队列主要节点
队列属性
示例 1
[
	['exchange' => 'first.exchange', 'routing_key' => '*'],
	['exchange' => 'second.exchange', 'routing_key' => 'foo_bar'],
]
2.3. 交换机
交换机主要节点
交换机属性
示例 2
[
	['queue' => 'first.exchange', 'routing_key' => '*'],
	['queue' => 'second.exchange', 'routing_key' => 'foo_bar'],
]
2.4. 发布者
发布者将消息推送到一个 交换机(但它也可以将其推送到一个队列)。定义发布者
'publishers' => [
	'myFirstPublisher' => 'echangeAliasName',
	'mySecondPublisher' => 'queueAliasName'
	// and many as you need
]
2.5. 消费者
消费者将从队列中获取消息。定义消费者
'consumers' => [
    'myConsumerName' => [
        'queue' => 'queueAliasName',
        'prefetch_count' => 1,
        'message_processor' => \NeedleProject\LaravelRabbitMq\Processor\CliOutputProcessor::class
    ]
]
3. 用法
配置完成后,您应该有一个类似于以下的配置文件 laravel_rabbitmq.php
return [
    'connections' => [
        'connectionA' => [],
    ],
    'exchanges' => [
        'exchangeA' => [
            'connection' => 'connectionA',
			'name' => 'foo_bar',
			'attributes' => [
				'exchange_type' => 'topic'
			]
        ]
	],
    'queues' => [
        'queueB' => [
            'connection' => 'connectionA',
            'name' => 'foo_bar_listener',
			'attributes' => [
				'bind' => [
                    ['exchange' => 'foo_bar', 'routing_key' => '*']
                ]
			]
        ]
    ],
    'publishers' => [
        'aPublisherName' => 'exchangeA'
    ],
    'consumers' => [
        'aConsumerName' => [
            'queue' => 'queueB',
            'message_processor' => \NeedleProject\LaravelRabbitMq\Processor\CliOutputProcessor::class
        ]
    ]
]
3.1. 发布消息
代码中的使用示例
<?php
/**
 * @var $app \Illuminate\Contracts\Container\Container
 * @var $publisher \NeedleProject\LaravelRabbitMq\PublisherInterface
 */
$publisher = $app->makeWith(PublisherInterface::class, ['aPublisherName']);
$message = [
    'title' => 'Hello world',
    'body' => 'Lorem ipsum dolor sit amet, consectetur adipiscing elit, sed do eiusmod tempor incididunt ut labore et dolore magna aliqua.',
];
$routingKey = '*';
$publisher->publish(json_encode($message), /* optional */$routingKey);
可选,有一个命令可以用来发布消息。
php artisan rabbitmq:publish aPublisherName MyMessage
注意:目前,CLI 中的路由键不受支持。
3.2. 消费消息
应该通过在守护进程模式下运行命令来消费消息。虽然 PHP 不适合这样做,但您可以使用 supervisor 来实现。
消费者的 流程 比较简单:CLI 消费者 -> 获取消息 -> 将其传递给配置中的 message_processor 键。
消息处理器是一个实现了 NeedleProject\LaravelRabbitMq\Processor 接口的类。如果您不想处理确认,可以扩展 \NeedleProject\LaravelRabbitMq\Processor\AbstractMessageProcessor,该类需要实现 processMessage(AMQPMessage $message): bool 方法。
message_processor 键由 Laravel 的 app 命令运行以构建类。
启动消息消费者/监听器
php artisan rabbitmq:consume aConsumerName
运行有数量限制的消费者(当达到其中一个限制时将停止)
php artisan rabbitmq:consume aConsumerName --time=60 --messages=100 --memory=64
这告诉消费者如果在运行 1 分钟后、处理 100 条消息或内存使用达到 64MB 时停止。
3.3. 可用命令
当运行 php artisan 时,会出现一个新的命名空间
3.4. 自定义消息处理器
目前,您可以选择实现 MessageProcessorInterface 类或扩展 AbstractMessageProcessor。
当使用 AbstractMessageProcessor 时,您将可以访问额外的 API,这些 API 可以用于您的 processMessage() 方法。
protected function ack(AMQPMessage $message);
protected function nack(AMQPMessage $message, bool $redeliver = true);
4. 贡献
您可以通过提交拉取请求或报告任何问题在 Github 上进行贡献。在项目的当前阶段,尚未定义贡献流程。

