lingaro / magento2-module-style-guide
Magento 2 风格指南模块
Requires
- php: ^7.4 || ^8.1
- magento/framework: 103.0.*
- magento/module-theme: 101.1.*
- magento/module-ui: 101.2.*
This package is auto-updated.
Last update: 2024-09-07 10:00:47 UTC
README
由 Lingaro 提供
1. 简介
本模块旨在帮助 Magento 2 开发者构建一致的主题。
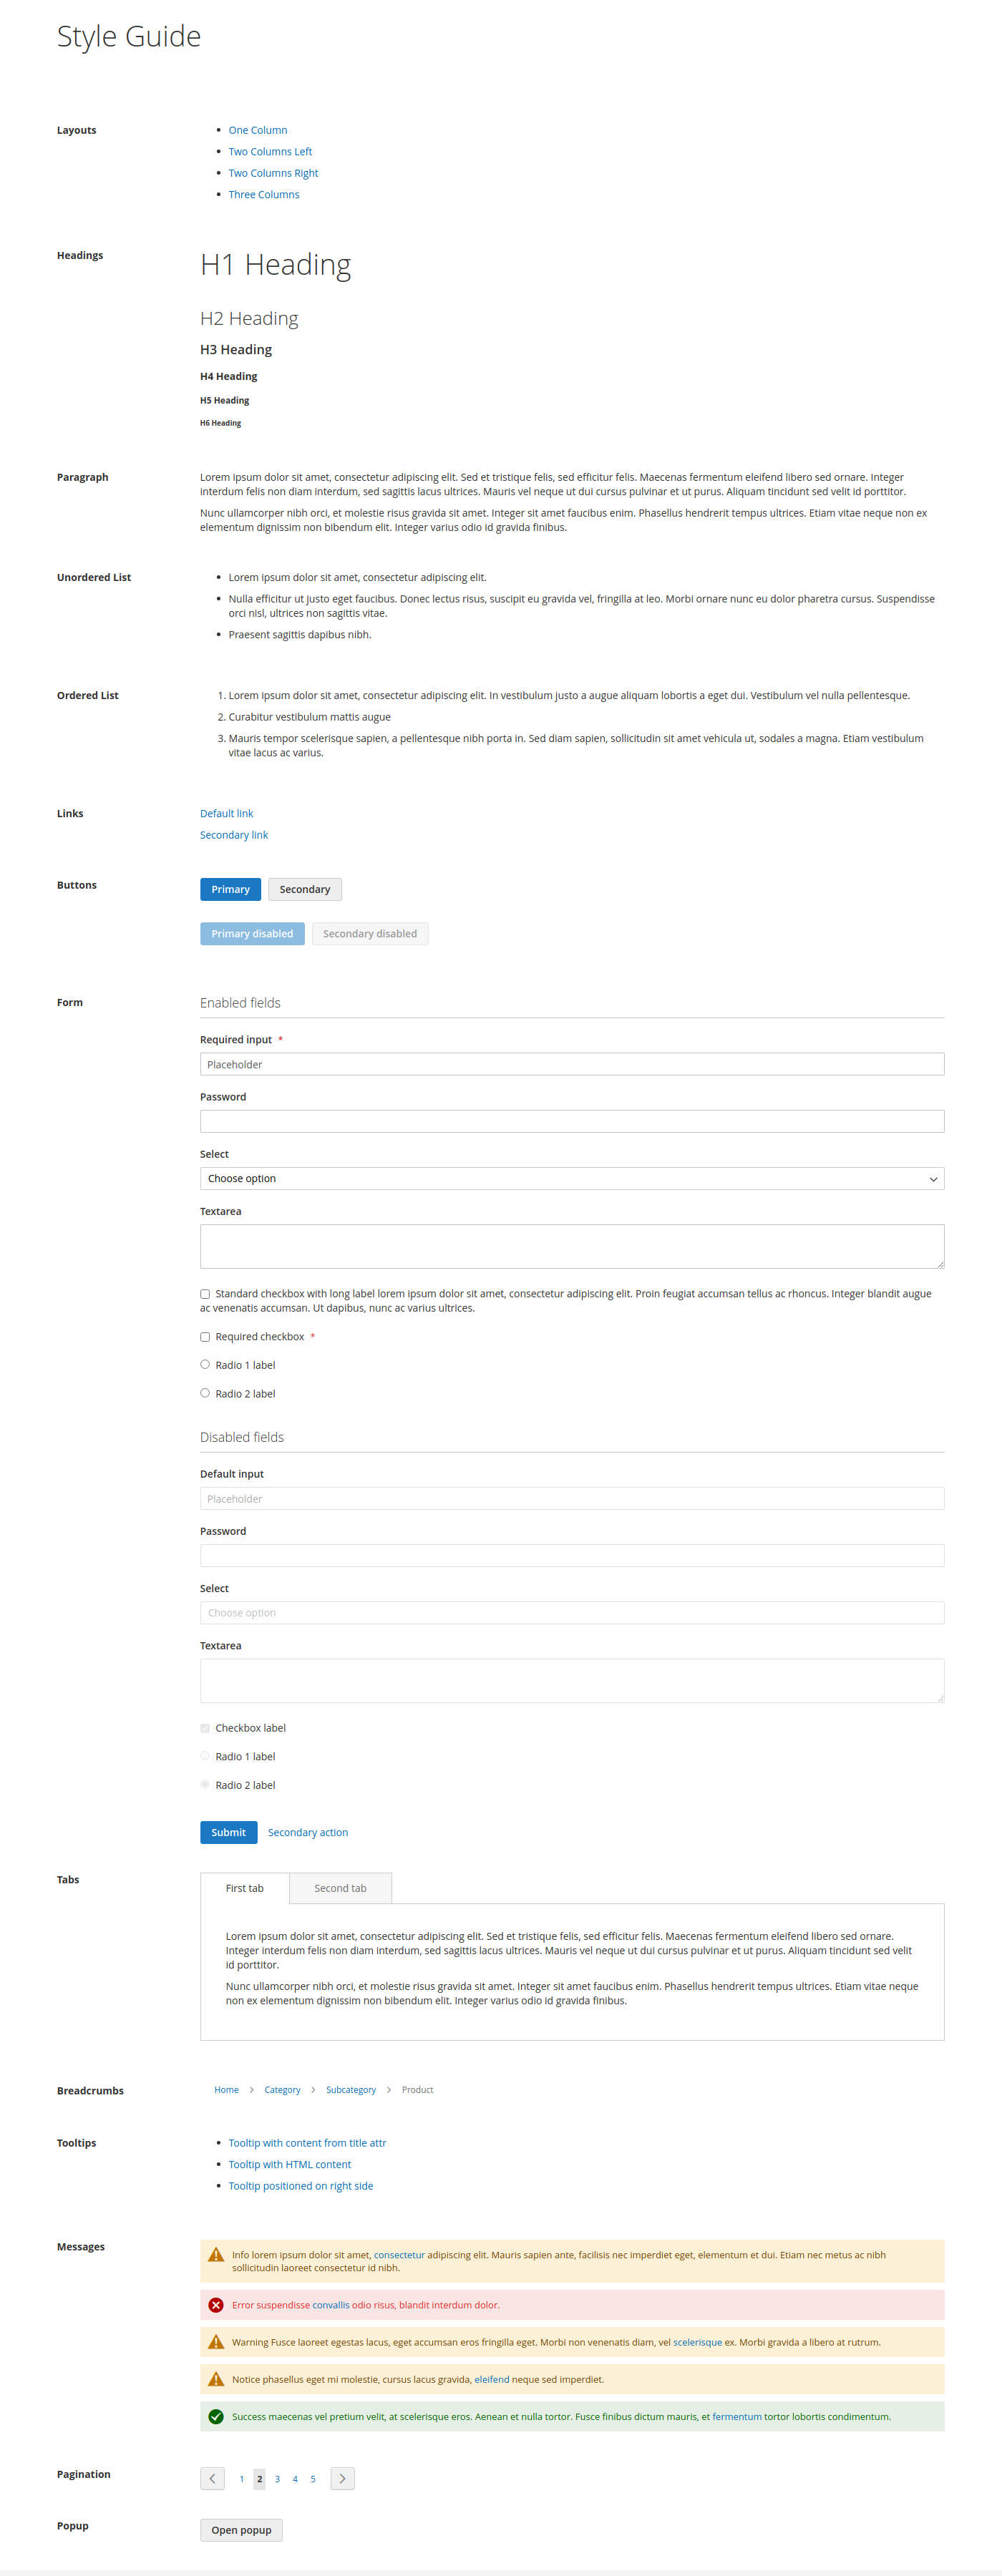
它添加了以下页面到商店: /style_guide。风格指南列出了通用块、小部件和 HTML 元素。首先,这些元素将被风格化,然后在其基础上构建特定的主题页面。风格指南也是为特定主题设计任何自定义元素的地方,例如精美的滑块、手风琴等。由于依赖注入和主题继承系统,风格指南中的每个项目都很容易自定义。很容易从风格指南中添加或删除项目。
该库是开源的。请随时贡献!
2. 安装
安装此包的推荐方法是使用 Composer。
composer require lingaro/magento2-module-style-guide
3. 风格指南部分概述
风格指南的主要组件是部分。每个部分都有一个标签和一个 PHTML 模板。如果需要,部分可以有一个视图模型。部分可以被标记为已删除,以便不在风格指南页面上显示。
默认部分在 etc/frontend/di.xml 文件中定义为 Lingaro\StyleGuide\ViewModel\SectionBlocksProvider 类型的参数。
3.1. 布局
本节提供了到示例页面的链接,每个页面都设置了不同的页面布局:1列、2列-左侧、2列-右侧、3列。使用它们来风格化诸如:断点、列宽、边距和填充、侧边栏块标题等。
3.2. 颜色
本节提供了一组主题颜色及其视觉化的列表。其目的是在一个地方向开发者展示主要的主题调色板。
3.3. 标题
本节提供了 HTML 标题元素(h1、h2、h3、h4、h5、h6)。如果主题设计需要在不同页面上使用不同样式的同一级别标题,请不要犹豫添加自定义标题。
3.4. 段落
本节提供了 HTML 段落元素(p)。如果它们是为全局使用而设计的,请不要犹豫添加自定义段落。
3.5. 无序列表
本节提供了 HTML 无序列表元素(ul、li)。如果它们是为全局使用而设计的,请不要犹豫添加自定义无序列表。
3.5. 有序列表
本节提供了 HTML 有序列表元素(ol、li)。如果它们是为全局使用而设计的,请不要犹豫添加自定义有序列表。
3.6. 链接
本节提供了 HTML 链接(a)。如果它们是为全局使用而设计的,请不要犹豫添加自定义链接。
请记得为悬停、活动、焦点和已访问状态进行样式化!
3.7. 按钮
本节提供了 HTML 按钮(button)。如果它们是为全局使用而设计的,请不要犹豫添加自定义按钮。
请记得为悬停、活动、焦点和已访问状态进行样式化!
3.8. 表单
本节提供了 HTML 表单元素(form、fieldset、legend、label、文本输入、密码输入、textarea、select、单选按钮、复选框、提交按钮)。表单添加了基本验证。每个表单输入元素都有禁用版本。如果它们是为全局使用而设计的(例如,不同尺寸的输入),请不要犹豫添加自定义表单元素。
记得为验证错误信息和输入框的悬停、激活、聚焦和错误状态设置样式!
3.9. 选项卡
本节提供原生的Magento选项卡小部件。如果你的主题不打算使用此小部件,请不要犹豫将其删除,或将其更改为自定义版本。
3.10. 选项卡
本节提供原生的Magento面包屑块。
3.11. 工具提示
本节提供原生Magento工具提示的示例。如果你的主题不打算使用工具提示,请不要犹豫将其删除,或更改为自定义实现/示例。
3.12. 消息
本节提供原生Magento闪存消息。
注意:某些Magento模块在其模板文件中使用不同的消息HTML结构。为了保持一致性,在这种情况下,你应该覆盖这些模板并使用标准的HTML结构。
3.13. 分页
本节提供原生的Magento分页器。如果你的主题不打算使用分页器,请不要犹豫将其删除。
3.14. 弹出窗口
本节提供原生的Magento弹出窗口。如果它们是为全局使用而设计的,请不要犹豫添加自定义弹出窗口。
3.15. 颜色
本节提供主题图标及其视觉化的列表。其目的是向开发者展示一个地方的主要主题图标调色板。
4. 定制化
风格指南模块允许为您的主题创建高度可定制的风格指南。在本章中介绍了定制技术。
4.1. 先决条件
需要自定义模块来创建自定义风格指南。您可以将其命名为任何您想要的名字,但惯例是使用您项目供应商的名称后跟"StyleGuide",例如:"ProjectVendor_StyleGuide"。
风格指南模块在很大程度上依赖于Magento的DI系统。对于定制化,您需要创建etc/frontend/di.xml文件。下面您可以找到模板。
<?xml version="1.0"?>
<config xmlns:xsi="http://www.w3.org/2001/XMLSchema-instance" xsi:noNamespaceSchemaLocation="urn:magento:framework:ObjectManager/etc/config.xsd">
    <virtualType name="ProjectVendor\StyleGuide\ViewModel\SectionBlocksProvider\YourThemeName"
                 type="Lingaro\StyleGuide\ViewModel\SectionBlocksProvider">
        <arguments>
            <argument name="sections" xsi:type="array">
            </argument>
        </arguments>
    </virtualType>
</config>
Lingaro\StyleGuide\ViewModel\SectionBlocksProvider是风格指南页面的主要视图模型。所有定制化都将注入其中。
在类之上定义ProjectVendor\StyleGuide\ViewModel\SectionBlocksProvider\YourThemeName虚拟类型的原因是,通过这种方式,您可以针对项目中使用的每个主题定义不同的风格指南。
要将自定义视图模型应用于特定主题,您需要在您的主题文件夹中创建以下布局XML文件:Lingaro_StyleGuide/layout/lingaro_style_guide_index_index.xml。下面您可以找到示例
<?xml version="1.0" encoding="UTF-8"?>
<page xmlns:xsi="http://www.w3.org/2001/XMLSchema-instance" layout="1column" xsi:noNamespaceSchemaLocation="urn:magento:framework:View/Layout/etc/page_configuration.xsd">
    <body>
        <referenceBlock name="lingaro.style_guide">
            <arguments>
                <argument name="view_model" xsi:type="object">ProjectVendor\StyleGuide\ViewModel\SectionBlocksProvider\YourThemeName</argument>
            </arguments>
        </referenceBlock>
    </body>
</page>
默认风格指南配置可以在风格指南模块的etc/frontend/di.xml文件中找到。
4.2. 添加新部分
要将新部分添加到您的主题风格指南中,您需要在etc/frontend/di.xml文件中定义它,并将其注入到您的自定义部分视图模型中。下面您可以找到示例
<?xml version="1.0"?>
<config xmlns:xsi="http://www.w3.org/2001/XMLSchema-instance" xsi:noNamespaceSchemaLocation="urn:magento:framework:ObjectManager/etc/config.xsd">
    <virtualType name="ProjectVendor\StyleGuide\Model\Section\YourSection" type="Lingaro\StyleGuide\Model\Section">
        <arguments>
            <argument name="title" xsi:type="string" translatable="true">Your section name</argument>
            <argument name="template" xsi:type="string">ProjectVendor_StyleGuide::section/your_section.phtml</argument>
            <!-- View model is optional. Add it only if you need to collect some data in section's template -->
            <argument name="viewModel" xsi:type="object">ProjectVendor\StyleGuide\ViewModel\YourSection</argument>
        </arguments>
    </virtualType>
    <virtualType name="ProjectVendor\StyleGuide\ViewModel\SectionBlocksProvider\YourThemeName"
                 type="Lingaro\StyleGuide\ViewModel\SectionBlocksProvider">
        <arguments>
            <argument name="sections" xsi:type="array">
                <item name="your_section_code" xsi:type="object" sortOrder="100">ProjectVendor\StyleGuide\Model\Section\YourSection</item>
            </argument>
        </arguments>
    </virtualType>
</config>
注意"sections"数组的"sortOrder"属性。多亏了它,您可以将您的自定义部分定位到已经创建的部分中。
完成上述操作后,您需要创建DI XML文件中定义的部分的PHTML模板文件。在我们的示例中,它应该位于view/frontend/teplates/section/your_section.phtml的ProjectVendor_StyleGuide模块中。下面您可以找到模板。
<?php

declare(strict_types=1);

/** @var \Lingaro\StyleGuide\Block\Section $block */
/** @var \Magento\Framework\Escaper $escaper */
?>
<!-- Your code here -->
如果您为部分定义了视图模型,当然您需要在您的模块中创建它。下面您可以找到模板。
<?php

declare(strict_types=1);

namespace ProjectVendor\StyleGuide\ViewModel;

use Magento\Framework\View\Element\Block\ArgumentInterface;

class YourSection implements ArgumentInterface
{
    // Your code here
}
清除以下缓存以查看您的更改:config,full_page。
4.3. 删除部分
要从您的主题风格指南中删除部分,您需要在您的etc/frontend/di.xml文件中覆盖它,并将更改注入到您的自定义部分视图模型中。下面您可以找到示例
<?xml version="1.0"?>
<config xmlns:xsi="http://www.w3.org/2001/XMLSchema-instance" xsi:noNamespaceSchemaLocation="urn:magento:framework:ObjectManager/etc/config.xsd">
    <virtualType name="ProjectVendor\StyleGuide\Model\Section\Tooltips" type="Lingaro\StyleGuide\Model\Section\Tooltips">
        <arguments>
            <argument name="isRemoved" xsi:type="boolean">true</argument>
        </arguments>
    </virtualType>
    <virtualType name="ProjectVendor\StyleGuide\ViewModel\SectionBlocksProvider\YourThemeName"
                 type="Lingaro\StyleGuide\ViewModel\SectionBlocksProvider">
        <arguments>
            <argument name="sections" xsi:type="array">
                <item name="tooltips" xsi:type="object">ProjectVendor\StyleGuide\Model\Section\Tooltips</item>
            </argument>
        </arguments>
    </virtualType>
</config>
清除以下缓存以查看您的更改:config,full_page。
4.4. 覆盖现有部分
要覆盖现有部分,您只需在您的主题中覆盖其模板即可。
清除以下缓存以查看您的更改:full_page。
4.5. 修改现有章节的位置
要修改主题风格指南中现有章节的位置,您需要修改etc/frontend/di.xml文件中章节的'sortOrder'属性。以下是一个示例:
<?xml version="1.0"?>
<config xmlns:xsi="http://www.w3.org/2001/XMLSchema-instance" xsi:noNamespaceSchemaLocation="urn:magento:framework:ObjectManager/etc/config.xsd">
    <virtualType name="ProjectVendor\StyleGuide\ViewModel\SectionBlocksProvider\YourThemeName"
                 type="Lingaro\StyleGuide\ViewModel\SectionBlocksProvider">
        <arguments>
            <argument name="sections" xsi:type="array">
                <item name="tooltips" xsi:type="object" sortOrder="123">Lingaro\StyleGuide\Model\Section\Tooltips</item>
            </argument>
        </arguments>
    </virtualType>
</config>
清除以下缓存以查看您的更改:config,full_page。
4.6. 向调色板添加颜色
要向主题风格指南的调色板中添加颜色,您需要在etc/frontend/di.xml文件中创建自定义颜色提供者,向其中添加自定义颜色项,并将提供者注入到您的自定义主题视图中。以下是一个示例。
<?xml version="1.0"?>
<config xmlns:xsi="http://www.w3.org/2001/XMLSchema-instance" xsi:noNamespaceSchemaLocation="urn:magento:framework:ObjectManager/etc/config.xsd">
    <!-- Colors -->
    <virtualType name="ProjectVendor\StyleGuide\Model\Color\YourThemeName\ColorName" type="Lingaro\StyleGuide\Model\Color">
        <arguments>
            <argument name="code" xsi:type="string">color_code</argument>
            <argument name="label" xsi:type="string" translatable="true">label for visualization</argument>
            <argument name="cssColor" xsi:type="string">#000000</argument>
        </arguments>
    </virtualType>
    <virtualType name="ProjectVendor\StyleGuide\ViewModel\ColorsProvider\YourThemeName"
                 type="Lingaro\StyleGuide\ViewModel\ColorsProvider">
        <arguments>
            <argument name="colors" xsi:type="array">
                <item name="color_code" xsi:type="object">ProjectVendor\StyleGuide\Model\Color\YourThemeName\ColorName</item>
            </argument>
        </arguments>
    </virtualType>
    <virtualType name="ProjectVendor\StyleGuide\Model\Section\Colors\YourThemeName"
                 type="Lingaro\StyleGuide\Model\Section\Colors">
        <arguments>
            <argument name="viewModel" xsi:type="object">ProjectVendor\StyleGuide\ViewModel\ColorsProvider\YourThemeName</argument>
        </arguments>
    </virtualType>
    <!-- / Colors -->
    <virtualType name="ProjectVendor\StyleGuide\ViewModel\SectionBlocksProvider\YourThemeName"
                 type="Lingaro\StyleGuide\ViewModel\SectionBlocksProvider">
        <arguments>
            <argument name="sections" xsi:type="array">
                <item name="colors" xsi:type="object">ProjectVendor\StyleGuide\Model\Section\Colors\YourThemeName</item>
            </argument>
        </arguments>
    </virtualType>
</config>
完成以上步骤后,您需要添加一些颜色可视化的样式。将更改放置在主题的Lingaro_StyleGuide/web/css/source/_extend.less文件中。以下是一个模板。
.style-guide-container {
  .style-guide-colors {
    .style-guide-color {
      &.style-guide-color-example {
        .style-guide-color-visualization {
          background-color: @color-color-name;
        }
      }
    }
  }
}
请记住在主题的变量文件中定义@color-color-name。
清除以下缓存以查看您的更改:config,full_page。
4.7. 向图标集中添加图标
要向主题风格指南的图标集中添加图标,您需要在etc/frontend/di.xml文件中创建自定义图标提供者,向其中添加自定义图标项,并将提供者注入到您的自定义主题视图中。以下是一个示例。
<?xml version="1.0"?>
<config xmlns:xsi="http://www.w3.org/2001/XMLSchema-instance" xsi:noNamespaceSchemaLocation="urn:magento:framework:ObjectManager/etc/config.xsd">
    <!-- Icons -->
    <virtualType name="ProjectVendor\StyleGuide\Model\Icon\YourThemeName\IconName" type="Lingaro\StyleGuide\Model\Icon">
    <arguments>
        <argument name="name" xsi:type="string">icon-name</argument>
        <argument name="cssClass" xsi:type="string">icon-css-class</argument>
    </arguments>
    <virtualType name="ProjectVendor\StyleGuide\ViewModel\IconsProvider\YourThemeName"
                 type="Lingaro\StyleGuide\ViewModel\IconsProvider">
        <arguments>
            <argument name="icons" xsi:type="array">
                <item name="icon-name" xsi:type="object">ProjectVendor\StyleGuide\Model\Icon\YourThemeName\IconName</item>
            </argument>
        </arguments>
    </virtualType>
    <virtualType name="ProjectVendor\StyleGuide\Model\Section\Icons\YourThemeName"
                 type="Lingaro\StyleGuide\Model\Section\Icons">
        <arguments>
            <argument name="viewModel" xsi:type="object">ProjectVendor\StyleGuide\ViewModel\IconsProvider\YourThemeName</argument>
        </arguments>
    </virtualType>
    <!-- / Icons -->
    <virtualType name="ProjectVendor\StyleGuide\ViewModel\SectionBlocksProvider\YourThemeName"
                 type="Lingaro\StyleGuide\ViewModel\SectionBlocksProvider">
        <arguments>
            <argument name="sections" xsi:type="array">
                <item name="icons" xsi:type="object">ProjectVendor\StyleGuide\Model\Section\Icons\YourThemeName</item>
            </argument>
        </arguments>
    </virtualType>
</config>
当然,您还需要在主题中添加适当的.icon-css-class样式。
清除以下缓存以查看您的更改:config,full_page。
5. 支持的Magento版本
当前风格指南模块支持以下Magento版本:
- 2.4.x
6. 截图
6.1. 在Luma主题上应用风格指南
6.2. 为示例项目主题应用并自定义风格指南
7. 骨架集成
您可以为模块开发自动设置Lingaro Skeleton。为此,将Makefile.dist复制到Makefile,并在其中填写SKELETON变量为Skeleton的GIT仓库URL。然后,运行make。这将设置一个新骨架项目在您的当前根目录中,并将模块文件复制到source/packages/module-style-guide。要运行项目,只需运行make up。


