juneszh / alight-admin
Alight Admin 是基于 Alight 框架的快速管理面板扩展。
v2.0.3
2024-02-20 07:11 UTC
Requires
- php: >=7.4
- gregwar/captcha: ^1.2
- juneszh/alight: *
- symfony/var-exporter: >=5.4
README
Alight-Admin 是基于 Alight 框架 的快速管理面板扩展。
特性
- 无需前端编码。内置 Ant Design UI (React) 组件,由 PHP 接口驱动。
- 快速构建并轻松配置带有表格/表单渲染的 CRUD 页面。
- 包括 授权、权限 和 用户管理。
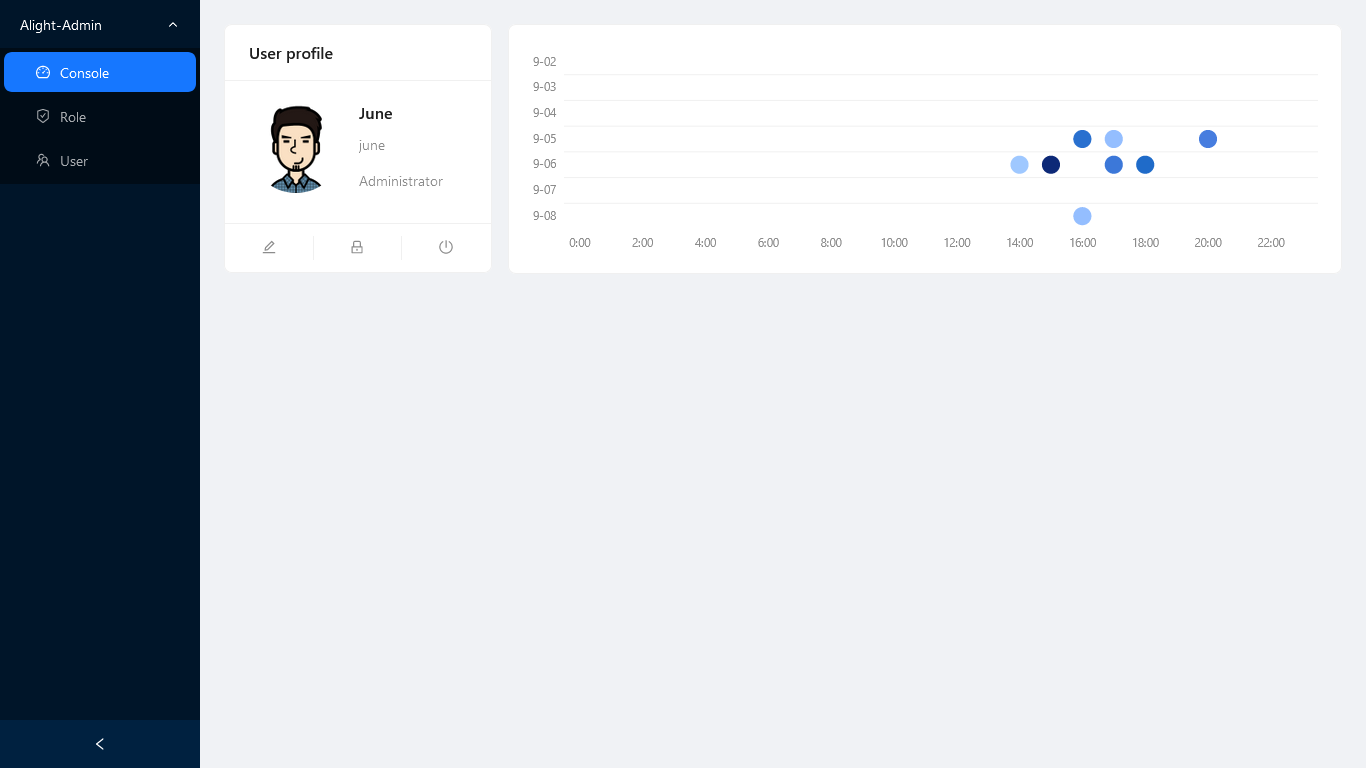
- 可自定义的 图表,通过 PHP 在控制台中显示,如 折线图、柱状图、饼图 等。
Alight 家族
要求
PHP 7.4+
使用方法
可以使用 Alight-Project 快速构建 Alight-Admin。
创建项目
$ composer create-project juneszh/alight-project {PROJECT_DIRECTORY}
初始化 Admin
以下命令将构建 Alight-Admin 所需的运行环境,例如安装 composer 包、插入配置选项、创建数据库表和下载前端资源。请确保已配置 数据库。
$ cd {PROJECT_DIRECTORY}
$ composer require juneszh/alight-admin
$ composer run admin-install
$ composer run admin-download
尝试 CRUD
假设我们已经有了一个数据库表:admin_user
现在,在控制器下创建一个 php 表格函数。例如
文件:app/controller/admin/Test.php
<?php
namespace ctr\admin;

use Alight\Admin\Auth;
use Alight\Admin\Form;
use Alight\Admin\Table;

class Test
{
    public static function userTable()
    {
        // Check the role_id from logged in user
        Auth::checkRole([1]); // Here '1' means only administrators have access

        // Create the table columns and search bar
        Table::column('id')->sort('ascend');
        Table::column('account')->search()->sort();
        Table::column('role_id')->search('select')->enum([1 => 'Administrator', 2 => 'Editor']);
        Table::column('name')->search();
        Table::column('email')->search();
        Table::column('status')->search('select')->enum([1 => 'Enable', 2 => 'Disable']);
        Table::column('create_time')->search('dateRange');

        // Create the buttons
        Table::button('add')->toolbar(); // Here 'toolbar()' means this button will be placed on toolbar
        Table::button('edit');
        Table::button('password')->danger();

        // Bind the database table 'admin_user' and render table page
        Table::render('admin_user');
    }
}
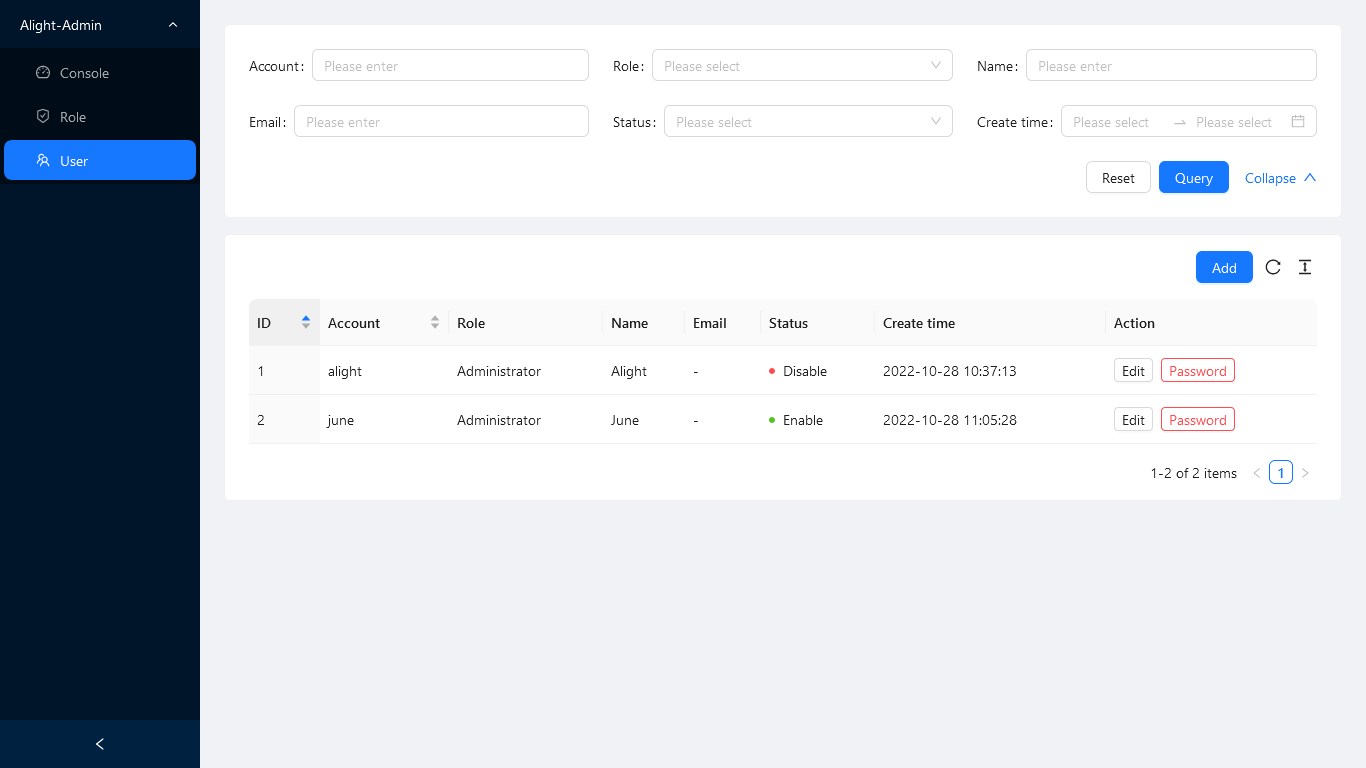
然后,我们将得到表格页面
接下来,我们继续创建表单函数
    public static function userForm()
    {
        // Ditto, Check the user access
        Auth::checkRole([1]);

        // Create the form fields
        Form::create('add'); // This form will bind the 'add' button
        Form::field('account')->required();
        Form::field('role_id')->type('select')->enum([1 => 'Administrator', 2 => 'Editor'])->required()->default(1);
        Form::field('name')->required();
        Form::field('email');
        Form::field('password')->type('password')->required();
        Form::field('confirm_password')->database(false)->type('password')->required()->confirm('password');

        // Create another form
        Form::create('edit')->copy('add'); // This form will bind the 'edit' button and copy fields from 'add'
        Form::field('password')->delete();
        Form::field('confirm_password')->delete();
        Form::field('status')->type('radio')->enum([1 => 'Enable', 2 => 'Disable']);

        // Create last form for 'password' button
        Form::create('password')->copy('add', ['password', 'confirm_password']);

        // Bind the database table 'admin_user' and render form page
        Form::render('admin_user');
    }
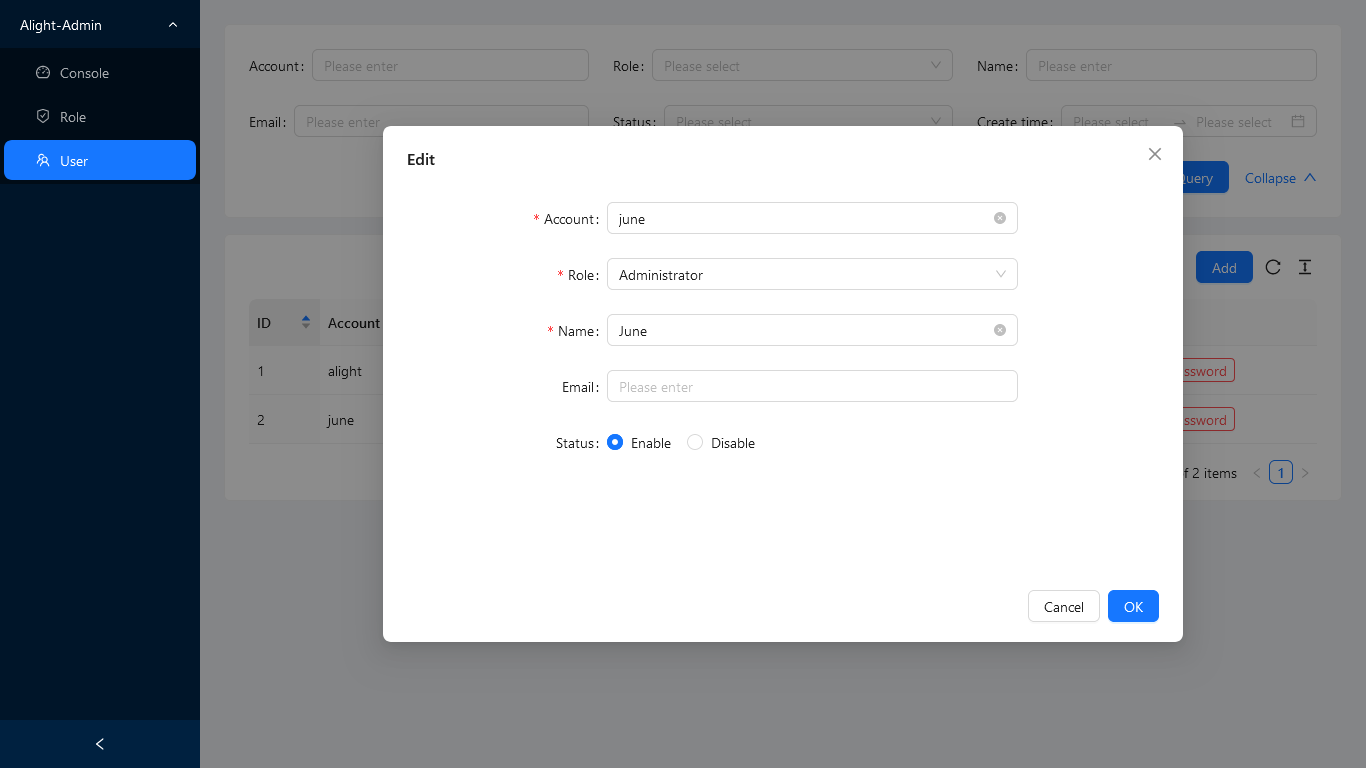
然后,我们将得到表单页面
最后一步,配置路由和侧边菜单
文件:app/config/route/admin.php
Route::get('test/user/table', [ctr\admin\Test::class, 'userTable'])->auth();
Route::any('test/user/form', [ctr\admin\Test::class, 'userForm'])->auth();
文件:app/config/admin/menu.php
Menu::item('Test');
Menu::subItem('User')->url('test/user/table');
最后,数据库表 user_admin 已完成 CRUD 创建。更多信息请参见 API 列表。
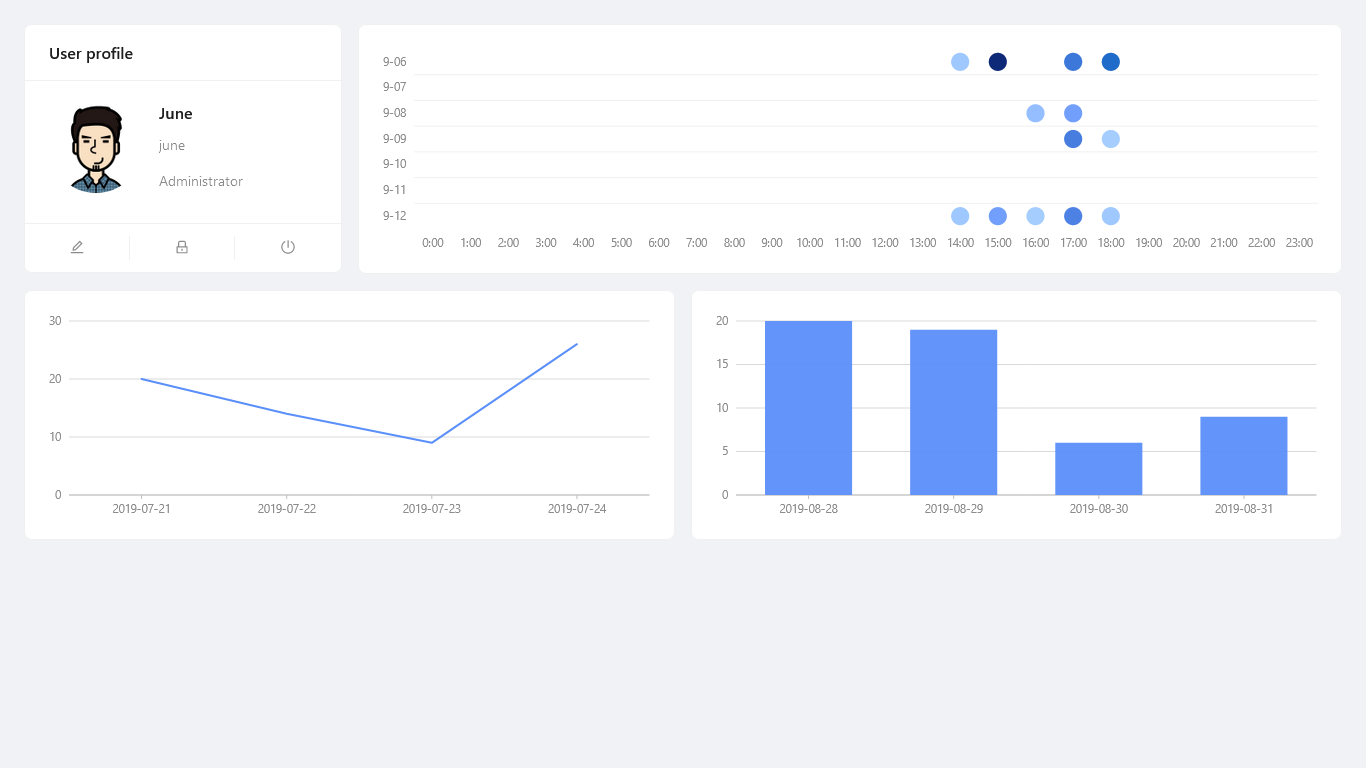
尝试控制台图表
使用内置数据创建图表。
文件:app/config/admin/console.php
// Here using Line charts, we support 30+ charts with AntDesign Charts
// More details please refer to : https://charts.ant.design/en/docs/api
Console::chart('Line')->config([
    'xField' => 'date',
    'yField' => 'value',
    'height' => 200,
    'data' => [
        ['date' => '2019-07-21', 'value' => 20],
        ['date' => '2019-07-22', 'value' => 14],
        ['date' => '2019-07-23', 'value' => 9],
        ['date' => '2019-07-24', 'value' => 26]
    ]
])->grid(['span' => 12]); // Means half the width of the grid. full of 24
使用 API 数据创建图表。
文件:app/config/admin/console.php
Console::chart('Column')->config([
    'xField' => 'date',
    'yField' => 'value',
    'height' => 200
])->grid(['span' => 12])->api('test/column'); // Define the path to the API
文件:app/controller/admin/Test.php
    public static function columnData()
    {
        // Check the user access
        Auth::checkRole([1]);

        $data => [
            ['date' => '2019-08-28', 'value' => 20],
            ['date' => '2019-08-29', 'value' => 19],
            ['date' => '2019-08-30', 'value' => 6],
            ['date' => '2019-08-31', 'value' => 9]
        ];

        // Respond using the built-in json format api
        Alight\Response::api(0, null, ['data' => $data]);
    }
文件:app/config/route/admin.php
Route::get('test/column', [ctr\admin\Test::class, 'columnData'])->auth();
最后,我们将得到控制台页面
API
- Alight\Admin\Table
- ::button()
- ->action()
- ->batch()
- ->color()
- ->column()
- ->danger()
- ->expand()
- ->if()
- ->param()
- ->role()
- ->title()
- ->toolbar()
- ->type()
- ->url()
- ::column()
- ->align()
- ->copyable()
- ->database()
- ->ellipsis()
- ->enum()
- ->fixed()
- ->hide()
- ->html()
- ->role()
- ->search()
- ->sort()
- ->title()
- ->tooltip()
- ->type()
- ->width()
- ::expand()
- ->align()
- ->copyable()
- ->enum()
- ->fixed()
- ->hide()
- ->html()
- ->role()
- ->sort()
- ->title()
- ->tooltip()
- ->width()
- ::statistic()
- ->title()
- ->value()
- ::summary()
- ->avg()
- ->precision()
- ::render()
- ::button()
- Alight\Admin\Form
- ::create()
- ->copy()
- ::field()
- ->confirm()
- ->database()
- ->default()
- ->delete()
- ->disabled()
- ->enum()
- ->grid()
- ->hide()
- ->placeholder()
- ->raw()
- ->readonly()
- ->required()
- ->role()
- ->rules()
- ->title()
- ->tooltip()
- ->type()
- ::render()
- ::create()
- Alight\Admin\Console
- ::chart()
- ->api()
- ->config()
- ->grid()
- ->role()
- ::build()
- ::chart()
- Alight\Admin\Menu
- ::item()
- ->action()
- ->role()
- ->url()
- ::subItem()
- ->action()
- ->role()
- ->url()
- ::build()
- ::item()
致谢
- Composer 需求
- UI 组件

