gustocoder / laravel-datatable
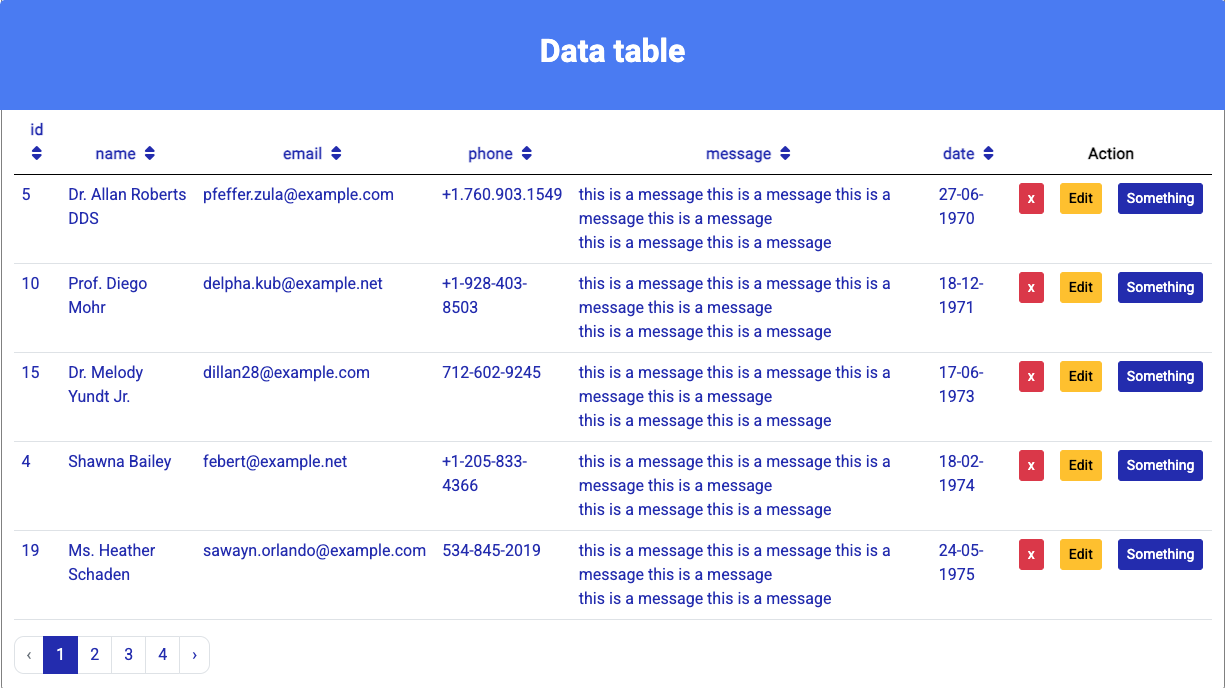
Laravel datatable 包,提供排序功能,允许您可选地添加一个额外的列,在其中您可以添加用于 CRUD 操作的按钮。按钮创建方法将自动生成链接并将单个记录 ID 发送到您传递给它的路由名称。您可以配置是否
This package is auto-updated.
Last update: 2024-09-24 20:31:40 UTC
README
从 Laravel 模型立即生成漂亮的表格
如何使用它
安装它
composer require gustocoder/laravel-datatable
安装后,将为您在以下位置创建配置文件:
'config/laravel-datatable.php'
样式表应在以下位置为您创建:
'public/vendor/datatable.css'
如果您遇到问题,请确保在您的 /bootstrap/providers.php 中注册了 LaravelDatatableServiceProvider 类
这里的主要类是 DatatableController
使用它
    namespace GustoCoder\LaravelDatatable\Http\Controllers;

    use App\Http\Controllers\Controller;
    use Gustocoder\LaravelDatatable\Http\Controllers\DatatableController;


    class ExampleController extends Controller
    {
        public function showUsers() {
            $dataTableClass = new DatatableController(
                'User',
                'users',
                [],
                ['date_field' => 'created_at', 'orderBy' => 'created_at']
            );

            //give the full route path (NOT the route name) as defined in the route file, eg 'admin/users'
            $deleteRoute = 'deleteUser';
            $editRoute = 'editUsers';


            //This is optional, & it creates a new column, eg 'Actions'. It accepts the name of the column
            //and you can call it whatever you want. It only supports adding one column, so only call this
            //once. You can however, add multiple field buttons under that columns, and the column will be
            //expanded to contain them all eg Actions.
            //If you do call addColumn, make sure you also call addFieldButton(...) to insert data under
            //the new column
            $dataTableClass->addColumn('Action');

            //used to add field data to go under the column you added above. Handy for Edit, or Delete buttons.
            $dataTableClass->addFieldButton(
                'Action',
                'Delete',
                'x',
                $deleteRoute,
                ['id'],
                ['id' => 'deleteUserBtn', 'class' => 'btn btn-danger btn-sm']
            );

            $dataTableClass->addFieldButton(
                'Action',
                'Edit',
                'Edit',
                $editRoute,
                ['id'],
                ['id' => 'editUserBtn', 'class' => 'btn btn-warning btn-sm']
            );

            //add another button if you want. Give it relevant attributes
            $dataTableClass->addFieldButton(
                'Action',
                'Something',
                'something',
                'someRoute',
                ['id'],
                ['id' => 'doSomethingBtn', 'class' => 'btn btn-primary btn-sm']
            );

            $panelId = 'usersPanel';
            $usersTable = $dataTableClass->getTable($panelId);
            return view('laravel-datatable::datatable-view', ['usersTable' => $usersTable]);
        }


        /**
         * An example of how you would delete a record from the datatable-see the delete
         * button link and the route that points to this method
        */
        public function deleteUser($userId)
        {
            $userModel = new User();
            $record = $userModel::find($userId);

            if ($record) {
                $record->delete();
                return redirect()->back()->with('success', 'User deleted successfully');
            }
            else
            {
                return redirect()->back()->with('danger', 'User could not be deleted');
            }
        }
    }
Override the panel id value-the current/default value is 'datatablePanel'. After
setting the id, do not forget to edit your panel styling in
public/vendor/laravel-datatable/css/datatable.css. Go in there & edit the styling
for 'datatablePanel'. The reason for allowing you to set an id attribute on the panel
that wraps around the table is to allow you use CSS to customise the look and behaviour
of the table, and, or JS to manipulate the table dynamically. If you do assign a
panelId, do not forget to go into the CSS stylesheet in your public directory and
change the panelId from the default one 'datatablePanel' to the one you have added.

Do not forget to use the config file 'config/laravel-datatable.php' to enter base
settings for your data table. See the 'Your datatable configurations' below.

You would display the generated table ('usersTable') in your view blade file like so:
{!! $usersTable !!}
传递给 DatatableController 的参数描述
-
这里的第一个参数(必需)必须是您要使用的模型的准确拼写。
-
第二个参数(可选)是您在路由文件中定义的用于显示从模型获取的数据的视图文件的路径。它是可选的,因为您可以选择记录不可点击,或者不可排序,在这种情况下,将不会生成锚点链接或获取更多数据。
-
第三个参数(可选)是一个关联数组,您可以使用它来获取特定的字段,如果您不想获取模型上的所有字段。键是实际的数据库表字段名,而值(可选)是您希望在生成的表中作为别名出现的字符串,以替代表字段名。
-
第四个参数(可选)是一个数组,您可以使用它来覆盖当前创建的表的基配置设置。您传递一个关联数组,其中包含配置设置及其值。例如
['date_field' => 'created_at', 'orderBy' => 'created_at']
-
默认情况下,系统假定您的表有一个 'date' 字段,这是一个 datetime/timestamp 字段,其数据将为您从 'Y-m-d' 格式转换为 'd-m-Y' 格式。
-
如果您的表的时间戳字段名为 'date' 以外的名称,并且您想要这种日期格式转换,则需要传递一个配置数组到这里的第四个参数,以便告诉系统您的日期字段名称。例如,如果您的日期字段名称是 'created_at',请按如下方式传递:
['date_field' => 'created_at']
-
如果您不希望这种转换,请从配置文件中完全删除 'date_field' 设置。
-
默认情况下,系统还按 'date' 字段排序日期。如果您想使用不同的字段进行排序,或者如果您的日期字段名称不是 'date',请将配置条目传递到这里的第四个参数,以指定默认排序的字段,如下所示
['orderBy' => 'created_at']
-
可选地,您可以在相同的配置第四个参数中设置表的标题
['heading' => 'Users data']
否则,系统将使用您传递的模型名称自动生成标题,格式为:“Modelname 数据”。
-
关于 orderBy 子句的 date_field 配置设置的一些建议
-You must only use a datetime/timestamp type for this field, and not a 'date' format
    because the package code expects a time segment in the date string given.
如何处理操作按钮上的操作
-When you indicate that you want the table records to be clickable (config file), the system
 will create anchor links for the individual records and automatically send the record ids
 with these links. All you then have to do create the routes to match those paths.

-Also, when you add buttons, the system will add anchor links to them, adding in the record
 ids as well. Here is an example of how you would create a route to handle deletion of a
 record:
-
routes\web.php
    use Illuminate\Support\Facades\Route;
    use Gustocoder\LaravelDatatable\Http\Controllers\ExampleController;

    //This is an example of how you would define routes for the feature
    Route::get('/users', [ExampleController::class, 'showUsers'])->name('show-users');
    Route::get(
        '/deleteUser/{userId}',
        [ExampleController::class, 'deleteUser']
    )->name('delete-user');
-
控制器
    ...
    $dataTableClass = new DatatableController(...);
    ...
    $deleteRoute = 'deleteUser';
    ...
    $dataTableClass->addFieldButton(
        'Action',
        'Delete',
        'x',
        $deleteRoute,
        ['id'],
        ['id' => 'deleteUserBtn', 'class' => 'btn btn-danger btn-sm']);
-
由DatatableController的getTable()方法创建的删除按钮将包含一个指向'/deleteUser/6'的锚链接,其中6是对应删除按钮的记录ID。上面定义的deleteUser路由将请求传递到ExampleController类中的deleteUser()方法。
-
确保为所有路由命名,因为系统会使用它们。
从多个模型(由Eloquent连接提供)生成表格
This is also possible, but it has some limitations (see 'Limitation to joining models' below).
Let us assume you want a table of records from two tables 'blog' and 'blog_comments', and you
are going to link them based on a foreign key for example, where
blog.id = blog_comments.blog_id.

The steps are very similar except for one extra method that you need to call: 'setJoinData()'

Here is how you would do it. First of all, instantiate the DatatableController class exactly
as you would when generating a table for a single model. Pass it the model name of the
main (parent) table of the join relationship. A parent table is the table whose primary key
is used as foreign keys in other (child) tables. In our case the main table would be 'blog'.
Also pass in the optional arguments like dataRoute, fields, config exactly as you would do
for a single model.
$dataTableClass = new DatatableController('Blog', 'blog-comments');
Next, call the setJoinData() method and pass it three arrays eg:
    ...
    $dataTableClass->setJoinData(
            ["'blog_comments', 'blog.id', '=', 'blog_comments.blog_id'"],
            [
                'blog.blog_id as post_id',
                'blog.blog_title',
                'blog.blog_article',
                'blog.blog_author as author',
                'blog_comments.blog_comments_comment as comment',
                'blog_comments.blog_comments_id as primary_key',
                'blog_comments.blog_comments_author as commentor'
            ],
            ["'blog_comments.blog_comments_status', 'valid'"]
        );
Once you have passed the main model you want to the constructor, eg:

    $dataTableClass = new DatatableController('Blog');

    You can now make a join on it like so:
        -call the method $dataTableClass->setJoinData()
            -pass it as first argument as an array of join strings where the
                first element is the (child) table to join on the main table eg:

                ["'blog_comments', 'blog.id', '=', 'blog_comments.blog_id'"];

                Here the 'blog_comments' table will be joined on the main 'blog' table
                on the condition that blog.id is equal to blog_comments.blog_id.

            -The optional second argument is a select string in case you only want
                specific fields-leave it blank to select all fields from all tables joined.
                Use aliases to avoid column name conflicts, or use a wildcard on a table
                name eg 'tableName.*' to select all fields on that table eg:

                "'blog.id as post_id', 'blog.blog_title', 'blog.blog_article',
                'blog.blog_author as author', 'blog_comments.blog_comments as comment',
                'blog_comments.blog_comments_author as commentor'"

                Note that when it comes to joins like this, if you need the table records
                to be clickable, when you call setJoinData(), you MUST create an alias
                of the primary key. Do it like so:

                    'blog_comments.blog_comments_id as primary_key'

                This will tell the system what the unique key of the joined records are.

            -The optional second argument is a where string which basically refers to a
                where clause if there is any eg:

                "'blog_comments.blog_comments_status', 'valid'"

The rest is the steps are exactly the same as with generating a table for a single model:
    -Optionally call the addColumn() and the addFieldButton() methods.
    -Then finally genrate the table and render the table view file like so:

    $panelId = 'blogPanel';
    $blogCommentsTable = $dataTableClass->getTable($panelId);
    return view('admin.contactMessages', ['contactMessagesTable' => $blogCommentsTable]);

Feel free to call $dataTableClass->setJoinData(...) multiple times to join more tables to
the main table.
以下是一个模型连接的示例
    <?php

    namespace App\Http\Controllers;

    use Gustocoder\LaravelDatatable\Http\Controllers\DatatableController;
    ...


    class AdminController extends Controller
    {
        public function blogComments()
        {
            $dataTableClass = new DatatableController('Blog', 'blog-comments');

            $dataTableClass->setJoinData(
                ["'blog_comments', 'blog.blog_id', '=', 'blog_comments_blog_id'"],
                [
                    'blog.blog_id as post_id',
                    'blog.blog_title',
                    'blog.blog_article',
                    'blog.blog_author as author',
                    'blog_comments.blog_comments_comment as comment',
                    //Specify the joined record's primary key field as 'primary_key'
                    'blog_comments.blog_comments_id as primary_key',
                    'blog_comments.blog_comments_author as commentor'
                ],
                ["'blog_comments.blog_comments_status', 'valid'"]
            );

            //-------------------Add columns & buttons (optional)-----------------------
            $deleteRoute = 'admin/blog-comments';
            $editRoute = 'admin/edit-blog-comments';
            $doSomethingRoute = 'admin/do-something-with-comments';

            $dataTableClass->addColumn('Stuff');

            //used to add field data to go under the column you added above. use this
            //for Edit, or Delete buttons.
            $dataTableClass->addFieldButton(
                'Stuff',
                'Delete',
                'x',
                $deleteRoute,
                ['id'],
                ['id' => 'deleteBlogCommentBtn', 'class' => 'btn btn-danger btn-sm']
            );

            $dataTableClass->addFieldButton(
                'Stuff',
                'Edit',
                'Edit',
                $editRoute,
                ['id'],
                ['id' => 'editBlogCommentBtn', 'class' => 'btn btn-warning btn-sm']
            );

            $dataTableClass->addFieldButton(
                'Stuff',
                'Sometype',
                'Something',
                $doSomethingRoute,
                ['id'],
                ['id' => 'doSomethingBtn', 'class' => 'btn btn-primary btn-sm']
            );
            //-------------------Add columns & buttons (optional)-------------------------

            $panelId = 'blogPanel';
            $blogCommentsTable = $dataTableClass->getTable($panelId);
            return view(
                'admin.contactMessages',
                ['contactMessagesTable' => $blogCommentsTable]
            );
        }
    }
连接模型的限制
The only set back to joining models with this DatatableController class is that the
generated table fields of the main table are going to be the only fields you can
do sorting on. The fields from the joined (children) tables will only serve as
display data.
您的表格配置
Once you have run the command


The config file will be generated for you and placed in

    'config/laravel-datatable.php'

There are 4 fields that you should have separate entries per model for because
they are unique to every model's records
The config settings here must be prefixed with the model names in all lowercase.

    '..._panelId'       => '',
    '..._heading'       => '',
    '..._date_field'    => '',
    '..._orderBy'       => '',

These should be prefixed here with the model names-in all lowercase. Here is an
example entry for these fields for 'blog' and 'blog_comments' tables.
    'blog_panelId'          => '',
    'blog_heading'          => 'Blog',
    'blog_comments_heading' => 'Blog comments',
    'blog_date_field'       => 'blog_created',
    'blog_orderBy'          => 'blog_created',
    'blog_comments_orderBy' => 'blog_comments_created',
There are four other fields that are generic and will apply to all your data
tables, so you do not have to set them for every model.
        'recordsPerpage'    => 5,
        'sortable'          => true,
        'sortOrder'         => 'ASC',
        'clickableRecs'     => true,
自定义表格外观
It is up to you to style the generated table as you wish.
The table is wrapped in a panel with the id of: 'datatablePanel' or any id you
specified for it when you called getTable($panelId)

The table element itself also has an id generated from the model name like so
id='modelname_table'

You may use the panelId and table id attributes to customise the styling of the
table.
- 因此,请记住从它所在的位置(在'public/vendor/laravel-datatable/css/datatable.css')将datatable样式表引用到您的布局文件中,如下所示
    <link
        href="{{ asset('vendor/laravel-datatable/css/datatable.css') }}"
        rel="stylesheet">
-
请记住,为了样式化表格,您需要编辑位于'public/vendor/laravel-datatable/css/datatable.css'的CSS文件
当前的CSS选择器指向默认的panelId值,即'datatablePanel'。如果您在调用getTable()时传入了panelId;您需要进入CSS文件('public/vendor/laravel-datatable/css/datatable.css')并将CSS选择器引用从'datatablePanel'更改为您传给getTable()的panelid的值。
-
再次提醒,如果在安装包后您在项目中找不到以下文件
- /config/laravel-datatable.php
- /vendor/laravel-datatable/css/datatable.css
那么您需要运行此命令来修复它
php artisan vendor:publish
最后,请确保在您的/bootstrap/providers.php文件中注册了LaravelDatatableServiceProvider类,如下所示
    return [
        ...
        Gustocoder\laravelDatatable\LaravelDatatableServiceProvider::class
    ];