floppy / server
Floppy是一个文件存储库。这个库允许你创建自己的存储文件服务器,简化文件上传和使用上传的文件。
Requires
- floppy/common: >=0.1.0,<0.2.0
- imagine/imagine: >=0.6.0,<0.7.0
- pimple/pimple: 2.0.*
- ps/image-optimizer: ~1.0
- ps/imagine-extra: >=1.0.0,<2.0.0
- psr/log: 1.0.0
- symfony/event-dispatcher: >=2.1,<2.5
- symfony/filesystem: >=2.1,<2.5
- symfony/http-foundation: >=2.1,<2.5
This package is not auto-updated.
Last update: 2024-09-24 02:52:33 UTC
README
FloppyServer是一个文件存储库。还有FloppyClient库和symfony2包,这些包为symfony2应用添加了一些集成点。
Floppy家族库的主要目标是尽可能简化处理文件的各个方面。Floppy家族库改进了处理:文件上传、文件存储、生成各种文件版本(缩略图、水印等)、在实体中表示文件等。
当你的应用程序大量使用图像和其他文件时,生成所需的缩略图存在问题,处理文件上传的代码充满了样板代码,处理文件很尴尬。有很好的Imagine包可以部分解决第一个问题,但不能解决其他问题。本文档仅涵盖FloppyServer库,如果你想查看如何从客户端使用FloppyServer,请查看FloppyBundle和FloppyClient库。
文件优化
FloppyServer能够对上传的文件进行一些额外的处理。它能够在存储之前将大图像进行缩放,并利用ImageOptimizer库对图像执行各种优化。默认情况下,大于Full HD尺寸的图像缩放是启用的,但其他优化是禁用的,你可以通过fileHandlers.image.enableOptimizations选项手动启用它。请注意,图像优化可能非常占用CPU资源,但默认优化器尽可能轻量。
文件过滤器
Floppy支持对文件应用过滤器,尤其是在图像上。原始的优化文件存储在存储中,但有可能在用户请求文件时即时生成文件的不同版本。文件的不同版本可以是缩略图、带水印的图像、裁剪图像等。有关过滤器的更多信息,请参阅FloppyClient文档,支持的过滤器与LiipImagineBundle中的过滤器类似。在生成缩略图或其他版本的文件后,它将被缓存,在下一次请求相同版本的文件时,文件将从缓存中获取,因此处理只进行一次。
可扩展的架构
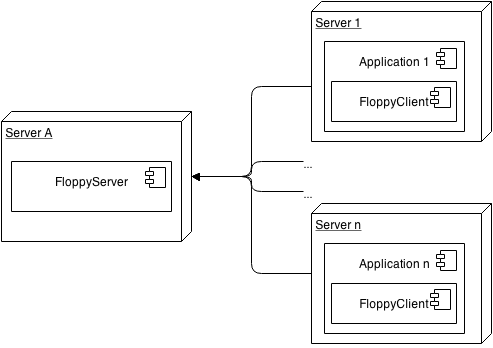
FloppyServer被设计为可以处理多个客户端,因此你可以设置一个FloppyServer实例并在许多应用程序中使用它。这个库是完全可定制和可扩展的,你可以定义可以存储哪些文件类型,在发送到客户端之前处理哪些文件类型(例如生成缩略图、添加水印等),优化哪些文件类型以及如何优化,上传/下载文件所需的安全凭证,等等。
通过在配置中添加简单的条目,支持CORS / crossdomain.xml / clientaccesspolicy.xml,因此您可以直接从Web浏览器上传到FloppyServer,即使FloppyServer实例运行在与您的应用程序不同的主机上。还有很好的symfony2集成(请参阅FloppyBundle文档),因此上传文件和在应用程序中使用文件非常简单且优雅。
文档
目录
简单设置示例
要创建您的Floppy服务器应用程序,您应该创建一个空的composer项目,添加对floppy/server包的依赖,并创建以下index.php文件。
composer.json文件
    "require": {
        "floppy/server": "*"
    }
web/index.php文件
    require_once __DIR__.'/../vendor/autoload.php';

    $requestHandlerFactory = new \Floppy\Server\RequestHandler\RequestHandlerFactory();

    $requestHandler = $requestHandlerFactory->createRequestHandler(array(
        'storage.dir' => __DIR__.'/../storage',
        'secretKey' => 'super-secret-key',
        'cors.allowedOriginHosts' => array(
            '*.your-client-host.com',
        ),
        //enable images optimizations
        'fileHandlers.image.enableOptimizations' => true,
    ));

    $request = \Symfony\Component\HttpFoundation\Request::createFromGlobals();

    $response = $requestHandler->handle($request);

    $response->send();
应在web目录中创建虚拟主机,存储将在web/../storage目录。
详细配置和扩展点
安全
定义安全规则有两个级别
- 防火墙 - 允许或拒绝执行某些操作,例如,您可以限制对上传操作的IP地址访问。默认情况下没有防火墙,因此每个人都可以上传文件。
- 安全规则 - 更具体和可定制的安全规则,您可以根据访问的文件信息、客户端提供的额外信息等来决定是否允许或拒绝访问操作。
要为给定的操作定义防火墙,请使用此代码
    $requestHandler = $requestHandlerFactory->createRequestHandler(array(
        //other options...
        'requestHandler.firewall.download' => function($container){ //it can be also requestHandler.firewall.upload
            return function(\Symfony\Component\HttpFoundation\Request $request){
                if(/* if access should be denied */) {
                    throw new \Floppy\Server\RequestHandler\Exception\AccessDeniedException();
                }
            };
        },
        //...
    ));
FloppyServer使用Pimple2库作为依赖注入容器,因此Closure参数中的$container变量是Pimple实例。
您还可以使用安全规则来访问正在上传或下载的文件的信息,并在决定权限时使用这些信息。
    $requestHandler = $requestHandlerFactory->createRequestHandler(array(
        //other options...
            'action.upload.securityRule' => function($container){ //it can be also action.download.securityRule
                return //implementation of Floppy\Server\RequestHandler\Security\Rule interface
            },
        //...
    ));
Floppy\Server\RequestHandler\Security\Rule接口有一个方法:processRule(Request $request, HasFileInfo $object)。当操作是上传时,$object可以是Floppy\Common\FileSource,当操作是下载时,可以是Floppy\Common\FileId。当前Security\Rule接口的唯一实现是PolicyRule,它能够检查请求的过期时间和上传文件的类型。PolicyRule检查来自Request的两个参数:policy和signature。Policy包含有关请求过期时间和请求支持文件类型的信
息,signature确保策略是由批准的客户端发送的,并且没有被第三方实体修改。PolicyRule是默认安全规则。默认情况下,当在Request中缺少策略时,规则允许执行请求的操作(下载/上传)。您可以改变这种行为,并配置PolicyRule在策略缺失时抛出安全异常。这是通过两个选项实现的
    $requestHandler = $requestHandlerFactory->createRequestHandler(array(
        //...
        'action.upload.securityRule.requirePolicy' => true,
        'action.download.securityRule.requirePolicy' => true,
        //...
    ));
当您将PolicyRule定义为需要策略的上传(或/和下载)操作时,每个上传(或/和下载)请求都应该包含安全凭证。要从FloppyClient生成文件的正确URL,您应该在Floppy\Client\UrlGenerator::generate($fileId, $fileType = null, $credentialAttributes = array())方法的第三个参数中提供安全凭证,示例
$url = $urlGenerator->generate(new \Floppy\Common\FileId('someid.jpg'), 'image', array('expiration' => time() + 60));
要使用Floppy\Client\FloppyClient类将安全凭证附加到上传操作,您应该使用FloppyClient::upload方法的第二个参数
$flieId = $client->upload($someFileSource, array('expiration' => time() + 60, 'file_types' => array('image')));
如果您使用FloppyBundle,您可以在floppy_file表单类型中提供安全凭证
    //for example in controller
    $form = $this->createFormBuilder($document)
        ->add('file', 'floppy_file', array('credentials' => array('expiration' => time()+500, 'file_types' => array('image', 'file'))))
        ->getForm();
您还可以在从floppy_url twig函数生成URL时提供凭证
    <img src="{{ floppy_url(document.file, {
        "expiration": date().timestamp + 60, "some-custom-attr": "custom-value"
    }) }}" />
如果您想添加额外的安全属性,您可以扩展PolicyRule并添加对您的额外属性的支持,例如用户ID等。
文件处理器
默认情况下有两组文件:图片和其他文件。图片有一套自己的FileHandler,它在存储和发送文件到客户端之前会处理文件。如果你想创建自己的文件组,你应该创建Floppy\Server\FileHandler\FileHandler的实现(Floppy\Server\FileHandler\AbstractFileHandler实现了大部分文件处理功能)。
默认情况下,当文件扩展名为jpg、jpeg、png或gif,并且MIME类型为image/png、image/jpg、image/jpeg、image/pjpeg或image/gif时,文件将由image文件处理程序处理。file文件处理程序默认是关闭的,因此你需要明确配置支持哪些扩展名和MIME类型。扩展名和MIME类型可以通过选项配置:fileHandlers.image.mimeTypes、fileHandlers.image.extensions、fileHandlers.file.mimeTypes、fileHandlers.file.extensions。示例
    //add support for text files - both mimeTypes and extensions must be configured
    $requestHandler = $requestHandlerFactory->createRequestHandler(array(
        'fileHandlers.file.mimeTypes' => array('text/plain'),
        'fileHandlers.file.extensions' => array('txt'),
    ));
下面是一个如何配置自己的文件处理程序的示例
    //add support for text files - both mimeTypes and extensions must be configured
    $requestHandler = $requestHandlerFactory->createRequestHandler(array(
        'fileHandlers' => function($container){
            return array(
                //default "image" file handler
                $container['fileHandlers.image.name'] => $container['fileHandlers.image'],

                'custom' => new YourCustomFileHandler(new CustomPathMatcher(), array()),

                //default "file" file handler
                $container['fileHandlers.file.name'] => $container['fileHandlers.file'],
            );
        }
    ));
推荐设置
FloppyServer可以通过几种方式设置,有4种推荐的设置。在阅读这一部分之前,请先阅读简单设置示例部分,因为它说明了composer.json和index.php文件应该如何设置。
公共目录 + apache htaccess(或nginx替代品)用于处理不存在的文件
想法是将你的存储目录放在公共目录中,并配置htaccess以将不存在的文件的请求回退到你的index.php文件。这是设置Floppy最有效的方式。当请求的缩略图存在时(因为以前已经生成),服务器会直接发送文件,而不运行PHP代码。当缩略图缺失时,FloppyServer会创建它。
优势
- 性能
- 易于设置
劣势
- 上传和生成的文件是公开可见的(但名称难以猜测),即使你配置了安全凭证来访问文件——因此这是一个安全问题
示例
    //part of web/index.php file in public directory

    $requestHandler = $requestHandlerFactory->createRequestHandler(array(
        'storage.dir' => __DIR__,//path to public directory
        'secretKey' => 'super-secret-key',
        'action.cors.allowedOriginHosts' => array(
            '*.your-client-host.com',
        ),
    ));

    //example of minimal web/.htaccess file

    RewriteEngine On
    RewriteBase /
    RewriteCond %{REQUEST_FILENAME} !-f
    RewriteRule (.*) index.php/$1
非公共目录 + apache x-sendfile(或nginx替代品)
另一种方法是将在非公共目录中设置FloppyServer,并添加x-sendfile(或nginx替代品)支持以提高性能。
优势
- 比“公共目录”解决方案更安全,每个请求都会运行PHP代码,因此总会有安全检查
劣势
- 性能比“公共目录”解决方案差,每个请求都会运行PHP代码;但x-sendfile提高了性能
- 你应该已经在服务器上配置了x-sendfile模块(或nginx替代品)
示例
    //part of web/index.php file in public directory

    $requestHandler = $requestHandlerFactory->createRequestHandler(array(
        'storage.dir' => __DIR__.'/../storage', //path to private directory
        'secretKey' => 'super-secret-key',
        'action.cors.allowedOriginHosts' => array(
            '*.your-client-host.com',
        ),
        'action.download.responseFactory' => new \Floppy\Server\RequestHandler\XSendFileDownloadResponseFactory(),
    ));

    //web/.htaccess file

    <IfModule mod_xsendfile.c>
        <files index.php>
            XSendFile on
        </files>
    </IfModule>

    //your virtual host configuration

    <VirtualHost ...>
        XSendFilePath /absolute/path/to/your/storage/directory
    </VirtualHost>
有关x-sendfile配置的更多信息,请参阅文档
如果你的Web服务器上没有x-sendfile模块,你应该使用简单设置示例部分中的配置。它将工作,但效率较低。
非公开目录和公开目录
你也可以设置你的Floppy服务器,使其在两个根目录中存储文件。其中一个目录应该是非公共的。上传文件的客户端会指定文件应该存储在公共目录还是非公共目录中。
示例
    //part of web/index.php file in public directory

    $requestHandler = $requestHandlerFactory->createRequestHandler(array(
        'storage.dir' => __DIR__, //path to public directory
        'storage.dir.private' => __DIR__.'/../storage', //path to private directory
        'secretKey' => 'super-secret-key',
        'action.cors.allowedOriginHosts' => array(
            '*.your-client-host.com',
        ),
        //if you have xsendfile on your webserver this response factory is recommended
        'action.download.responseFactory' => new \Floppy\Server\RequestHandler\XSendFileDownloadResponseFactory(),
    ));

    //eventual xsendfile configuration as in previous example
在客户端,你应该告诉你要上传私有文件还是公共文件(默认值是公共)
(在安全部分有更多关于使用$client、floppy表单和twig函数在symfony2包中的信息)
    //using Floppy\Client\FloppyClient

    $client->upload($someFileSource, array('access' => 'private'));

    //using symfony2 form
    $form = $this->createFormBuilder($document)
        ->add('file', 'floppy_file', array('credentials' => array('access' => 'private')))
        ->getForm();

    //generate url to private file using twig function from symfony2 bundle
    <img src="{{ floppy_url(document.file.with({ "thumbnail": { "size": [50, 50] } }), {
        "access": "private"
    }) }}" />
将FloppyServer集成到您的symfony2应用程序中
尚未提供
许可证
本项目采用MIT许可证。

