cheesegrits / filament-google-maps
用于 Filament PHP 的 Google Maps 包,支持字段、列和小部件
Requires
- php: ^8.0
- geocoder-php/google-maps-provider: ^4.7
- guzzlehttp/guzzle: ^7.5
- laravel/prompts: ^0.1.4
- mastani/laravel-google-static-map: ^2.2
- php-http/guzzle7-adapter: ^1.0
- php-http/message: ^1.13
- ryangjchandler/blade-capture-directive: ^0.3|^1.0
- spatie/guzzle-rate-limiter-middleware: ^2.0
- spatie/laravel-package-tools: ^1.9
Requires (Dev)
- filament/filament: ^3.0
- laravel/pint: ^1.6
- nonsapiens/realaddressfactory: ^2.0
- orchestra/testbench: ^7.11|^8.0
- pestphp/pest: ^2.0
- pestphp/pest-plugin-laravel: ^2.0
- pestphp/pest-plugin-livewire: ^2.0
- timacdonald/log-fake: ^2.0
- dev-main
- v3.x-dev
- v3.0.14
- v3.0.13
- v3.0.12
- v3.0.11
- v3.0.10
- v3.0.9
- v3.0.8
- v3.0.7
- v3.0.6
- v3.0.5
- v3.0.4
- v3.0.3
- v3.0.2
- v3.0.1
- v3.0.0
- v2.0.0-alpha17
- v2.0.0-alpha16
- v2.0.0-alpha15
- v2.0.0-alpha14
- v2.0.0-alpha13
- v2.0.0-alpha12
- v2.0.0-alpha11
- v2.0.0-alpha10
- v2.0.0-alpha9
- v2.0.0-alpha8
- v2.0.0-alpha7
- v2.0.0-alpha6
- v2.0.0-alpha5
- v2.0.0-alpha4
- v2.0.0-alpha3
- v2.0.0-alpha2
- v2.0.0-alpha1
- v1.0.25
- v1.0.24
- v1.0.23
- v1.0.22
- v1.0.21
- v1.0.20
- v1.0.19
- v1.0.18
- v1.0.17
- v1.0.16
- v1.0.15
- v1.0.14
- v1.0.13
- v1.0.12
- v1.0.11
- v1.0.10
- v1.0.9
- v1.0.8
- v1.0.7
- v1.0.6
- v1.0.5
- v1.0.4
- v1.0.3
- v1.0.2
- v1.0.1
- v1.0.0
- dev-v3-alpha
- dev-dev
This package is auto-updated.
Last update: 2024-09-22 02:38:51 UTC
README
Filament Google Maps
本包为在 Filament PHP 生态系统(一个用于 Laravel 的应用程序构建器)中使用 Google Maps 提供了一套全面的工具,无论是作为管理面板的一部分,还是在独立的前端表单、表格和仪表板中。
关于项目
Filament v3 版本
这是 v3 分支,与最近的 Filament v3 版本兼容。在不久的将来,我们将用这个 v3 分支替换主分支(目前是 Filament v2 兼容分支),并将 Filament v2 支持转移到 v2 分支。
请将您发现的问题报告到 GitHub 问题页面,或者在我的 Filament Discord 服务器(@cheesegrits)上找到我。
API 使用
重要提示 - 本包的一些功能可能会增加您的 API 账单。如果您有大量表格,您在静态地图上显示,并且频繁清除缓存。或者如果允许公众访问使用地理编码的表单,并且遭受了机器人的攻击。
我们 强烈建议您在您的 Google 控制台 中设置使用配额。如果您收到意外的账单,我们不负责任!
TL/DR
如果您无法处理阅读文档,只想直接跳进去...
composer require cheesegrits/filament-google-maps "^3.0"
...那么请按照以下说明向任何将使用这些组件的模型(它们应该已经具有单独的经纬度字段,即使它们是空的,请参阅批量命令部分)添加计算属性...
php artisan filament-google-maps:model-code
...然后开始使用组件,例如...
use Cheesegrits\FilamentGoogleMaps\Fields\Map
...
->schema[
    ...
    // must use the computed attribute name you used on your model
    // which must NOT exist on the table itself
    Map::make('location'),
    ...
]
组件
地图字段
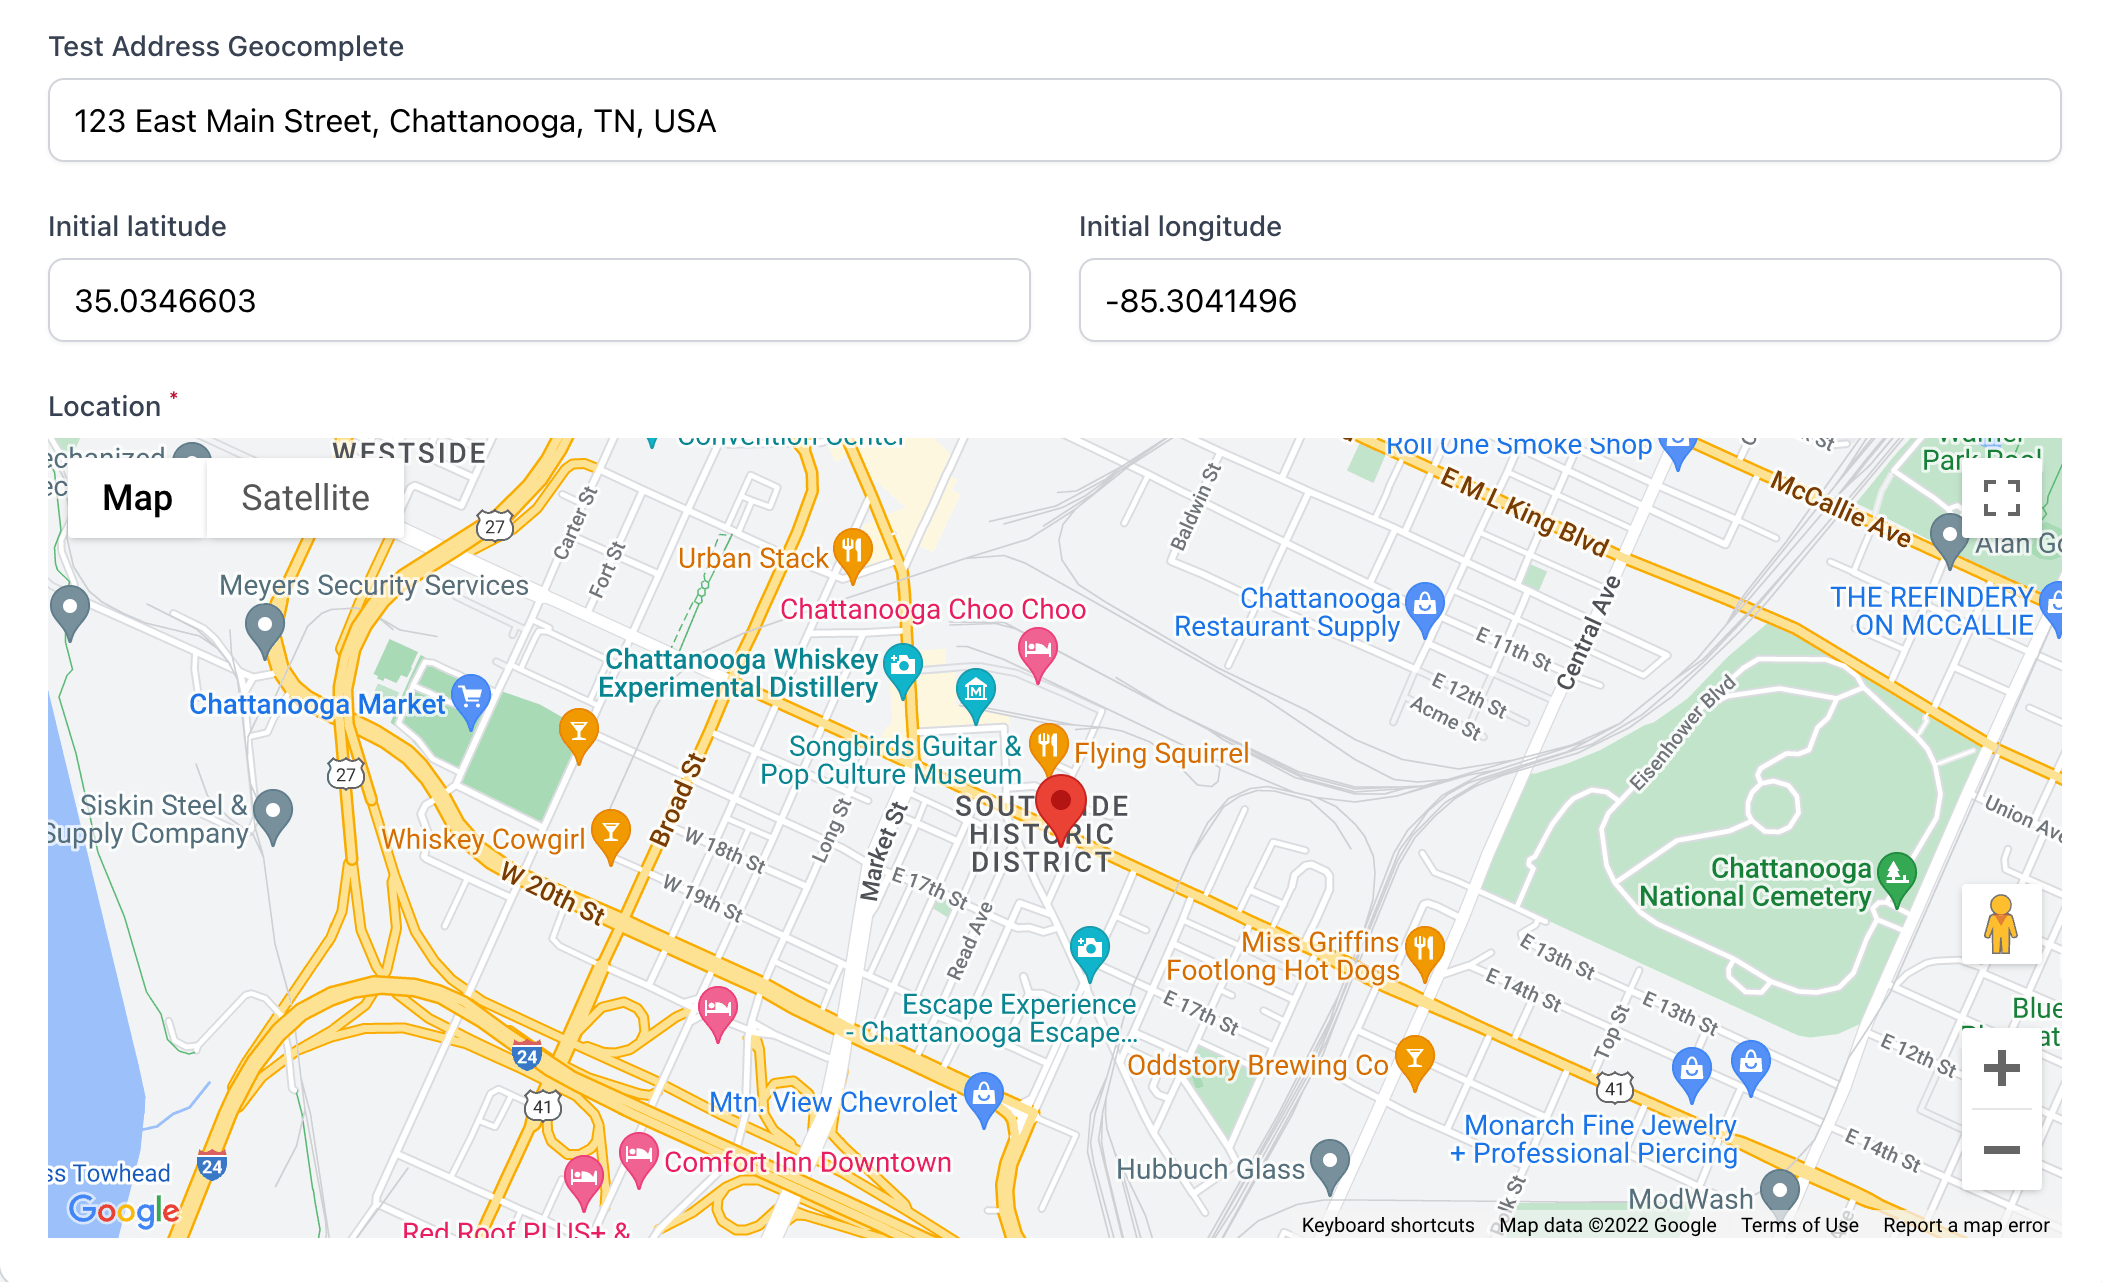
该 地图 字段显示一个 Google 地图(不出所料),并提供了一套全面的配置选项。它支持地图和表单之间的双向坐标更新,正向和反向地理补全,反向地理编码和 KML 层。
地理补全字段
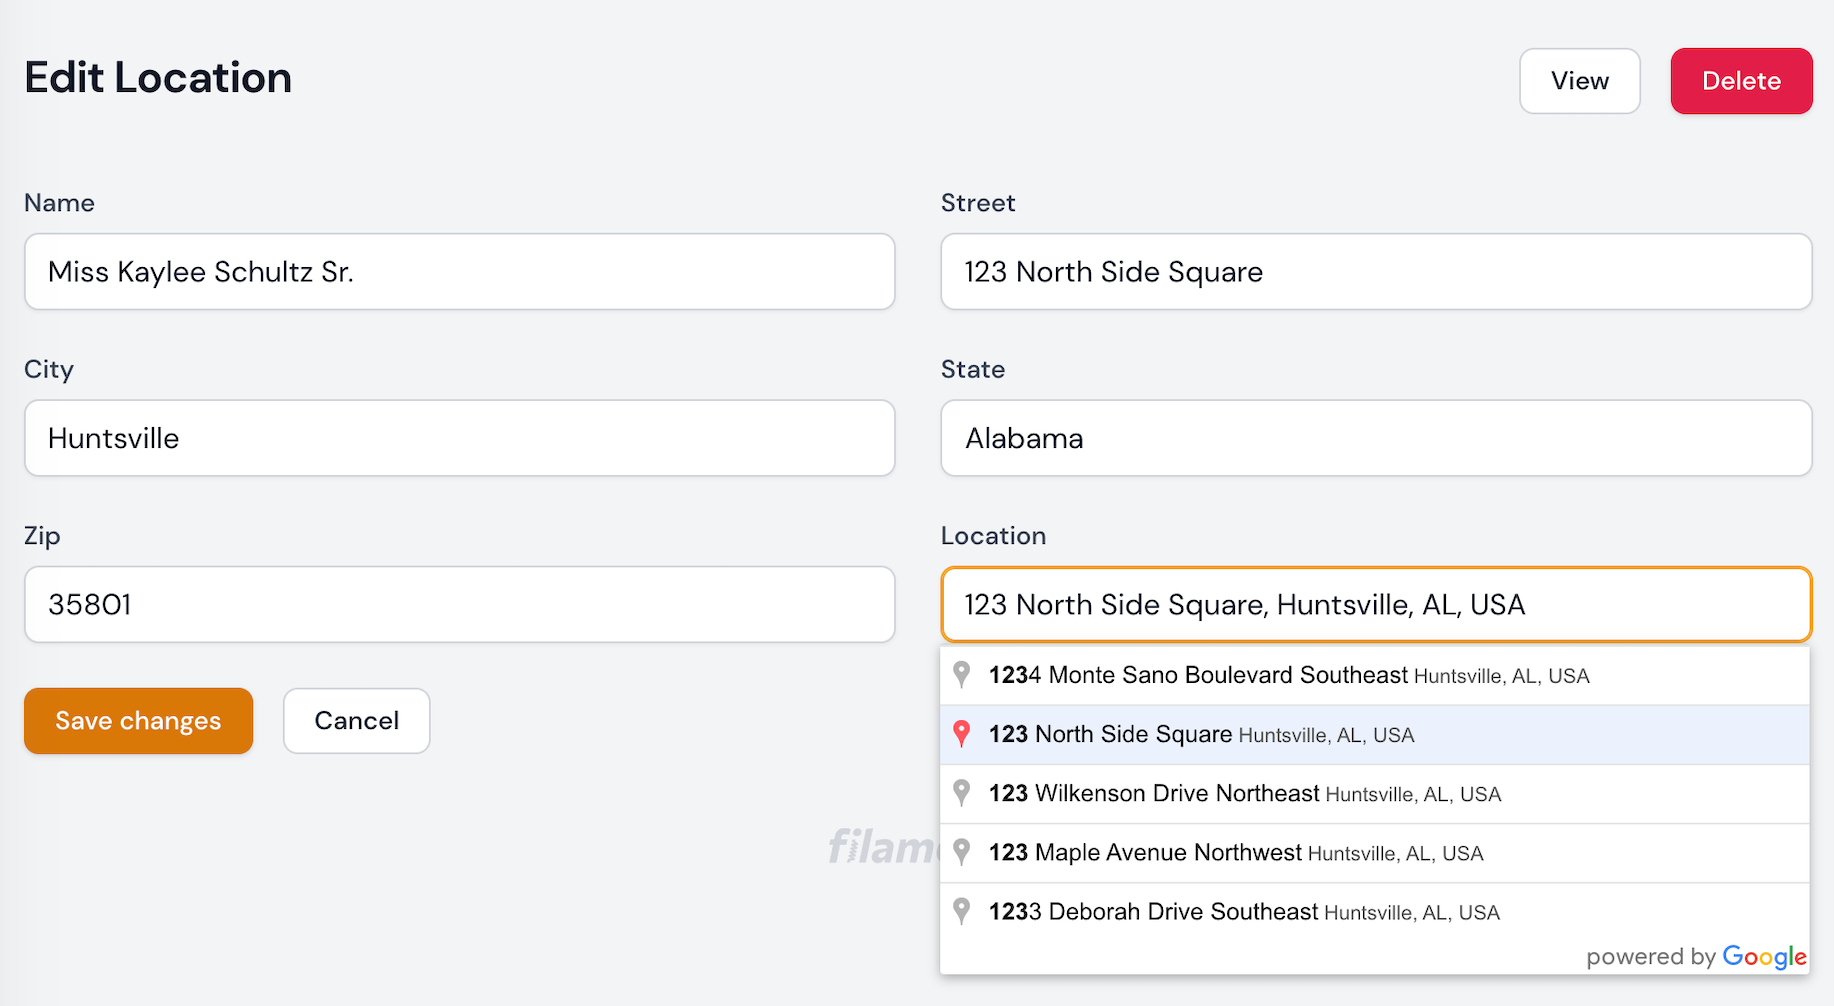
该 地理补全 字段将表单上的文本字段转换为 Google 地理补全字段,并可选地执行地址组件的反向地理编码。
信息列表字段
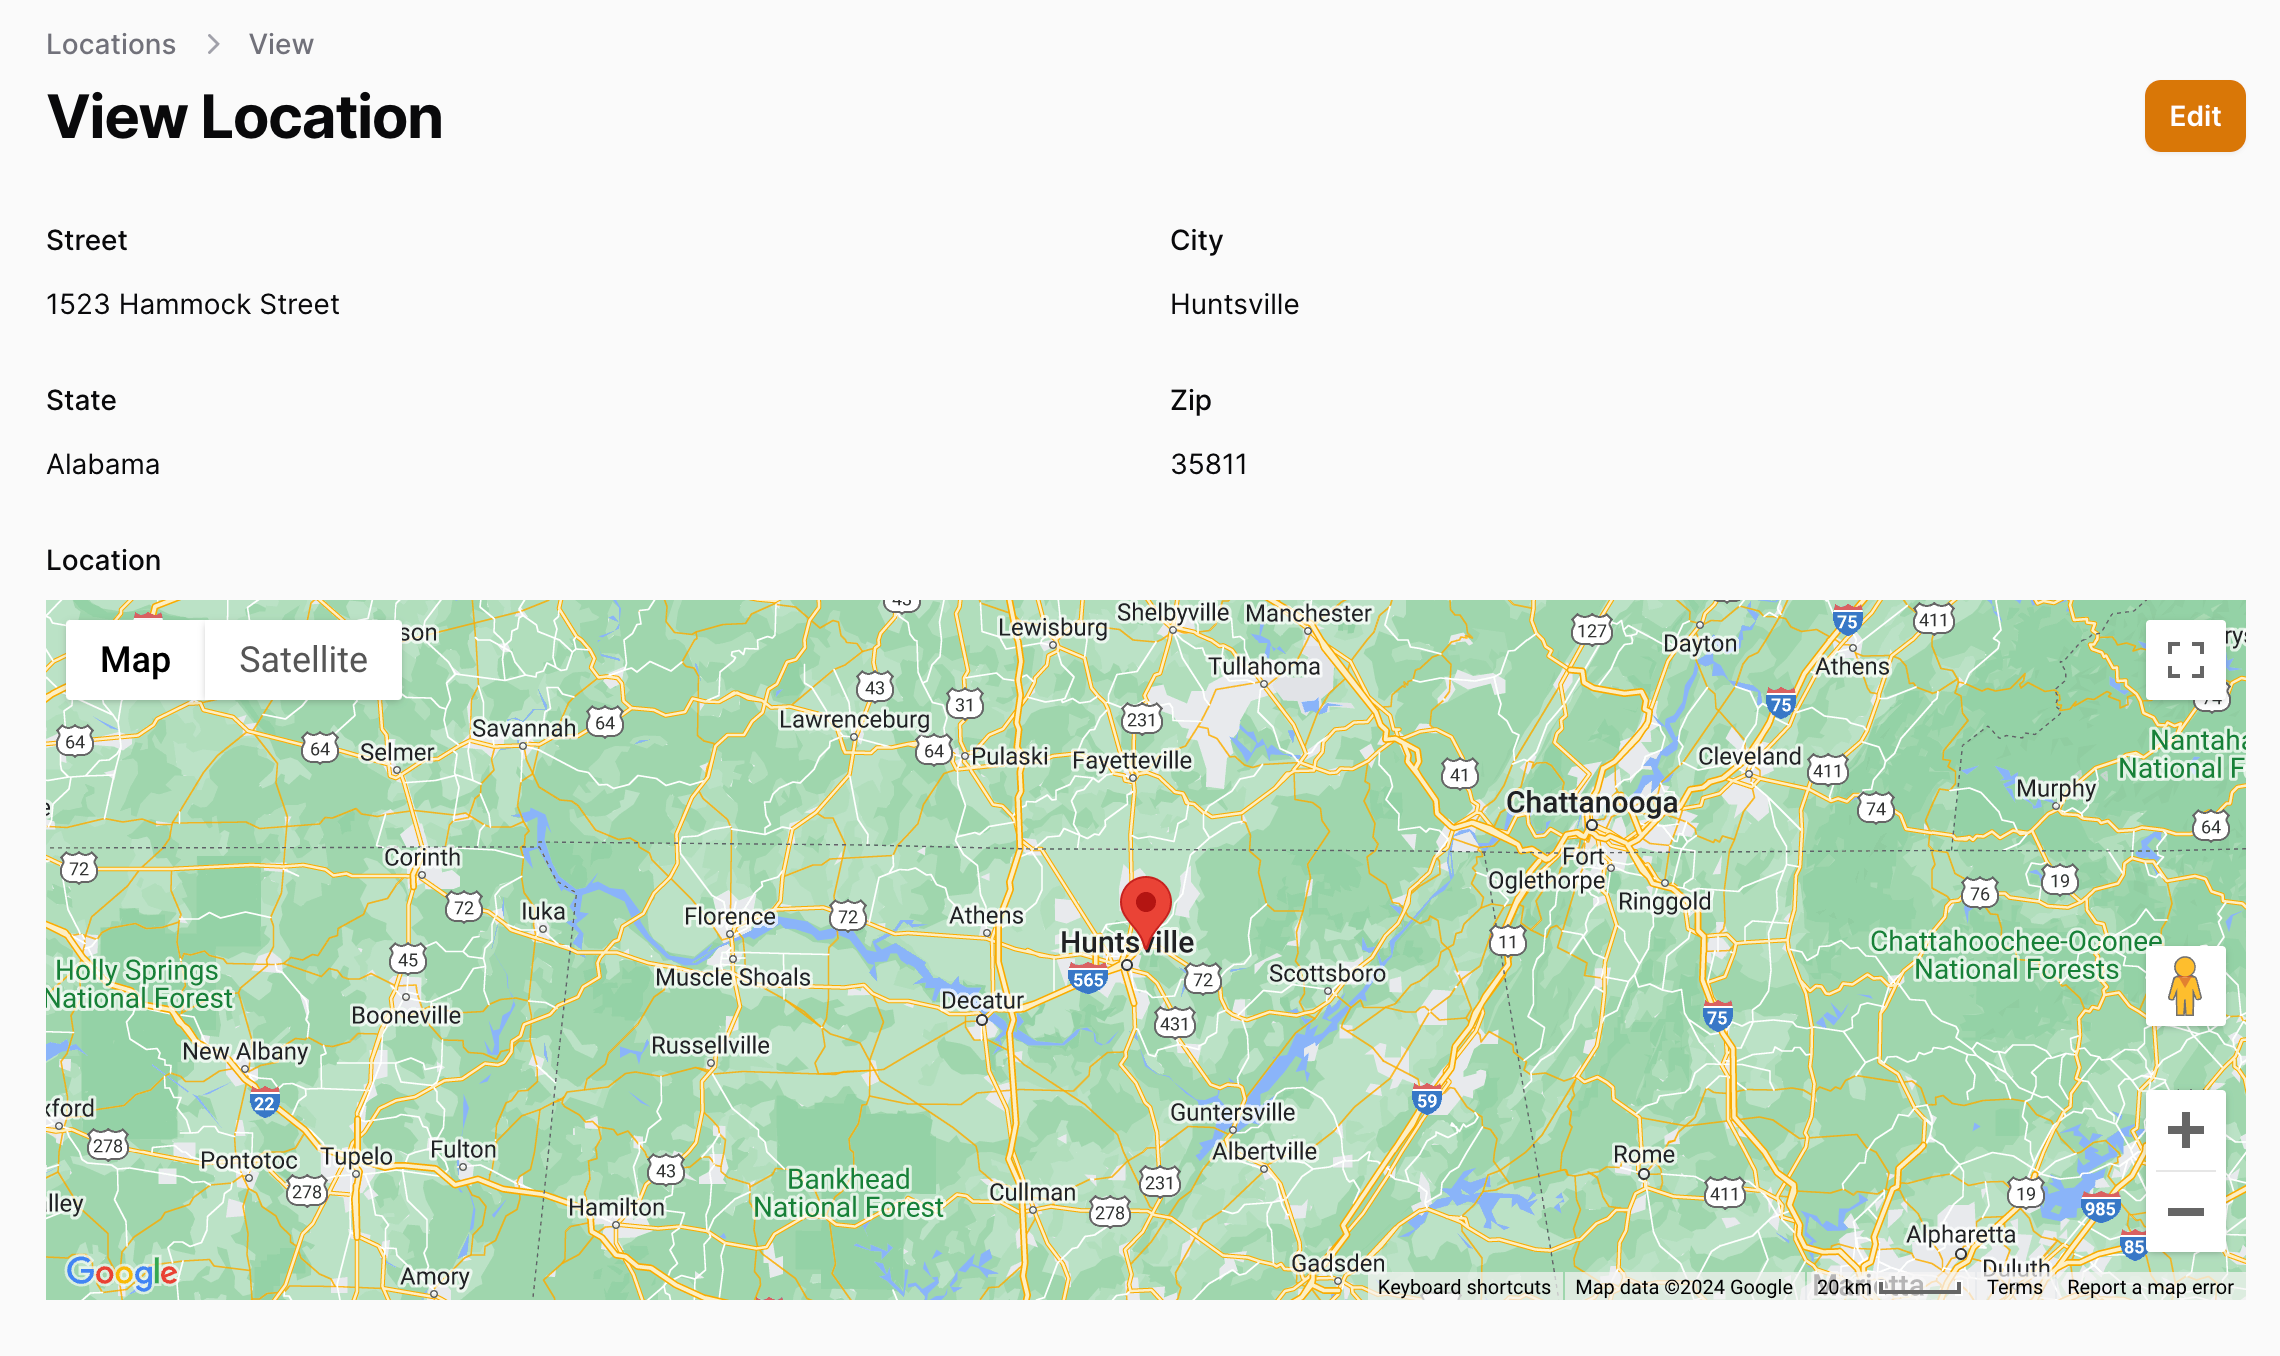
该 MapEntry 信息列表字段显示一个(只读)地图,显示一个单独的标记。目前这是 WIP,即将添加的功能和功能(如 KML 层、GeoJSON 绘图等)。
地图小部件
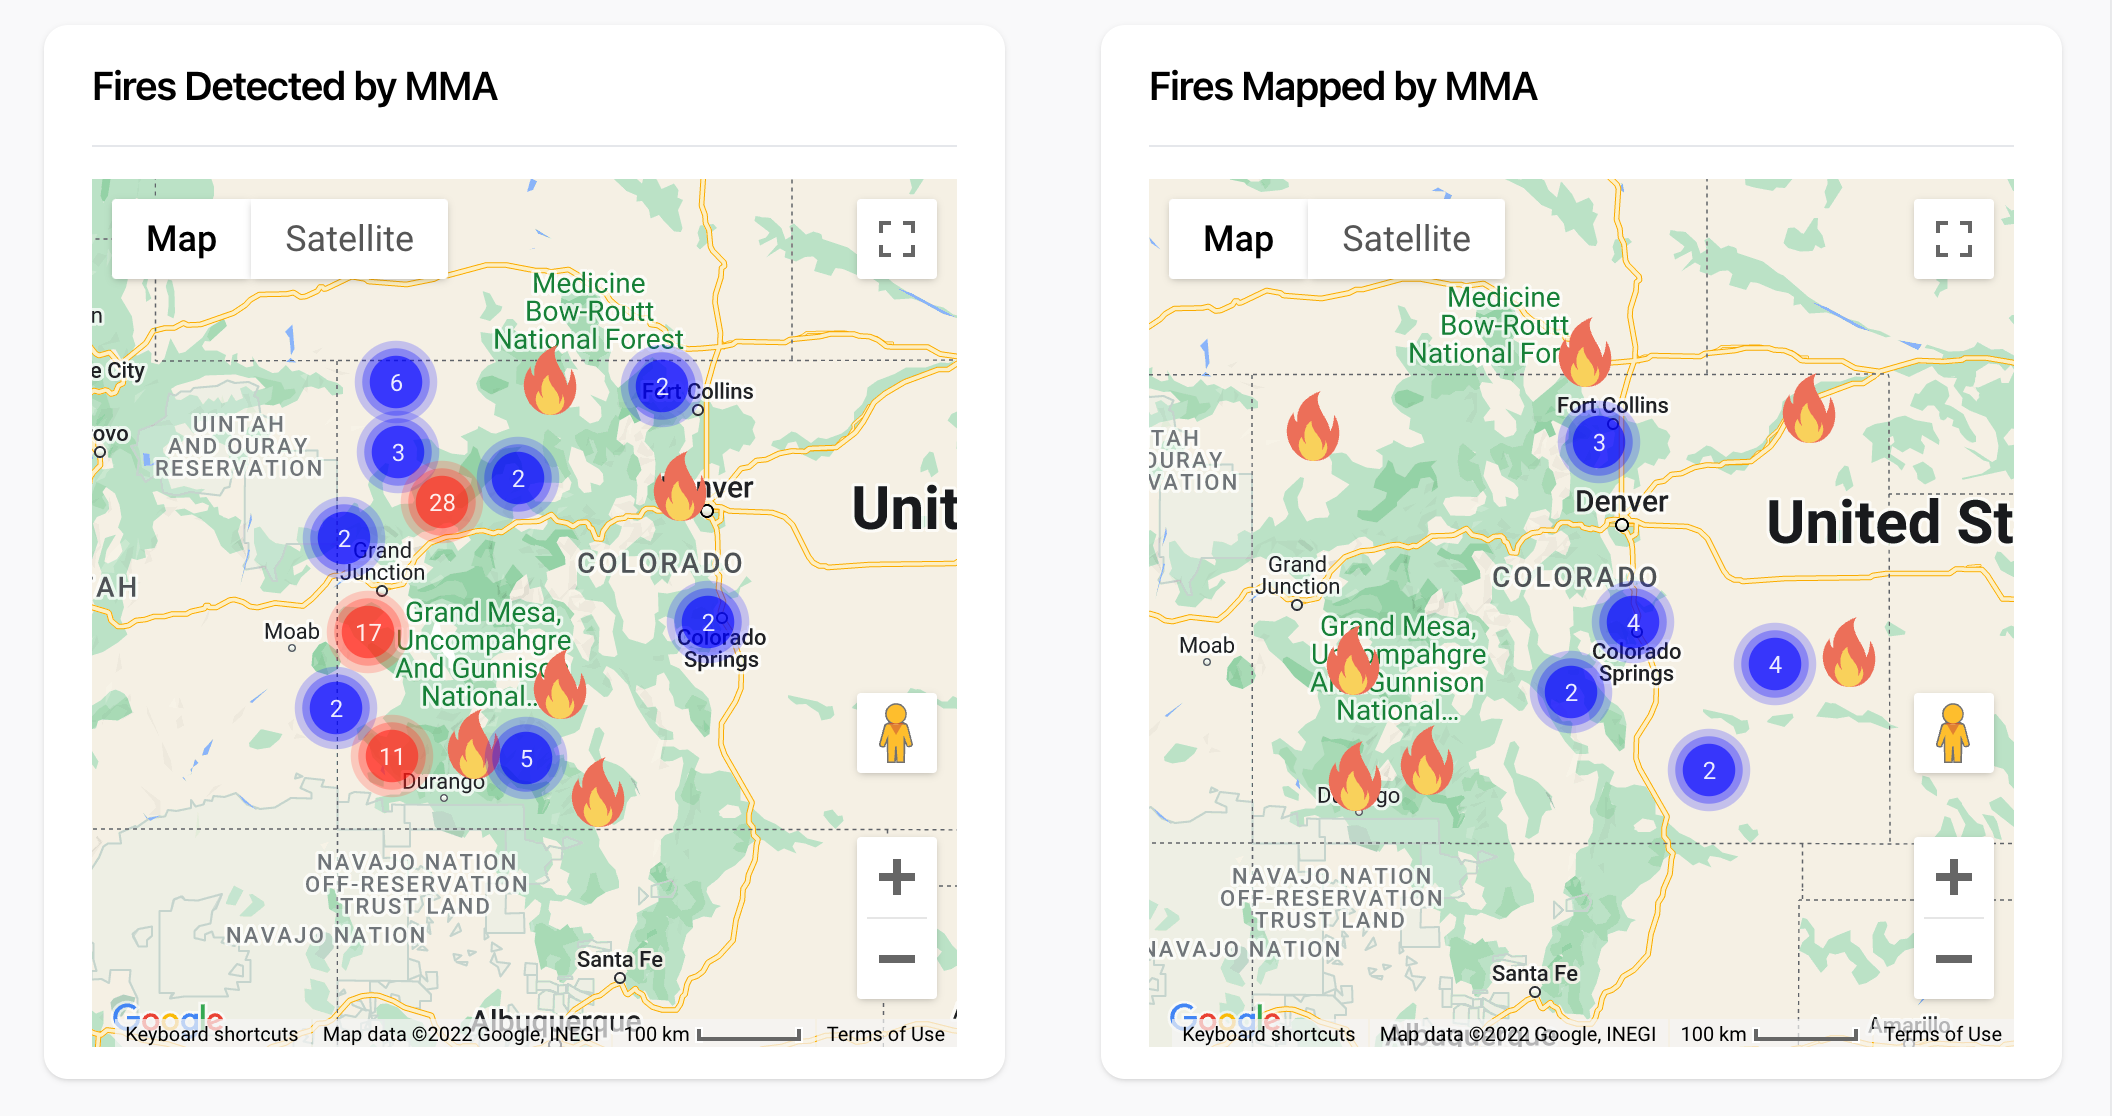
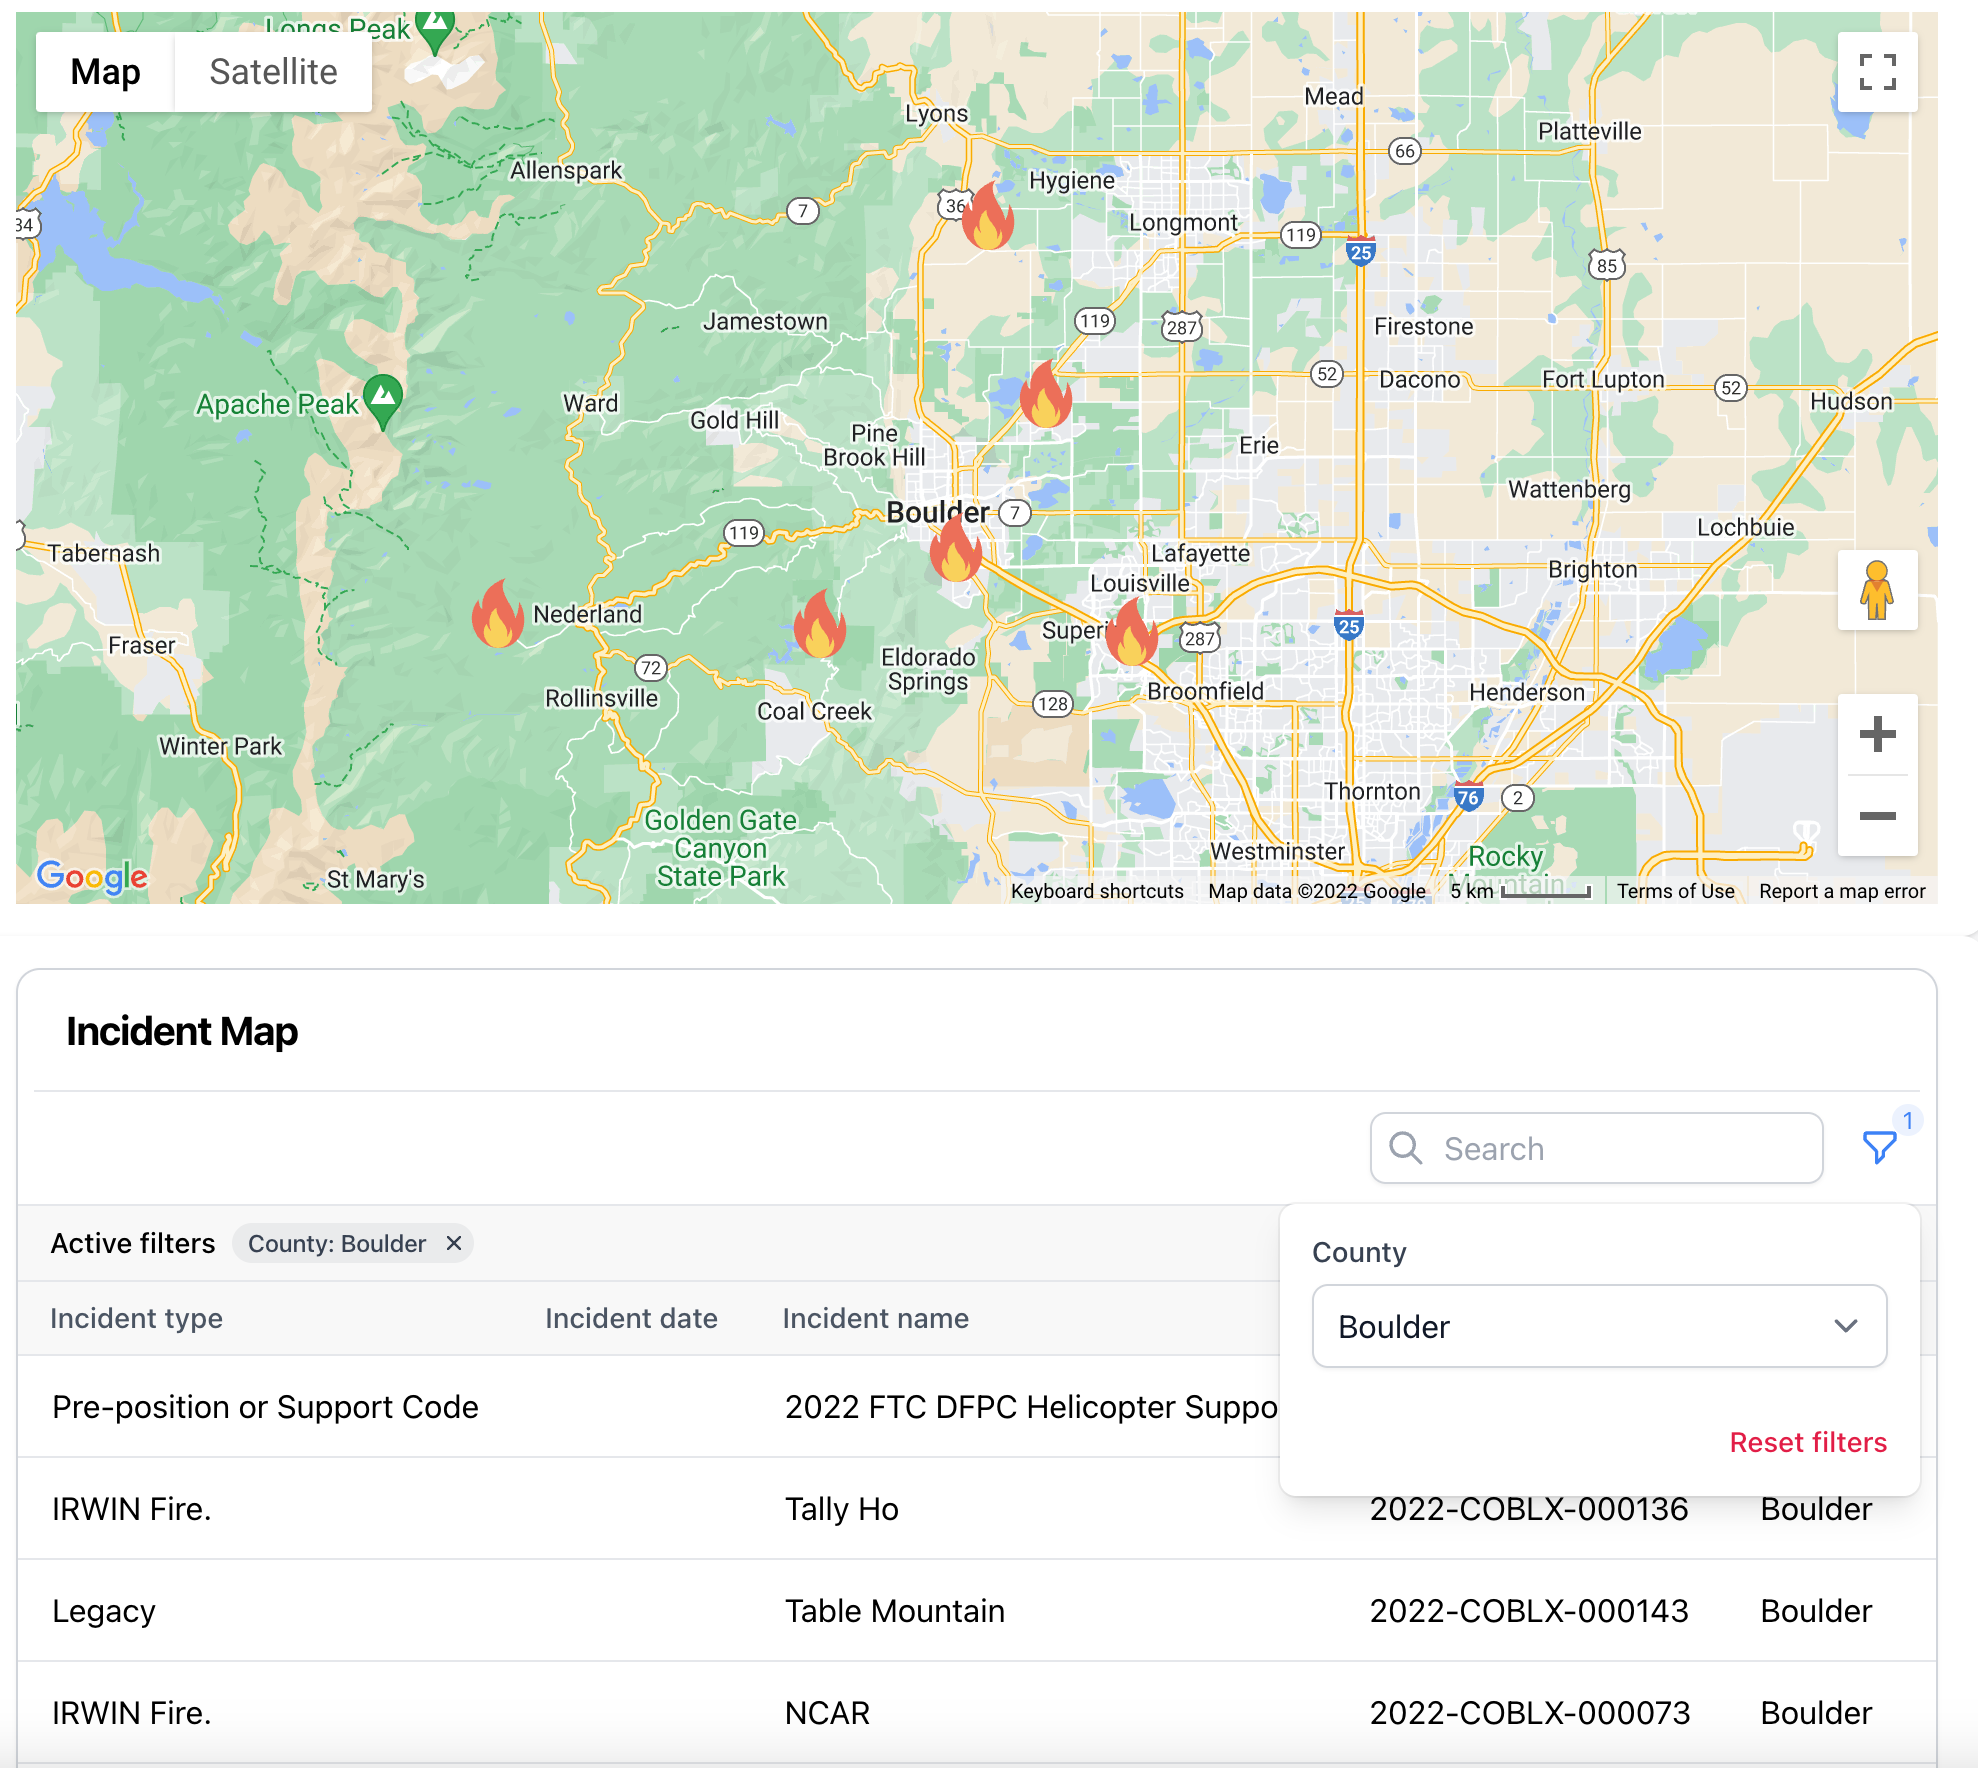
该 MapWidget 显示来自模型的可筛选位置集,具有可选的聚合、可模板化标签、可自定义图标等。
地图表格小部件
该 MapTableWidget 显示地图小部件和 Filament 表格,并响应表格上的所有筛选和搜索。
地图列
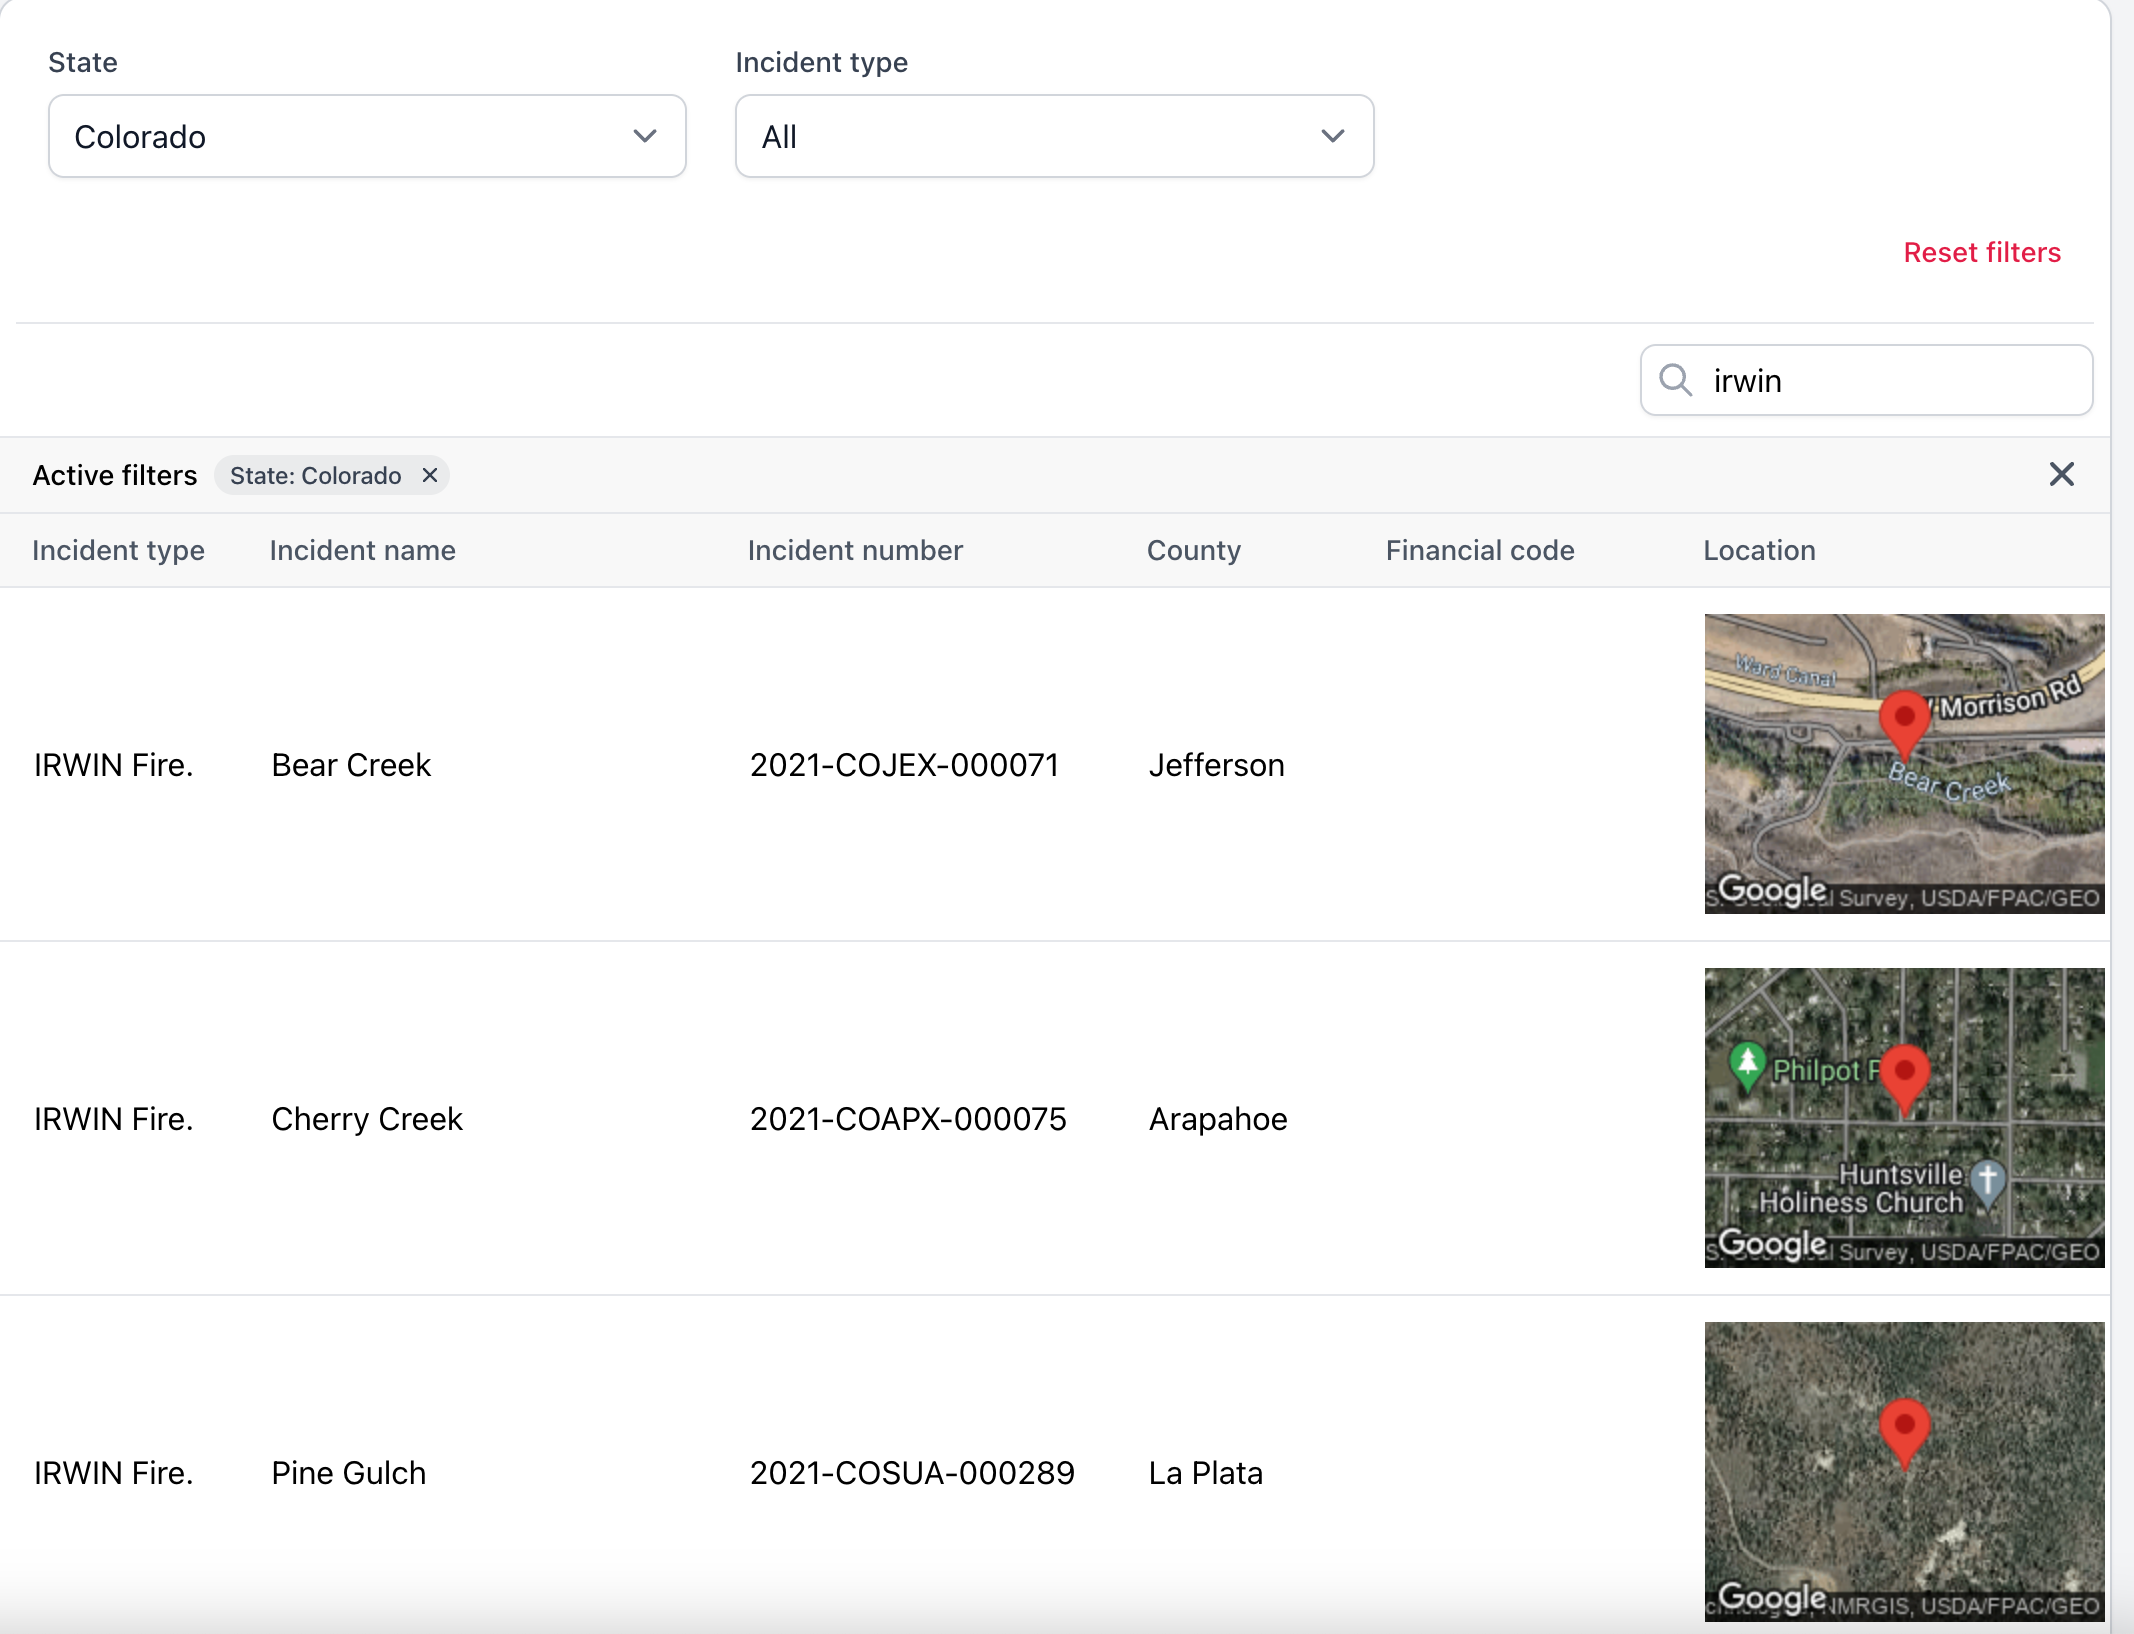
该 MapColumn 显示一个可自定义的静态地图图像,并将图像缓存在本地以减少 API 开销。
静态地图操作
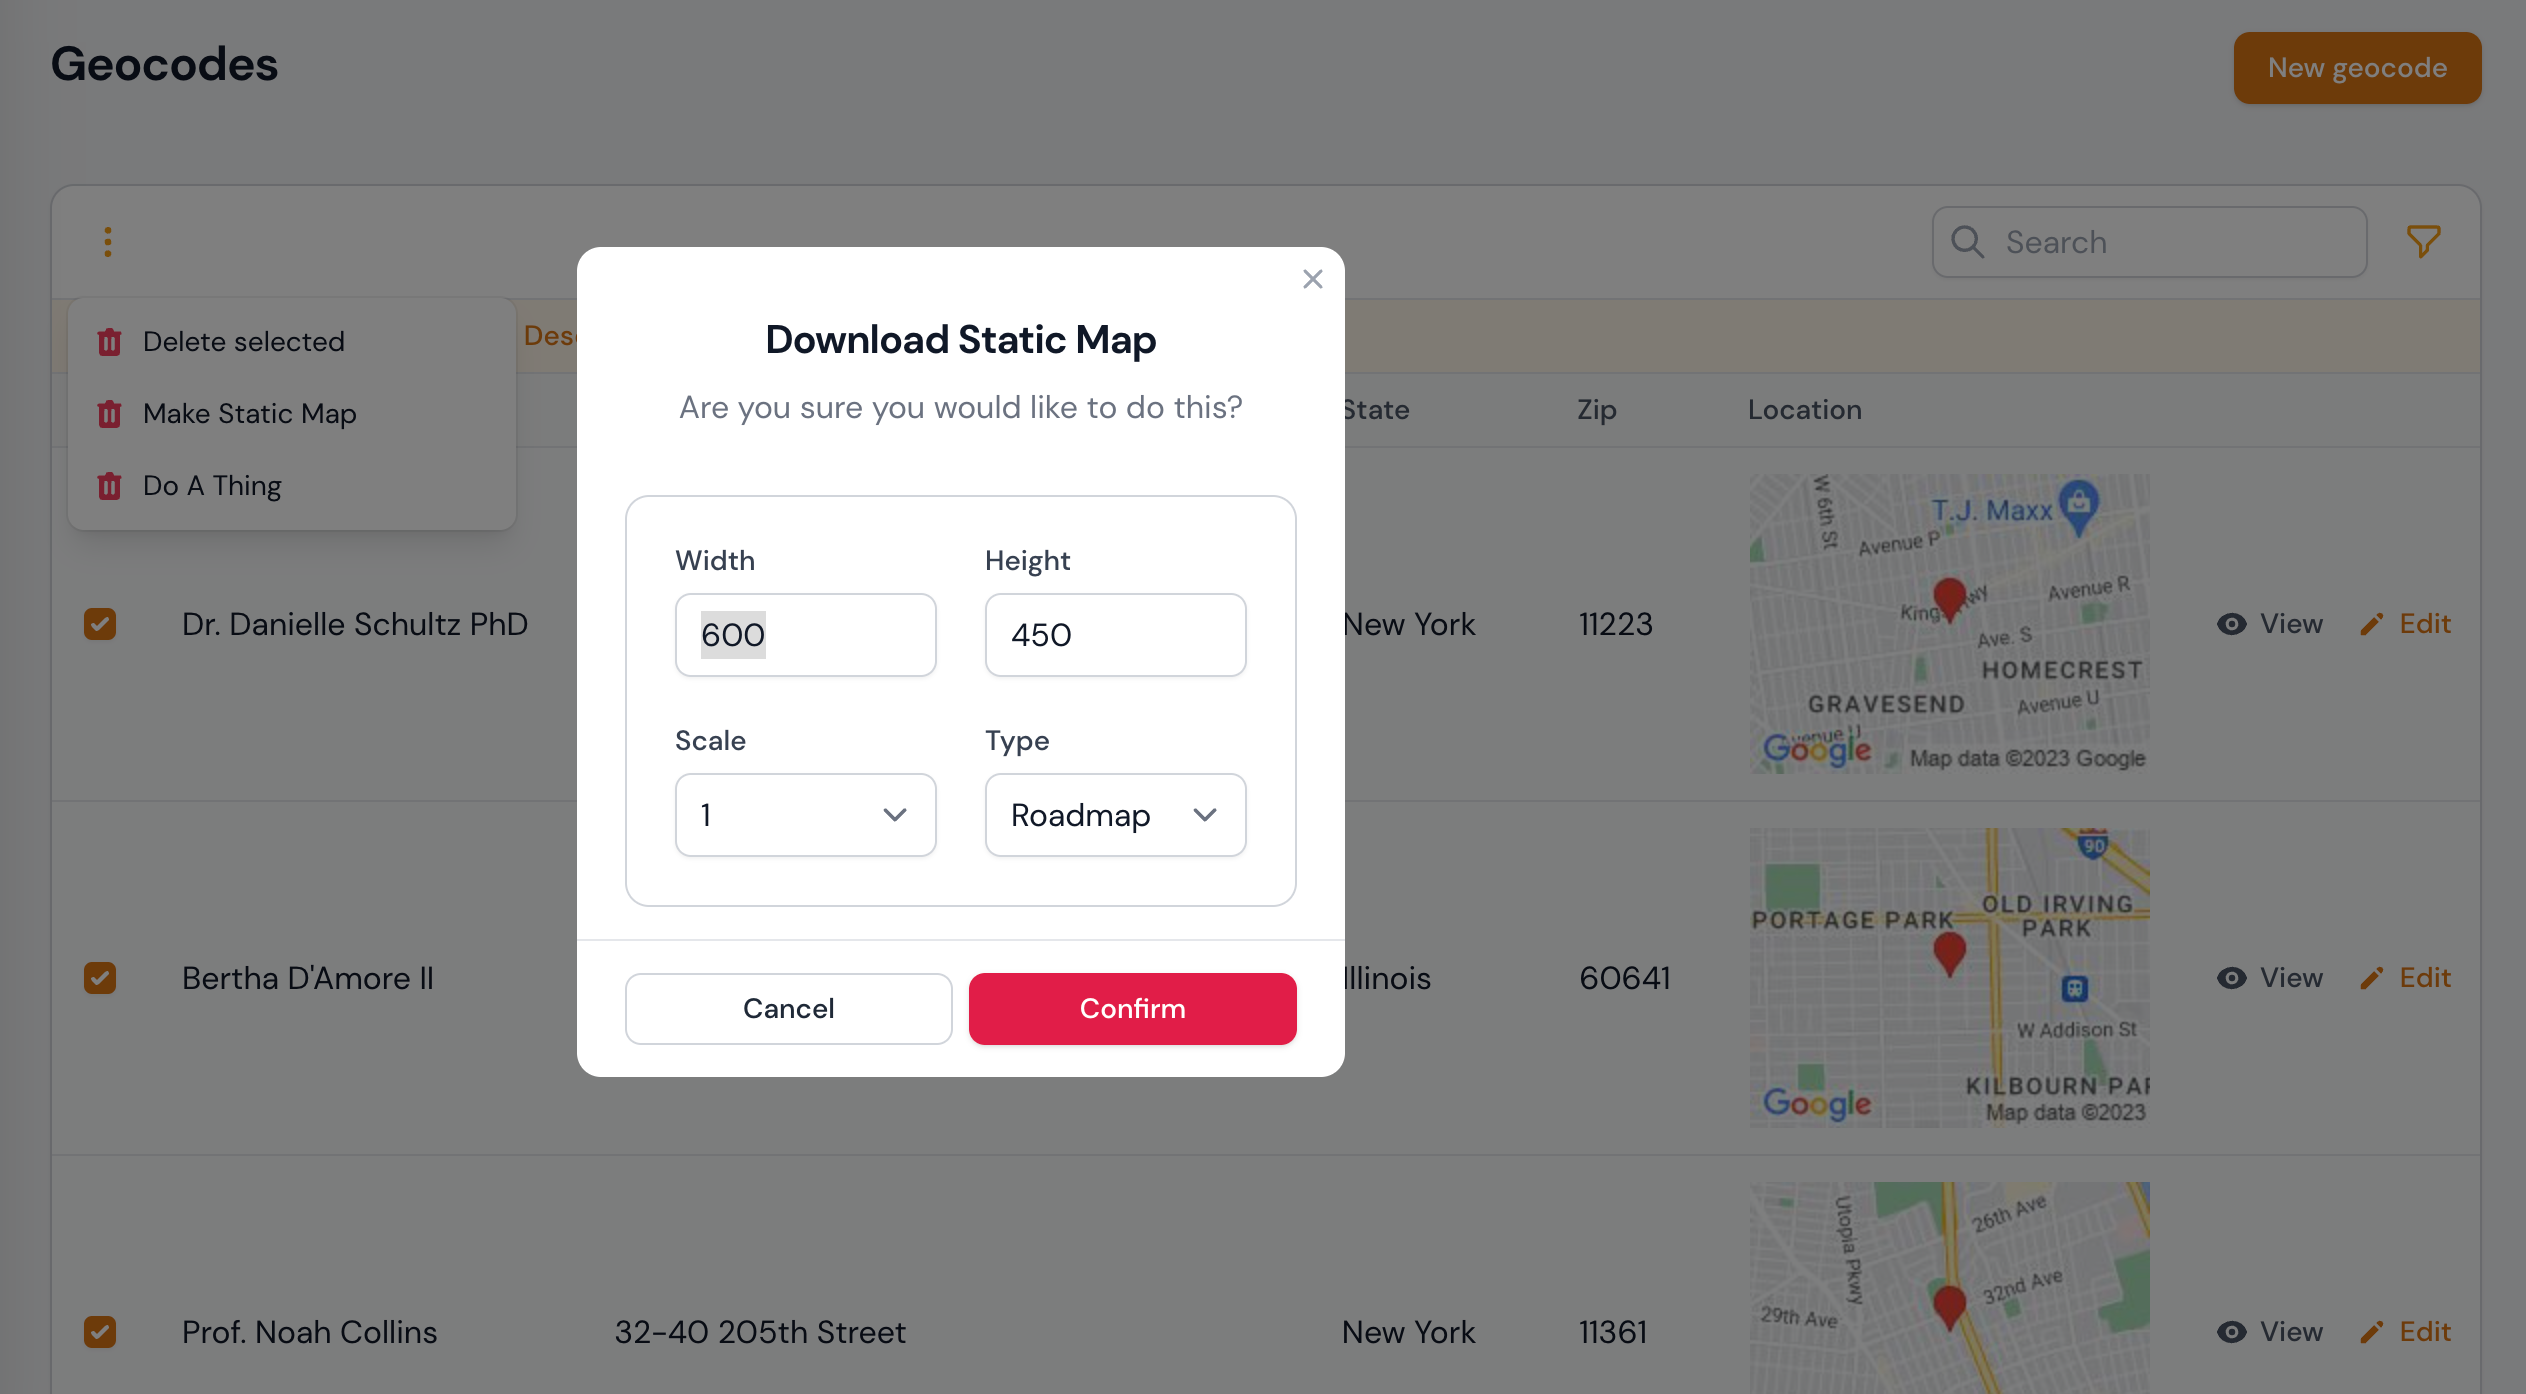
该 StaticMapAction 是一个批量操作,允许您选择任意数量的表格行,并生成一个显示这些位置的下载式静态地图。
半径过滤器
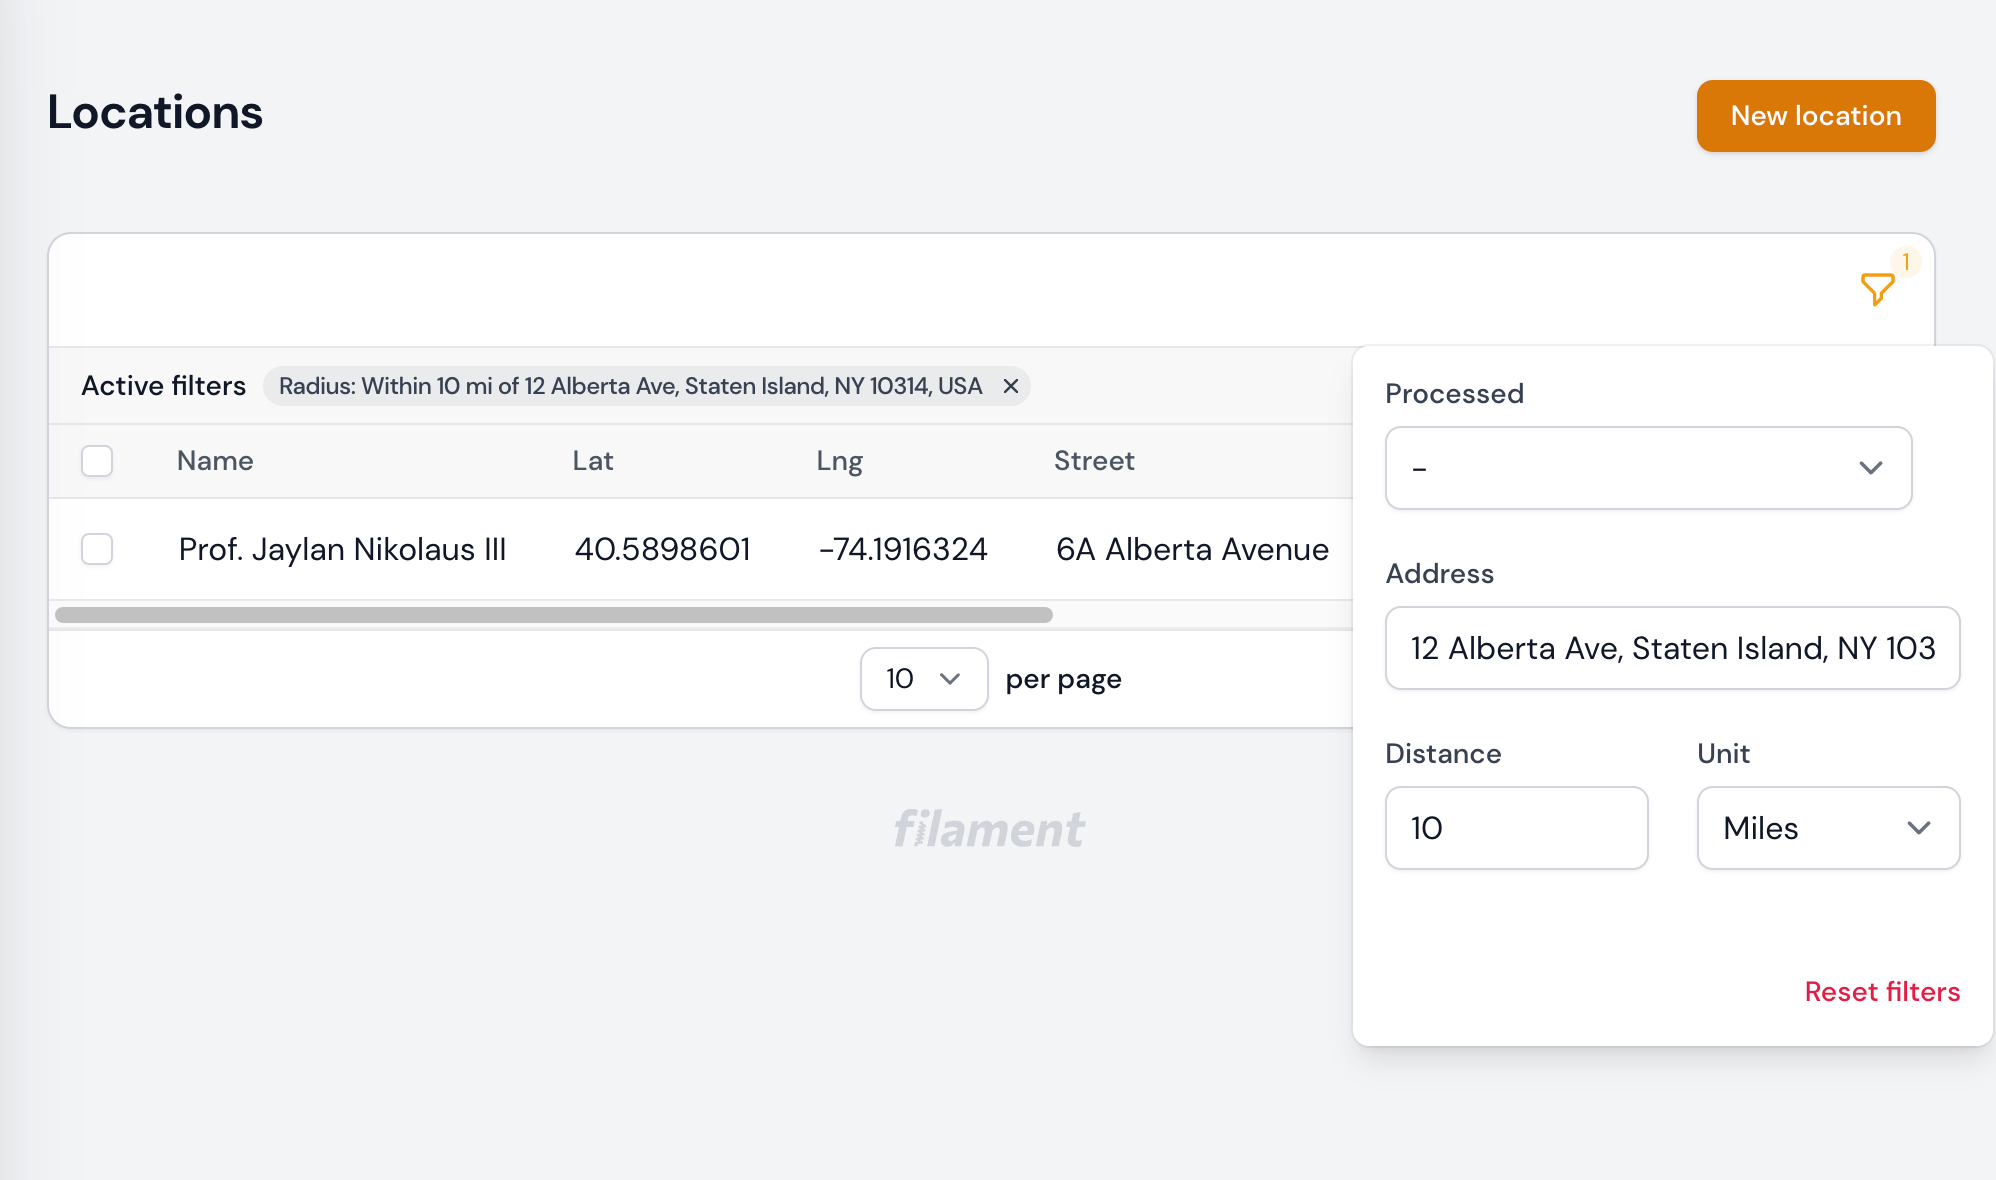
该 RadiusFilter 提供针对地理补全地址的半径筛选,单位为公里或英里。
批量命令
artisan 命令允许您对位置表进行批量处理,无论是将地址字段组合成经纬度,还是将经纬度反向地理编码为地址字段。
(返回顶部)
入门指南
先决条件
此包基于 Filament V2 和 Laravel 9 构建。它可能在更早版本的 Laravel 上运行,但尚未进行测试。
安装
您可以通过 composer 安装此项目。
composer install cheesegrits/filament-google-maps
资源
此包处理 Filament 管理面板和独立页面中的 JS 和 CSS 资产的异步加载,无需发布任何内容或修改您的项目。
准备模型
为了简化对坐标数据的处理,我们要求在用于地图数据的任何模型上有一个计算属性,该属性在您的表中的单独经纬度字段之间进行转换,并转换为包含 'lat' 和 'lng' 键的 Google 点样式数组。
要准备您的模型,请使用 Artisan 命令
php artisan filament-google-maps:model-code
... 它将提示您输入
- 模型:您的模型类,例如 Places,或 Dealerships/Dealership
- 经度:您的纬度属性(现有表字段)
- 纬度:您的经度属性(现有表字段)
- 位置:计算属性名称,该属性在您的表中不应存在
当您制作()地图字段和列时,将使用 'location' 计算属性。如果您没有宗教偏好且该属性已在您的表中存在,只需使用 'location' 即可。
然后它会输出您需要复制和粘贴到模型类中的代码。
注意 - 如果需要,此脚本还会为您提供修改后的 $fillable 和 $appends 数组,这些数组将合并这些数组的现有内容,如果这些数组已经存在,请确保将其替换。
设置您的 Google Maps API 密钥
所有使用 Google Maps API 都需要 API 密钥。如果您没有密钥,请参阅Google 的文档。
一旦您有了密钥,您可以将其添加到 .env 文件中,如下所示
GOOGLE_MAPS_API_KEY=your_map_key_here
... 或者发布并编辑 filament-google-maps.php 配置文件。我们建议使用环境变量。请注意,我们故意使用了大多数 Google 相关 Laravel 包使用的相同密钥名称,以简化操作。但是,如果您需要为此包使用不同的密钥,您可以这样操作 - 参考下一节的配置文件。
发布配置
您可以选择发布包配置。配置包含一组合理的默认值,因此我们建议除非您确实需要更改某些内容,否则不要发布 ... 即使如此,最好使用 .env 变量进行更改。
php artisan vendor:publish --tag="filament-google-maps-config"
... 它可以在 ./config/filament-google-maps.php 中找到
特别值得注意的是 API 密钥和缓存存储的配置设置。默认情况下,我们将使用您的默认缓存驱动程序将所有 API 响应缓存 30 天。对于大多数正常使用来说,这已经足够了,但如果您预计会有大量使用,我们建议在您的 cache.php 配置中设置专门的 Redis 存储并使用 FILAMENT_GOOGLE_MAPS_CACHE_STORE 环境变量指定此存储。
(点击展开)
<?php
return [
	/*
	 | Your Google Maps API key, usually set in .env (but see 'keys' section below).
	 */

    'key' => env('GOOGLE_MAPS_API_KEY'),

	/*
	 | If you need to use both a browser key (restricted by HTTP Referrer) for use in the Javascript API on the
	 | front end, and a server key (restricted by IP address) for server side API calls, you will need to set those
	 | keys here (or preferably set the appropriate .env variables)
	 */

	'keys' => [
		'web_key' => env('FILAMENT_GOOGLE_MAPS_WEB_API_KEY', env('GOOGLE_MAPS_API_KEY')),
		'server_key' => env('FILAMENT_GOOGLE_MAPS_SERVER_API_KEY', env('GOOGLE_MAPS_API_KEY')),
	    'signing_key' => env('FILAMENT_GOOGLE_MAPS_SIGNING_KEY', null),
	],

	/*
	 | By default the browser side Google Maps API will be loaded with just the 'places' library.  If you need
	 | additional libraries for your own custom code, just add them as a comma separated list here (or in the
	 | appropriate env key)
	 */

	'libraries' => env('FILAMENT_GOOGLE_MAPS_ADDITIONAL_LIBRARIES', null),

	/*
	 | Region and country codes.
	 |
	 | Google STRONGLY ENCOURAGED you to set a region code (US, GB, etc) which they use to bias the results
	 |
	 | https://developers.google.com/maps/coverage
	 |
	 | Google discourage you from setting a language, as this should be controlled by the user's browser setting,
	 | and only controls localization of the UI.  So we do not apply a language code to the Javascript API.  However,
	 | we will apply any language code set here to server side API calls like static maps (as used in the Column).
	 |
	 | https://developers.google.com/maps/faq#languagesupport
	 */

	'locale' => [
		'region' => env('FILAMENT_GOOGLE_MAPS_REGION_CODE', null),
		'language' => env('FILAMENT_GOOGLE_MAPS_LANGUAGE_CODE', null),
	],

	/*
	 | Rate limit for API calls, although you REALLY should also set usage quota limits in your Google Console
	 */

	'rate-limit' => env('FILAMENT_GOOGLE_MAPS_RATE_LIMIT', 150),

	/*
	 | Log channel to use, default is 'null' (no logging), set to your desired channel from logging.php if you want
	 | logs.  Typically only useful for debugging, or if you want to keep track of a scheduled geocoding task.
	 */
	'log' => [
		'channel' => env('FILAMENT_GOOGLE_MAPS_LOG_CHANNEL', 'null'),
	],

	/*
	 | Cache store and duration (in seconds) to use for API results.  Specify store as null to use the default from
	 | your cache.php config, false will disable caching (STRONGLY discouraged, unless you want a big Google
	 | API bill!).  For heavy usage, we suggest using a dedicated Redis store.  Max cache duration permitted by
	 | Google is 30 days.
	 */

	'cache' => [
		'duration' => env('FILAMENT_GOOGLE_MAPS_CACHE_DURATION_SECONDS', 60 * 60 * 24 * 30),
		'store' => env('FILAMENT_GOOGLE_MAPS_CACHE_STORE', null),
	]

	 /*
     | Force https for Google API calls, rather than matching the schema of the current request,
	 | may be needed if your app is behind a reverse proxy.
     */

    'force-https' => env('FILAMENT_GOOGLE_MAPS_FORCE_HTTPS', false),
];
(返回顶部)
用法
表单字段
表单字段可以不带选项使用,只需将其添加到您的 Filament 表单模式中即可
use Cheesegrits\FilamentGoogleMaps\Fields\Map
...
->schema[
    ...
    Map::make('location'),
    ...
]
用于 make() 的名称必须是您为模型的计算位置属性设置的名称。请注意,您可以在表单上添加多个地图,通过添加一个引用第二对经纬度字段的第二个计算属性来实现。
完整选项
完整选项集如下。所有选项方法都支持闭包和直接值。
use Cheesegrits\FilamentGoogleMaps\Fields\Map

...

    Map::make('location')
    ->mapControls([
        'mapTypeControl'    => true,
        'scaleControl'      => true,
        'streetViewControl' => true,
        'rotateControl'     => true,
        'fullscreenControl' => true,
        'searchBoxControl'  => false, // creates geocomplete field inside map
        'zoomControl'       => false,
    ])
    ->height(fn () => '400px') // map height (width is controlled by Filament options)
    ->defaultZoom(5) // default zoom level when opening form
    ->autocomplete('full_address') // field on form to use as Places geocompletion field
    ->autocompleteReverse(true) // reverse geocode marker location to autocomplete field
    ->reverseGeocode([
        'street' => '%n %S',
        'city' => '%L',
        'state' => '%A1',
        'zip' => '%z',
    ]) // reverse geocode marker location to form fields, see notes below
    ->debug() // prints reverse geocode format strings to the debug console
    ->defaultLocation([39.526610, -107.727261]) // default for new forms
    ->draggable() // allow dragging to move marker
    ->clickable(false) // allow clicking to move marker
    ->geolocate() // adds a button to request device location and set map marker accordingly
    ->geolocateLabel('Get Location') // overrides the default label for geolocate button
    ->geolocateOnLoad(true, false) // geolocate on load, second arg 'always' (default false, only for new form))
    ->layers([
        'https://googlearchive.github.io/js-v2-samples/ggeoxml/cta.kml',
    ]) // array of KML layer URLs to add to the map
    ->geoJson('https://fgm.test/storage/AGEBS01.geojson') // GeoJSON file, URL or JSON
    ->geoJsonContainsField('geojson') // field to capture GeoJSON polygon(s) which contain the map marker
没有注释的mapControls是标准的Google Maps控件,请参阅API文档。
地理补全
autocomplete('field_name')选项将您提供的字段名称转换为Google Places地理补全字段,在您输入时会建议位置。选择建议会移动地图上的标记。
如果您指定autocompleteReverse(),移动地图标记将更新autocomplete()中指定的字段,以使用Google的formatted_address组件进行反向地理编码。
您可以为autocomplete()方法指定三个额外的选项(通常作为命名参数),有关详细信息,请参阅地理补全长度的部分。
Map::make('location')
    ->autocomplete(
        fieldName: 'airport_name',
        types: ['airport'],
        placeField: 'name',
        countries: ['US', 'CA', 'MX'],
    )
反向地理编码
reverseGeocode()选项允许您指定表单中一系列字段名称及其相应的格式字符串,用于解码Google的地址组件响应。我们使用以下由Geocoder PHP定义的printf()样式格式
- 门牌号:%n
- 街道名称:%S
- 城市(区域,或在瑞典和英国的邮政城镇):%L
- 城市区域(次区域):%D
- 邮政编码:%z
- 行政级别名称:%A1, %A2, %A3, %A4, %A5
- 行政级别代码:%a1, %a2, %a3, %a4, %a5
- 国家:%C
- 国家代码:%c
- 房产:%p
请注意,%p在Geocoder PHP文档中未列出,如果存在,表示地址的“房产”,通常是像“老农舍”这样的地点名称。
为了帮助您确定所需的格式字符串,您可以在地图字段上设置debug(),这将console.log()每个反向地理编码事件的响应(例如,每次移动标记时)。
图层 / GeoJSON
有两种方法可以向地图添加图层。layers()方法接受一个KML或GeoRSS文件URL数组,该数组将使用Maps API的KmlLayer()方法添加到地图中。请注意,这些URL必须是公开可访问的,因为KmlLayer()方法需要Google服务器读取和处理文件,有关详细信息和使用限制,请参阅KML & GeoRSS图层文档。
第二种方法允许使用geoJson()方法指定单个GeoJSON文件,该方法接受一个闭包或字符串,可以是本地文件路径、原始GeoJSON或GeoJSON文件的URL。如果指定本地路径,可选的第二个参数可以是要使用的存储磁盘名称。GeoJSON将使用Maps API的数据层在地图上渲染。
    Map::make('location')
    //
        ->geoJson('jsons/MyGeoJson.geojson', 'json-disk')
    // ... or ...
        ->geoJson('https://my.site/jsons/MyGeoJson.geojson')
    // ... or ...
        ->geoJson(function () {
            // code that builds and returns raw GeoJSON
            return $json;
        })
当使用GeoJSON时,我们提供了一个方便的方法来存储包含地图标记坐标的多边形特征的引用,使用geoJsonContainsField()方法。此方法的第一个参数是在您的表单中存储数据的字段名称(可以是隐藏字段类型)。第二个是可选参数,指定要存储的GeoJSON特征中的属性名称。如果没有指定,将存储整个GeoJSON特征。
    Map::make('location')
        ->geoJson(function () {
            return <<<EOT
{
    "type": "FeatureCollection",
    "features": [
        {
            "type": "Feature",
            "geometry": {
                "type": "Polygon",
                "coordinates": [
                    [100.0, 0.0],
                    [101.0, 0.0],
                    [101.0, 1.0],
                    [100.0, 1.0],
                    [100.0, 0.0]
                ]
            },
            "properties": {
                "prop0": "value0",
                "prop1": 0.0
            }
        },
    ]
}
EOT;
        })
        ->geoJsonContainsField('geojson_contains', 'prop0')
        ->geoJsonVisible(false)
在上面的示例中,如果用户将地图标记放入矩形内,'geojson_contains'字段将更新为["value0"]。如果省略了第二个参数,字段将使用包含矩形JSON的GeoJSON FeatureCollection更新。如果您有重叠的特征,并且多个多边形包含标记,则包含标记的所有特征都将包含在数组/ FeatureCollection中。
此外,请注意可选使用 geoJsonVisible(false) 方法,该方法隐藏图层(创建一个独立的数据层,并将其附加到地图),这样您就可以跟踪包含标记的多边形而无需显示多边形。
响应式表单字段
如果您希望地图标记对表单上 lat 或 lng 字段的变化做出反应
    Forms\Components\TextInput::make('latitude')
        ->reactive()
        ->afterStateUpdated(function ($state, callable $get, callable $set) {
            $set('location', [
                'lat' => floatVal($state),
                'lng' => floatVal($get('longitude')),
            ]);
        })
        ->lazy(), // important to use lazy, to avoid updates as you type
    Forms\Components\TextInput::make('longitude')
        ->reactive()
        ->afterStateUpdated(function ($state, callable $get, callable $set) {
            $set('location', [
                'lat' => floatval($get('latitude')),
                'lng' => floatVal($state),
            ]);
        })
        ->lazy(), // important to use lazy, to avoid updates as you type
如果您希望在地图标记移动时更新表单上的 lat 和 lng 字段
    Map::make('location')
        ->reactive()
        ->afterStateUpdated(function ($state, callable $get, callable $set) {
            $set('latitude', $state['lat']);
            $set('longitude', $state['lng']);
        }),
逆向编码 & 位置变更回调
要使用本节中的功能,您必须将 InteractsWithMaps 特性添加到您的 Livewire 组件中。如果您在 Filament 面板中使用它,这通常是在您的资源(例如 EditFoo 页面)的编辑部分(或简单资源的 ManageFoo)
//
use Cheesegrits\FilamentGoogleMaps\Concerns\InteractsWithMaps;

class EditLocation extends EditRecord
{
    use InteractsWithMaps;

    //
}
在独立表单上下文中,这将是您自己的组件。
如果内置的逆向编码符号映射不能满足您的需求,您可以提供一个闭包,该闭包将在地图上发生逆向编码时由 Livewire 调用。您将传递一个包含编码结果的数组,然后您可以按您想要的方式处理这些结果,并使用 $set 可调用设置表单字段。
注意,reverseGeocodeUsing() 可以与 reverseGeocode() 结合使用,因此您可以用简单的 reverseGeocode() 方法填充一些字段,用 reverseGeocodeUsing() 填充其他字段。这对于例如,如果您有县和/或州表,并使用它们与带有关系的 Select 字段,因此需要不同地处理县/州(通过在您的表中查找相应的地址组件并设置您的表单字段到适当的键)非常有用。
Map::make('location')
    ->reverseGeocodeUsing(function (callable $set, array $results) {
        // get whatever you need from $results, and $set your field(s)
        $set('street', $results['address_components'][1]['long_name'])
    })
同样,如果您希望在地图上解决位置(通常从 Geocomplete 或通过点击地图上的位置标记)时执行自定义处理,您可以使用
Map::make('location')
    ->placeUpdatedUsing(function (callable $set, array $place) {
        // do whatever you need with the $place results, and $set your field(s)
        $set('city', 'foo wibble');
    }),
注意,当您提供 placeUpdatedUsing() 回调时,我们自动将 'photos' 添加到从 API 获取的位置字段列表中,然后这些字段在 $place 数组中可供您使用。
此外,placeUpdatedUsing() 在地图上点击时会添加额外的 API 调用,所以如果您试图将 API 使用量保持在最低,请务必注意。
地理补全字段
Geocomplete 字段将表单上的字段转换为 Google Geocomplete 字段。您通常会使用这个 而不是 地图字段(如果您想同时使用带有地图的 geocomplete 字段,您通常会在地图字段上使用 autocomplete() 功能)。
Geocomplete 字段可以在两种模式之一中运行。要么独立运行,您只需使用它与表单上的普通文本字段,例如 'full_address',然后此组件将使用用户从下拉列表中选择时返回的格式化地址简单地填充该字段。
use Cheesegrits\FilamentGoogleMaps\Fields\Geocomplete
...
    Geocomplete::make('full_address'),
第二种模式是 isLocation() 模式,您可以使用它与模型中的 'location' 计算属性字段一起使用。在这种情况下,当表单保存时,当前选中的地址将被编码到您的 lat 和 lng 字段中。当表单加载时,如果指定了 geocodeOnLoad(),当前 lat 和 lng 将被逆向编码到一个完整的地址(使用 Google 的 formatted_address 字段)。
注意 - geocodeOnLoad() 功能需要您的服务器从 API 访问。如果您正在使用受限于 HTTP Referrers 的 API 密钥,这将不起作用。您需要使用 FILAMENT_GOOGLE_MAPS_SERVER_API_KEY 添加另一个密钥(请参阅配置部分),该密钥受 IP 地址限制。
use Cheesegrits\FilamentGoogleMaps\Fields\Geocomplete
...
    Geocomplete::make('location') // field name must be the computed attribute name on your model
        ->isLocation()
        ->geocodeOnLoad(), // server side geocode of lat/lng to address when form is loaded
在 isLocation 模式下,表单上的字段在加载时将是空的(因为它不是一个可以存储地址的文本字段)。如果您希望它被填充,您可以使用 geocodeOnLoad(),这将执行服务器端 API 调用来将 lat/lng 解码为地址。请参阅配置部分中的说明,有关服务器端 API 密钥。
在两种模式下,您可以指定要显示的位置类型,以及用于填充字段的“地点”响应字段。有关《位置类型》和《位置数据字段》的详细信息,请参阅Google地点API文档。位置类型和位置数据字段。请注意类型数量和组合的限制——从表3中选择1个(如'address'或'establishment'),或者从表1或表2中选择最多5个(如'airport'、'subway_station'等)。
    Geocomplete::make('location')
        ->types(['car_dealer', 'car_rental', 'car_repair'])
        ->placesField('name')
在两种模式下,您可以可选地指定字段,使用与上述地图组件相同的方法反向地理编码所选地址组件数据。
以下示例中未显示,但您也可以使用reverseGeocodeUsing()方法提供自己的闭包来处理反向地理编码数据,如上述地图组件所述。
    Geocomplete::make('location')
        ->isLocation()
        ->reverseGeocode([
            'city'   => '%L',
            'zip'    => '%z',
            'state'  => '%A1',
            'street' => '%n %S',
        ])
        ->countries(['us']) // restrict autocomplete results to these countries
        ->debug() // output the results of reverse geocoding in the browser console, useful for figuring out symbol formats
        ->updateLatLng() // update the lat/lng fields on your form when a Place is selected
        ->maxLength(1024)
        ->prefix('Choose:')
        ->placeholder('Start typing an address ...')
        ->geolocate() // add a suffix button which requests and reverse geocodes the device location
        ->geolocateIcon('heroicon-o-map'), // override the default icon for the geolocate button
Geocomplete字段还提供了与Filament的TextInput相同的许多功能,如前缀、后缀、占位符等。
信息列表字段
Infolist字段显示一个只读地图,其中单个字段显示字段的地理位置。
use Cheesegrits\FilamentGoogleMaps\Infolists\MapEntry;

//

    public function infolist(Infolist $infolist): Infolist
    {
        return $infolist->schema([
            TextEntry::make('street'),
            TextEntry::make('city'),
            TextEntry::make('state'),
            TextEntry::make('zip'),
            MapEntry::make('location')
                ->columnSpan(2),
        ]);
    }
表单WidgetMap字段
如果您需要在表单上的地图中显示多个标记,您可以使用WidgetMap字段。这是主MapWidget的简化版本(见下文),提供多个标记的只读显示。您不能移动或更新标记,只能显示它们。
WidgetMap::make('widget_map')
    ->mapControls([
        'zoomControl' => true,
    ])
    ->markers(function () {
        // retrieve and display all records from the Geocode model
        $markers = [];
        Geocode::all()->each(function (Geocode $record) use (&$markers) {
            $markers[] = [
                'location' => [
                    'lat' => $record->lat ? round(floatval($record->lat), 8) : 0,
                    'lng' => $record->lng ? round(floatval($record->lat), 8) : 0,
                ],
                'label' => $record->name,
            ];
        });

        return $markers;
    })
    ->columnSpan(2)
markers()方法必须返回一个位置数组的数组(与主Map Widget相同),形式为
[
    [
       'location' = > [ 'lat' => 12.34, 'lng' => -12.34 ],
       'label' => 'Foo bar', // optional
       'icon' => [ 'url' => 'path/to/foo.svg', 'type' => 'svg', 'scale' = [35,35] ] // optional
    ],
    //
]
您还可以使用center()和zoom()方法来自定义地图的初始显示。
表列
表格列显示静态的Google地图图像。图像是通过调用地图API在服务器端创建的,并使用Laravel的默认缓存驱动程序在服务器本地缓存(默认为30天),以防止过度使用API。请参阅本页顶部关于API使用的警告。
use Cheesegrits\FilamentGoogleMaps\Columns\MapColumn;
...
MapColumn::make('location')
    ->extraAttributes([
      'class' => 'my-funky-class'
    ]) // Optionally set any additional attributes, merged into the wrapper div around the image tag
    ->extraImgAttributes(
        fn ($record): array => ['title' => $record->latitude . ',' . $record->longitude]
    ) // Optionally set any additional attributes you want on the img tag
    ->height('150') // API setting for map height in PX
    ->width('250') // API setting got map width in PX
    ->type('hybrid') // API setting for map type (hybrid, satellite, roadmap, tarrain)
    ->zoom(15) // API setting for zoom (1 through 20)
    ->ttl(60 * 60 * 24 * 30), // number of seconds to cache image before refetching from API
注意标记为“API设置”的选项用作缓存键的一部分,因此更改其中任何内容都将强制刷新表格中显示的所有图像的缓存。
半径过滤
半径过滤器允许您指定地址(使用geocomplete下拉列表)、数字距离和可选的单位选择,然后表将过滤到指定地址距离内的记录。
use Cheesegrits\FilamentGoogleMaps\Filters\RadiusFilter;
...
    RadiusFilter::make('radius')
        ->latitude('lat')  // optional lat and lng fields on your table, default to the getLatLngAttributes() method
        ->longitude('lng') // you should have one your model from the fgm:model-code command when you installed
        ->selectUnit() // add a Kilometer / Miles select
        ->kilometers() // use (or default the select to) kilometers (defaults to miles)
        ->section('Radius Search') // optionally wrap the filter in a section with heading
如果您的位置在相关表中,例如,如果您想在'events'表上放置半径过滤器,而您的位置在'places'表中,并且您在Event模型上有一个'place' BelongsTo关系。
您还可以覆盖颜色和图标。
RadiusFilter::make('radius')
    ->attribute('place.location') // the relationship, with the computed location attribute
    ->color('primary')
    ->icon('heroicon-m-map'),
当使用半径过滤时,还有一个RadiusAction可以使用,它允许您单击表格中的按钮来设置当前半径过滤器使用的地址。
注意 - 您必须将RadiusAction命名为与您的RadiusFilter相同的名称。默认为'radius'。
use Cheesegrits\FilamentGoogleMaps\Actions\RadiusAction;

//

    protected function getTableActions(): array
    {
        return [
            //
            RadiusAction::make(),
        ];
    }
如果您的位置在相关数据中,您可以在RadiusAction上添加relationship()方法。您还可以覆盖颜色和图标。
use Cheesegrits\FilamentGoogleMaps\Actions\RadiusAction;

//

    protected function getTableActions(): array
    {
        return [
            //
            RadiusAction::make()
                ->relationship('location')
                ->color('primary')
                ->icon('heroicon-m-map'),
        ];
    }
地图是过滤器
有关如何将地图用作表格过滤器的详细信息,请参阅下面的地图表格小部件部分。
静态地图批量操作
静态地图批量操作允许您在表中选择任意数量的行,然后生成这些位置的可下载静态地图,并有一个对话框来指定地图大小、类型和比例。
use Cheesegrits\FilamentGoogleMaps\Actions\StaticMapAction;

        //
            ->bulkActions([
                //
                StaticMapAction::make(),
                //
            ]);
        //
地图小部件
地图小部件可以在Filament管理面板(见Filament文档)中或作为独立的普通Livewire组件独立使用。
要生成小部件的代码,请运行以下Artisan命令
php artisan fgm:make-widget


 Widget type (just a map, or map with integrated table [Map]:
  [0] Map
  [1] Map & Table
 > 1

 Name (e.g. `DealershipMap`):
 > LocationMapTableWidget

 Model (e.g. `Location` or `Maps/Dealership`):
 > Location

 (Optional) Resource (e.g. `LocationResource`):
 > LocationResource

Successfully created the LocationMapTableWidget in your LocationResource resource class.

Make sure to register the widget both in `LocationResource::getWidgets()`,
and in either `getHeaderWidgets()` or `getFooterWidgets()` of any `LocationResource` page.
如果您省略了资源,小部件将在主小部件文件夹/Filament/Widgets 中创建,并且命令将告诉您如何在前端使用它
Your widget has been created as: App/Filament/Resources/LocationMapTableWidget.php

If you want to use it on the front end, copy/move it to somewhere in your Livewire folder, say ...

/Http/Livewire/Widgets/LocationMapTableWidget.php

... and then invoke it from a front end Blade template like ...

@livewire('widgets.location_map_table_widget')
创建的代码看起来可能像这样
<?php

namespace App\Http\Livewire\Widgets;

use App\Models\Dealerships;
use Cheesegrits\FilamentGoogleMaps\Widgets\MapWidget;

class DealershipMap extends MapWidget
{
    protected static ?string $heading = 'Dealership Locations';

    protected static ?bool $clustering = true;

    protected function getData(): array
    {
        $dealerships = Dealerships::all();

        $data = [];

        foreach ($dealerships as $dealership)
        {
            if ($dealership->latitude && $dealership->longitude)
            {
                /**
                 * Each element in the returned data must be an array
                 * containing a 'location' array of 'lat' and 'lng',
                 * and a 'label' string.
                 *
                 * You should also aan 'id' attribute for internal use by this plugin.
                 */
                $data[] = [
                    'location'  => [
                        'lat' => $dealership->latitude,
                        'lng' => $dealership->longitude,
                    ],

                    'label' => $dealership->name,

                    'id' => $dealership->getKey(),

                    /**
                     * Optionally you can provide custom icons for the map markers,
                     * either as scalable SVG's, or PNG, which doesn't support scaling.
                     * If you don't provide icons, the map will use the standard Google marker pin.
                     */
                    'icon' => [
                        'url' => url('images/dealership.svg'),
                        'type' => 'svg',
                        'scale' => [35,35],
                    ],
                ];
            }
        }

        return $data;
    }
}
您可以可选地使用 Blade 模板渲染标签(请参阅 Google API 文档以了解您可以使用哪些 HTML 标记和样式),并提供一个图标(svg 或 png)...
                $data[] = [
                    // ...
                    'label'     => view(
                        'widgets.dealership-label',
                        [
                            'dealershipId'   => $dealership->id,
                            'dealershipName' => $dealership->name,
                            'dealershipIcon' => $dealership->icon,
                        ]
                    )->render(),
                    // ...
                ];
要为您的标记添加可点击的弹出操作,例如显示包含记录详情的信息列表,您可以添加一个 markerAction() 方法,该方法可以使用 actions 的 record() 方法中的 $arguments 中的 'model_id' 来定位被点击的标记的记录,例如
use Filament\Actions\Action;
use Filament\Infolists\Components\Card;
use Filament\Infolists\Components\TextEntry;

class DealershipMap extends MapWidget
{
    // must be the name of both the Action and your method that returns the Action
	protected static ?string $markerAction = 'markerAction';

    //

	public function markerAction(): Action
	{
		return Action::make('markerAction')
			->label('Details')
			->infolist([
				Card::make([
					TextEntry::make('name'),
					TextEntry::make('street'),
					TextEntry::make('city'),
					TextEntry::make('state'),
					TextEntry::make('zip'),
					TextEntry::make('formatted_address'),
				])
				->columns(3)
			])
			->record(function (array $arguments) {
				return array_key_exists('model_id', $arguments) ? Location::find($arguments['model_id']) : null;
			})
			->modalSubmitAction(false);
	}

    //
}
您可以通过重写 getConfig() 方法并添加一个 ['mapConfig'] 条目到 $config 中来向地图配置(传递给 JavaScript 中 Google 地图创建的 'opts' 对象)添加选项。您添加到其中的任何内容都将原封不动地传递到地图创建中。例如,要隐藏 POI(兴趣点)标记
    public function getConfig(): array
    {
        $config = parent::getConfig();

        // Disable points of interest
        $config['mapConfig']['styles'] = [
            [
                'featureType' => 'poi',
                'elementType' => 'labels',
                'stylers' => [
                    ['visibility' => 'off'],
                ],
            ],
        ];

        return $config;
    }
请参阅父组件代码以获取可以重写的其他方法和变量,例如更改或删除图标或使地图部分可折叠。
地图表格小部件
地图表格小部件具有原生小部件的所有功能,但下面还增加了一个 Filament 表格。地图对所有表格上的过滤和搜索做出响应,这是使用标准的 Filament 表格方法和模式完成的。
要生成经销商表格地图,您将运行相同的 Artisan 命令,但选择地图和表格选项。生成的代码将类似于地图选项,但增加了用于定义表格列、过滤器、操作等熟悉的 Filament 方法。
    protected function getTableFilters(): array
    {
        return [
            MapIsFilter::make('map'),
        ];
    }

    protected function getTableActions(): array
    {
        return [
            GoToAction::make()
                ->zoom(14),
        ];
    }
use Cheesegrits\FilamentGoogleMaps\Widgets\MapTableWidget;

// ...

class DealershipMap extends MapTableWidget
{
    // ...
    protected function getTableQuery(): Builder
    {
        return Dealer::all();
    }

    protected function getTableColumns(): array
    {
        return [
            Tables\Columns\TextColumn::make('name'),
            Tables\Columns\TextColumn::make('state.name'),
            Tables\Columns\TextColumn::make('phone')
                ->searchable(),
            Tables\Columns\TextColumn::make('email')
                ->searchable(),
        ];
    }

    protected function getTableFilters(): array
    {
        return [
            Tables\Filters\SelectFilter::make('state')
                ->label('State')
                ->relationship('state','state_name'),
            MapIsFilter::make('map'),
        ];
    }
    // ...
}
您可以在表格中做任何事情,就像在普通 Filament 表格中一样。
此外,请注意 MapIsFilter 表格过滤器的使用。通过将此可选地包含在表格过滤器中,您的地图作为附加表格的过滤器,因此缩放和拖动以更改可见的地图标记将相应地过滤表格。
此小部件还提供了一个额外的操作,即 GoToAction,当点击时将缩放和拖动地图到所选位置。
(返回顶部)
Artisan 命令
以下命令也可以作为 fgm: 引用,而不是 filament-google-maps:,因为我们也厌倦了键入它。
辅助命令
能够测试单个地理编码查找通常很有用。我们提供了两个命令 ...
php artisan filament-google-maps:geocode --address="1600 Pennsylvania Avenue NW, Washington, DC 20500" -A -C -G

lat: 38.8976633
lng: -77.0365739

[
    'lat' => 38.8976633
    'lng' => -77.0365739
[

--lat=38.8976633 --lng=-77.0365739

php artisan filament-google-maps:reverse-geocode --lat=38.8976633 --lng=-77.0365739
... 其中开关是可选的,并控制 lat/lng 的格式,对于(比如说)设置 Map 字段默认位置的数组很有用。或者,正如我们在这里所做的,找到用于反向查找命令的地址坐标,这样我们就可以检查地址组件格式 ...
php artisan filament-google-maps:reverse-geocode --lat=38.8976633 --lng=-77.0365739
+--------+-------------------------------+
| Symbol | Result                        |
+--------+-------------------------------+
| %n     | 1600                          |
| %S     | Pennsylvania Avenue Northwest |
| %L     | Washington                    |
| %D     |                               |
| %z     | 20502                         |
| %A1    | District of Columbia          |
| %A2    |                               |
| %A3    |                               |
| %A4    |                               |
| %A5    |                               |
| %a1    | DC                            |
| %a2    |                               |
| %a3    |                               |
| %a4    |                               |
| %a5    |                               |
| %C     | United States                 |
| %c     | US                            |
| %T     |                               |
+--------+-------------------------------+
批量命令
处理位置数据时,通常会有没有地址数据但有纬度和经度数据的表,反之亦然。此软件包提供了方便的方法来处理表格,以便将它们地理编码或反向地理编码以填充空白。
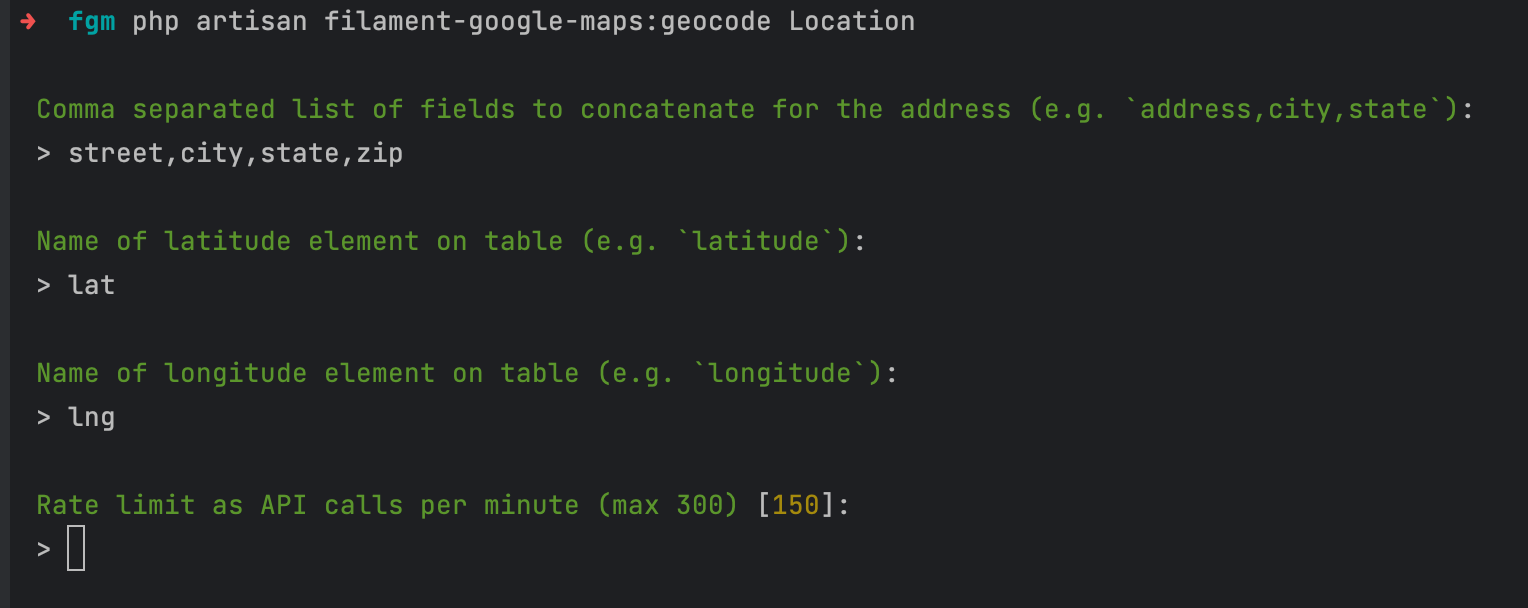
批量地理编码
要将纬度和经度坐标添加到具有地址数据的表格中,请运行此命令
php artisan filament-google-maps:geocode-table
... 它将提示您以下信息
- model - 您的模型名称,例如 Location 或 Dealerships/Location
- fields - 由地址组成的字段列表,以逗号分隔,例如 'street,city,state,zip'
- lat - 您的纬度字段
- lng - 您的经度字段
- processed - 可选的字段名称,当地理编码时将设置为 1,当设置为 1 时将被排除
- rate-limit - 每分钟查找的最大次数(最大为 300,这是 Google 的硬限制,建议的最大值为 150)
或者,您可以跳过手动操作并发布 ...
php artisan filament-google-maps:geocode-table Location --fields=street,city,state,zip --lat=lat --lng=lng --rate-limit=100
如果你的地址数据中存在关联关系,比如说你有一个名为 'states' 的表,其中 'state' 字段是外键,你可以用点分隔符来指定,例如 'states.state_full_name',其中第一部分(states)是你模型上关系的名称。
该命令将选择表中所有lat或lng字段为空(0、null或空字符串)的记录。
批量反向地理编码
从命令行进行反向地理编码有点复杂,因为我们需要分解并映射谷歌返回的相当复杂的地址格式。为此,我们使用来自Geocoder PHP的标准printf样式格式化。
这里不再一一解释,以下是一个示例终端会话...
(点击展开)
fgm> php artisan filament-google-maps:reverse-geocode Location

 Name of latitude element on table (e.g. `latitude`):
 > lat

 Name of longitude element on table (e.g. `longitude`):
 > lng

 Optional name of field to set to 1 when record is processed (e.g. `processed`)
 > processed

+------------------------------+-------------------------+
| Component                    | Format                  |
+------------------------------+-------------------------+
| Street Number                | %n                      |
| Street Name                  | %S                      |
| City (Locality)              | %L                      |
| City District (Sub-Locality) | %D                      |
| Zipcode (Postal Code)        | %z                      |
| Admin Level Name             | %A1, %A2, %A3, %A4, %A5 |
| Admin Level Code             | %a1, %a2, %a3, %a4, %a5 |
| Country                      | %C                      |
| Country Code                 | %c                      |
| Timezone                     | %T                      |
+------------------------------+-------------------------+
Use the table above to enter your address component mapping.

Google returns a complex set of address components.  You need to tell us how you want
those components mapped on to your database fields.  We use a standard symbolic format
as summarixed in the table above to extract the address components.

Each mapping should be of the form <field name>=<format symbol(s)>, for example
to map (say) a street address to your `street_name` field, you would need ...

street_name=%n %S

... and you might also add ...

city=%L
state=%A2
zip=%z

... or just ...

formatted_address=%s %S, %L, %A2, %z

You may enter as many mappings as you need, enter a blank line to continue.

Test your field mapping.

Yes.  This is complicated.  If you would like us to look up an example record from your table
and show you what all those formats translate to, enter an ID here.  If not, just press enter.

 ID (primary key on table):
 > 1

+--------+-------------------+
| Symbol | Result            |
+--------+-------------------+
| %n     | 19225             |
| %S     | North 44th Avenue |
| %L     | Glendale          |
| %D     |                   |
| %z     | 85308             |
| %A1    | Arizona           |
| %A2    | Maricopa County   |
| %A3    |                   |
| %A4    |                   |
| %A5    |                   |
| %a1    | AZ                |
| %a2    | Maricopa County   |
| %a3    |                   |
| %a4    |                   |
| %a5    |                   |
| %C     | United States     |
| %c     | US                |
| %T     |                   |
+--------+-------------------+

 Field mapping (e.g. city=%L), blank line to continue:
 > street=%n %S

 Field mapping (e.g. city=%L), blank line to continue:
 > city=%L

 Field mapping (e.g. city=%L), blank line to continue:
 > state=%A1

 Field mapping (e.g. city=%L), blank line to continue:
 > zip=%z

 Field mapping (e.g. city=%L), blank line to continue:
 > formatted_address=%n %S, %L, %z %a1

 Field mapping (e.g. city=%L), blank line to continue:
 >

 Rate limit as API calls per minute (max 300):
 > 100

Results
API Lookups: 2
Records Updated: 2

Command summary - you may wish to copy and save this somewhere!
php artisan filament-google-maps:reverse-geocode Location --fields="street=%n %S" --fields="city=%L" --fields="state=%A1" --fields="zip=%z" --fields="formatted_address=%n %S, %L, %z %a1" --lat=lat --lng=lng --processed=processed --rate-limit=100
(返回顶部)
示例/测试仓库
你可以使用一个示例应用程序进行测试,该应用程序提供了该包大多数功能的示例。
(返回顶部)
路线图
- 为所有API使用添加缓存
- 为静态地图添加缓存存储选项
- 添加Geocomplete字段
- 改进Geocomplete字段地点数据字段处理(允许组合多个字段)
- 为地理编码/反向地理编码表添加Artisan命令,当源表有地址但没有坐标,或者反之亦然时非常有用
- 添加API调用可选请求签名
- 为所有API调用添加地区设置
- 添加make-widget artisan命令
- 为字段和组件添加KML层
- 为表单字段添加更多地理编码选项,针对单个地址组件(街道、城市、邮编等)
- 改进反向地理编码格式语法,例如交替...%A3|%A2(%A3是否为空,尝试%A2),等
- 编写测试套件
(返回顶部)
问题
如果你(当)发现错误,请在问题页面上报告,我们将尽快修复它们。
(返回顶部)
贡献
如果你有改进建议,请fork仓库并创建一个pull request。你也可以简单地打开一个带有“enhancement”标签的问题。
- 分支项目
- 创建你的功能分支(
git checkout -b feature/AmazingFeature) - 提交你的更改(
git commit -m '添加一些AmazingFeature') - 推送到分支(
git push origin feature/AmazingFeature) - 打开一个Pull Request
(返回顶部)
许可证
在MIT许可证下分发。有关更多信息,请参阅LICENSE.txt。
(返回顶部)
联系
Hugh Messenger - @cheesegrits - hugh.messenger@gmail.com
项目链接: https://github.com/cheesegrits/filament-google-maps
(返回顶部)
致谢
(返回顶部)

