bdc / module-contactpreferences
BDCrops ContactPreferences 模块为 Magento 2 扩展。
This package is auto-updated.
Last update: 2024-09-16 18:56:29 UTC
README
此模块用于所有 BDCrops Magento 2 扩展的客户联系偏好设置。了解客户数据对象背后的机制以及部分加载,让我们通过创建一个小模块来使用它,在客户的“我的账户”区域以及结账时添加联系偏好功能。
构建了一个小模块,使我们能够更深入地了解 Magento 的客户数据和部分机制。我们成功构建了一个组件,它被用于客户的“我的账户”页面以及结账页面。
目标
- 为客户账户添加联系偏好
- 管理 Magento 2 中的 CustomerData 实体
- 在 Magento 2 中使用 Section.xml 文件
- 自定义结账流程
- 学习 Magento 2 认证专业开发者考试主题 "自定义结账流程 13%"
1. 如何安装和升级 ContactPreferences
1.1 复制粘贴
如果您不想通过 composer 安装,可以使用此方法。
- 在此处下载最新版本 [链接]
- 将
master.zip文件解压到app/code/BDC/ContactPreferences;如果您尚未存在,应该创建一个路径app/code/BDC/ContactPreferences。 - 转到 Magento 根目录并运行升级命令行以安装
BDC_ContactPreferences
php bin/magento setup:upgrade
php bin/magento setup:static-content:deploy
1.2 通过 composer 安装
我们建议您通过 composer 安装 BDC_ContactPreferences 模块。它易于安装、更新和维护。在 Magento 2 根目录中运行以下命令。
composer config repositories.module-contactpreferences git
https://github.com/bdcrops/module-contactpreferences.git

composer require bdcrops/module-contactpreferences:~1.0.0
php bin/magento setup:upgrade
php bin/magento setup:static-content:deploy
1.3 升级
composer update bdcrops/module-contactpreferences
php bin/magento setup:upgrade
php bin/magento setup:static-content:deploy
如果您的商店处于产品模式,请运行编译
php bin/magento setup:di:compile
2. BDC_ContactPreferences
- 创建 app/code/BDC/ContactPreferences/etc/module.xml
<?xml version="1.0"?>
<config xmlns:xsi="http://www.w3.org/2001/XMLSchema-instance" xsi:noNamespaceSchemaLocation="urn:magento:framework:Module/etc/module.xsd">
    <module name="BDC_ContactPreferences" setup_version="1.0.0">
        <sequence>
            <module name="Magento_Checkout"/>
        </sequence>
    </module>
</config>
- 创建 app/code/BDC/ContactPreferences/registration.php
<?php

\Magento\Framework\Component\ComponentRegistrar::register(
    \Magento\Framework\Component\ComponentRegistrar::MODULE,
    'BDC_ContactPreferences',
    __DIR__
);
- 创建 app/code/BDC/ContactPreferences/Setup/InstallData.php
<?php

namespace BDC\ContactPreferences\Setup;

class InstallData implements \Magento\Framework\Setup\InstallDataInterface {
    protected $customerSetupFactory;

    public function __construct(
        \Magento\Customer\Setup\CustomerSetupFactory $customerSetupFactory
    ) {
        $this->customerSetupFactory = $customerSetupFactory;
    }

    public function install(\Magento\Framework\Setup\ModuleDataSetupInterface $setup, \Magento\Framework\Setup\ModuleContextInterface $context)
    {
        $setup->startSetup();
        $customerSetup = $this->customerSetupFactory->create(['setup' => $setup]);
        $customerSetup->addAttribute(
            \Magento\Customer\Model\Customer::ENTITY,
            'contact_preferences', [
                'type' => 'varchar',
                'label' => 'Contact Preferences',
                'input' => 'multiselect',
                'source' => \BDC\ContactPreferences\Model\Entity\Attribute\Source\Contact\Preferences::class,
                'required' => 0,
                'sort_order' => 99,
                'position' => 99,
                'system' => 0,
                'visible' => 1,
                'global' => \Magento\Catalog\Model\ResourceModel\Eav\Attribute::SCOPE_GLOBAL,
            ]
        );

        $contactPreferencesAttr = $customerSetup
            ->getEavConfig()->getAttribute(
                \Magento\Customer\Model\Customer::ENTITY,
                'contact_preferences'
            );

        $forms = [ 'adminhtml_customer', 'customer_account_edit', ];

        $contactPreferencesAttr->setData('used_in_forms', $forms)
            ->setData('is_used_for_customer_segment', true)
            ->setData('is_system', 0)
            ->setData('is_user_defined', 1)
            ->setData('is_visible', 1)
            ->setData('sort_order', 99);
        $contactPreferencesAttr->save();
        $setup->endSetup();
    }
}
- 创建 app/code/BDC/ContactPreferences/etc/frontend/routes.xml
<?xml version="1.0"?>

<config xmlns:xsi="http://www.w3.org/2001/XMLSchema-instance" xsi:noNamespaceSchemaLocation="urn:magento:framework:App/etc/routes.xsd">
    <router id="standard">
        <route id="customer" frontName="customer">
            <module name="BDC_ContactPreferences" before="Magento_Customer"/>
        </route>
    </router>
</config>
- 创建 app/code/BDC/ContactPreferences/Controller/Contact/Preferences.php
<?php

namespace BDC\ContactPreferences\Controller\Contact;

use Magento\Framework\App\Action\Context;
use phpDocumentor\Reflection\Types\Boolean;

class Preferences extends \Magento\Customer\Controller\AbstractAccount {
    protected $customerSession;
    protected $customerRepository;
    protected $logger;

    public function __construct(
        \Magento\Framework\App\Action\Context $context,
        \Magento\Customer\Model\Session $customerSession,
        \Magento\Customer\Api\CustomerRepositoryInterface $customerRepository,
        \Psr\Log\LoggerInterface $logger
    ) {
        $this->customerSession = $customerSession;
        $this->customerRepository = $customerRepository;
        $this->logger = $logger;
        parent::__construct($context);
    }

    public function execute() {
        if ($this->getRequest()->isPost()) {
            $resultJson = $this->resultFactory->create(\Magento\Framework\Controller\ResultFactory::TYPE_JSON);
            if ($this->getRequest()->getParam('load')) {
                // This POST is merely to trigger "contact_preferences" section load
            } else {
                try {
                    $preferences = implode(',',
                        array_keys(
                            array_filter($this->getRequest()->getParams(), function ($_checked, $_preference) {
                                return filter_var($_checked, FILTER_VALIDATE_BOOLEAN);
                            }, ARRAY_FILTER_USE_BOTH)
                        )
                    );
                    $customer = $this->customerRepository->getById($this->customerSession->getCustomerId());
                    $customer->setCustomAttribute('contact_preferences', $preferences);
                    $this->customerRepository->save($customer);
                    $this->messageManager->addSuccessMessage(__('Successfully saved contact preferences.'));
                } catch (\Exception $e) {
                    $this->logger->critical($e);
                    $this->messageManager->addSuccessMessage(__('Error saving contact preferences.'));
                }
            }
            return $resultJson;
        } else {
            $resultPage = $this->resultFactory->create(\Magento\Framework\Controller\ResultFactory::TYPE_PAGE);
            $resultPage->getConfig()->getTitle()->set(__('My Contact Preferences'));
            return $resultPage;
        }
    }
}
- 创建 app/code/BDC/ContactPreferences/Model/Entity/Attribute/Source/Contact/Preferences.php
<?php

namespace BDC\ContactPreferences\Model\Entity\Attribute\Source\Contact;

class Preferences extends \Magento\Eav\Model\Entity\Attribute\Source\AbstractSource {
    const VALUE_EMAIL = 'email';
    const VALUE_PHONE = 'phone';
    const VALUE_POST = 'post';
    const VALUE_SMS = 'sms';
    const VALUE_TELEGRAM = 'telegram';

    public function getAllOptions() {
        return [
            ['label' => __('Email'), 'value' => self::VALUE_EMAIL],
            ['label' => __('Phone'), 'value' => self::VALUE_PHONE],
            ['label' => __('Post'), 'value' => self::VALUE_POST],
            ['label' => __('SMS'), 'value' => self::VALUE_SMS],
            ['label' => __('Telegram'), 'value' => self::VALUE_TELEGRAM],
        ];
    }
}
- 创建 app/code/BDC/ContactPreferences/etc/frontend/di.xml
<?xml version="1.0"?>

<config xmlns:xsi="http://www.w3.org/2001/XMLSchema-instance" xsi:noNamespaceSchemaLocation="urn:magento:framework:ObjectManager/etc/config.xsd">
    <type name="Magento\Customer\CustomerData\SectionPoolInterface">
        <arguments>
            <argument name="sectionSourceMap" xsi:type="array">
                <item name="contact_preferences" xsi:type="string">BDC\ContactPreferences\CustomerData\Preferences</item>
            </argument>
        </arguments>
    </type>
</config>
- 创建 app/code/BDC/ContactPreferences/CustomerData/Preferences.php
<?php

namespace BDC\ContactPreferences\CustomerData;

class Preferences extends \Magento\Framework\DataObject implements \Magento\Customer\CustomerData\SectionSourceInterface
{
    protected $preferences;
    protected $customerSession;

    public function __construct(
        \BDC\ContactPreferences\Model\Entity\Attribute\Source\Contact\Preferences $preferences,
        \Magento\Customer\Model\Session $customerSession,
        array $data = [] ) {
        $this->preferences = $preferences;
        $this->customerSession = $customerSession;
        parent::__construct($data);
    }

    public function getSectionData() {
        $existingPreferences = explode(',',
            $this->customerSession->getCustomer()->getContactPreferences()
        );

        $availablePreferences = [];

        foreach ($this->preferences->getAllOptions() as $_option) {
            $availablePreferences[] = [
                'label' => $_option['label'],
                'value' => $_option['value'],
                'checked' => in_array($_option['value'], $existingPreferences)
            ];
        }

        return [
            'selectOptions' => $availablePreferences,
            'isCustomerLoggedIn' => $this->customerSession->isLoggedIn()
        ];
    }
}
- 创建 app/code/BDC/ContactPreferences/etc/frontend/sections.xml
<?xml version="1.0"?>

<config xmlns:xsi="http://www.w3.org/2001/XMLSchema-instance" xsi:noNamespaceSchemaLocation="urn:magento:module:Magento_Customer:etc/sections.xsd">
    <action name="customer/contact/preferences">
        <section name="contact_preferences"/>
    </action>
</config>
- 创建 app/code/BDC/ContactPreferences/view/frontend/layout/checkout_index_index.xml
<?xml version="1.0"?>

<page xmlns:xsi="http://www.w3.org/2001/XMLSchema-instance" layout="1column"
      xsi:noNamespaceSchemaLocation="urn:magento:framework:View/Layout/etc/page_configuration.xsd">
    <body>
        <referenceBlock name="checkout.root">
            <arguments>
                <argument name="jsLayout" xsi:type="array">
                    <item name="components" xsi:type="array">
                        <item name="checkout" xsi:type="array">
                            <item name="children" xsi:type="array">
                                <item name="steps" xsi:type="array">
                                    <item name="children" xsi:type="array">
                                        <item name="billing-step" xsi:type="array">
                                            <item name="children" xsi:type="array">
                                                <item name="payment" xsi:type="array">
                                                    <item name="children" xsi:type="array">
                                                        <item name="afterMethods" xsi:type="array">
                                                            <item name="children" xsi:type="array">
                                                                <item name="contact-preferences" xsi:type="array">
                                                                    <item name="component" xsi:type="string">BDC_ContactPreferences/js/view/contact-preferences</item>
                                                                </item>
                                                            </item>
                                                        </item>
                                                    </item>
                                                </item>
                                            </item>
                                        </item>
                                    </item>
                                </item>
                            </item>
                        </item>
                    </item>
                </argument>
            </arguments>
        </referenceBlock>
    </body>
</page>

- 创建 app/code/BDC/ContactPreferences/view/frontend/layout/customer_account.xml
<?xml version="1.0"?>

<page xmlns:xsi="http://www.w3.org/2001/XMLSchema-instance" xsi:noNamespaceSchemaLocation="urn:magento:framework:View/Layout/etc/page_configuration.xsd">
    <body>
        <referenceBlock name="customer_account_navigation">
            <block class="Magento\Customer\Block\Account\SortLinkInterface" name="customer-account-navigation-contact-preferences-link">
                <arguments>
                    <argument name="path" xsi:type="string">customer/contact/preferences</argument>
                    <argument name="label" xsi:type="string" translate="true">My Contact Preferences</argument>
                    <argument name="sortOrder" xsi:type="number">230</argument>
                </arguments>
            </block>
        </referenceBlock>
    </body>
</page>

- 创建 app/code/BDC/ContactPreferences/view/frontend/layout/customer_contact_preferences.xml
<?xml version="1.0"?>

<page xmlns:xsi="http://www.w3.org/2001/XMLSchema-instance" xsi:noNamespaceSchemaLocation="urn:magento:framework:View/Layout/etc/page_configuration.xsd">
    <update handle="customer_account"/>
    <body>
        <referenceContainer name="content">
            <block name="contact_preferences"
                   template="BDC_ContactPreferences::customer/contact/preferences.phtml" cacheable="false"/>
        </referenceContainer>
    </body>
</page>
- 创建 app/code/BDC/ContactPreferences/view/frontend/templates/customer/contact/preferences.phtml
<div class="contact-preferences" data-bind="scope:'contact-preferences-scope'">
    <!-- ko template: getTemplate() --><!-- /ko -->
</div>

<script type="text/x-magento-init">
    {
        ".contact-preferences": {
            "Magento_Ui/js/core/app": {
                "components": {
                    "contact-preferences-scope": {
                        "component": "contactPreferences"
                    }
                }
            }
        }
    }
</script>
- 创建 app/code/BDC/ContactPreferences/view/frontend/requirejs-config.js
var config = {
    map: {
        '*': {
            contactPreferences: 'BDC_ContactPreferences/js/view/contact-preferences'
        }
    }
};
- 创建 app/code/BDC/ContactPreferences/view/frontend/web/js/view/contact-preferences.js
define([
    'uiComponent',
    'jquery',
    'mage/url',
    'Magento_Customer/js/customer-data',
    'Magento_Customer/js/model/customer'
], function (Component, $, url, customerData, customer) {
    'use strict';

    let contactPreferences = customerData.get('contact_preferences');

    return Component.extend({
        defaults: {
            template: 'BDC_ContactPreferences/contact-preferences'
        },

        initialize: function () {
            this._super();

            // Trigger "contact_preferences" section load
            $.ajax({
                type: 'POST',
                url: url.build('customer/contact/preferences'),
                data: {'load': true},
                showLoader: true
            });
        },

        isCustomerLoggedIn: function () {
            return contactPreferences().isCustomerLoggedIn;
        },

        getSelectOptions: function () {
            return contactPreferences().selectOptions;
        },

        saveContactPreferences: function () {
            let preferences = {};

            $('.contact_preference').children(':checkbox').each(function () {
                preferences[$(this).attr('name')] = $(this).attr('checked') ? true : false;
            });

            $.ajax({
                type: 'POST',
                url: url.build('customer/contact/preferences'),
                data: preferences,
                showLoader: true,
                complete: function (response) {
                    // todo
                }
            });

            return true;
        }
    });
});
- 创建 app/code/BDC/ContactPreferences/view/frontend/web/template/contact-preferences.html
<div class="contact-preferences-component" data-bind="if: isCustomerLoggedIn()">
    <div class="step-title iweb-contact-preferences-title" data-role="title" data-bind="i18n: 'Contact Preferences'"></div>
    <div class="contact-preferences" data-role="content">
        <div class="contact_preference" repeat="foreach: getSelectOptions(), item: '$option'">
            <input type="checkbox"
                   click="saveContactPreferences"
                   ko-checked="$option().checked"
                   attr="name: $option().value"/>
            <label text="$option().label" attr="for: $option().value"/>
        </div>
    </div>
</div>
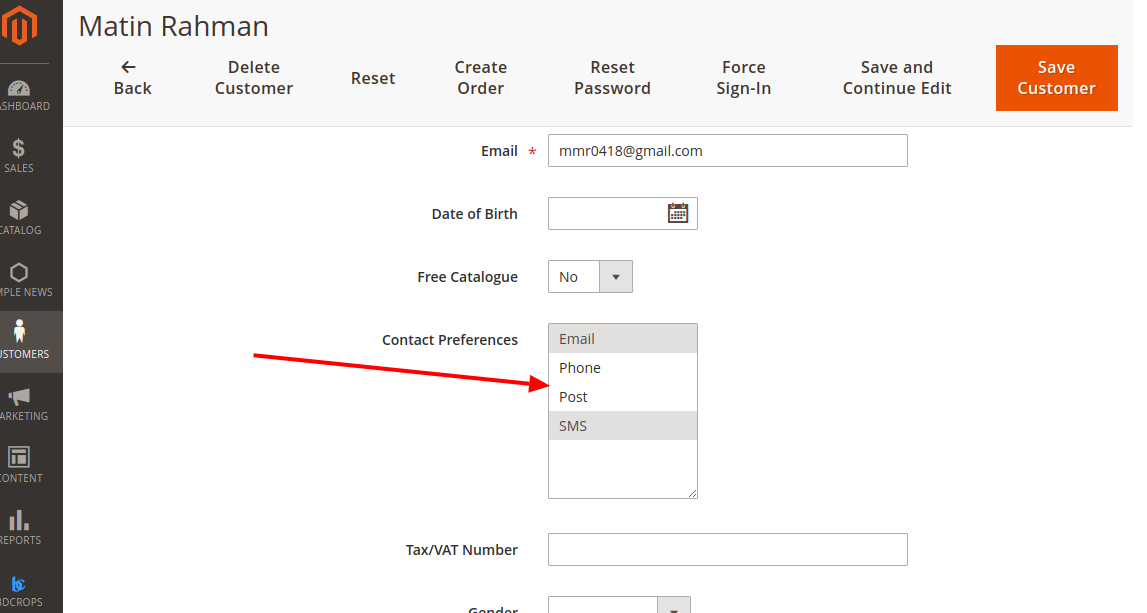
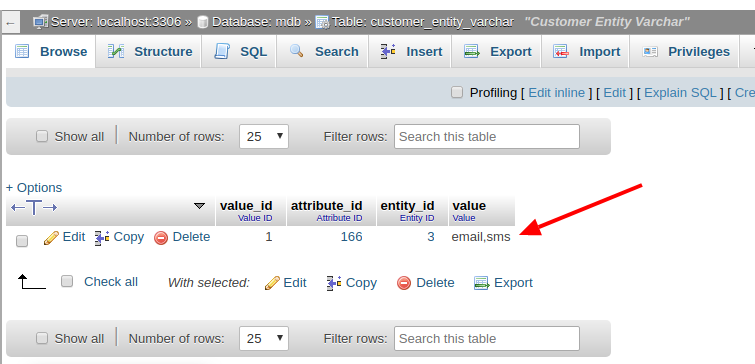
- 结果


常见问题解答
那些部分究竟是什么?
部分是一组客户数据的集合。每个部分都由一个键来表示,该键用于访问和管理数据以及数据本身。Magento通过AJAX请求加载部分,请求路径为/customer/section/load/,并将加载的数据缓存在浏览器本地存储中,键为mage-cache-storage。当某些部分发生变化时,Magento会自动加载更新后的部分。
如何定义一个部分?
在di.xml文件中,通过向部分池中添加一个新的部分来定义部分。
<type name="Magento\Customer\CustomerData\SectionPoolInterface">
    <arguments>
        <argument name="sectionSourceMap" xsi:type="array">
            <item name="cart" xsi:type="string">Magento\Checkout\CustomerData\Cart</item>
            <item name="directory-data" xsi:type="string">Magento\Checkout\CustomerData\DirectoryData</item>
        </argument>
    </arguments>
</type>
因此,这里注册了两个新部分:购物车和目录数据。Magento\Checkout\CustomerData\Cart和Magento\Checkout\CustomerData\DirectoryData实现了Magento\Customer\CustomerData\SectionSourceInterface,并在getSectionData方法的返回值中提供实际数据。
部分更新是如何触发的?
当客户发送一些状态修改请求(POST、PUT、DELETE)时,Magento假定客户私有数据发生了变化。为了最小化服务器负载,开发者应在etc/section.xml中指定哪些操作(或请求)更新哪些客户数据部分。
<action name="checkout/cart/add">
    <section name="cart"/>
</action>
操作名称是一个操作键模式。当用户调用与指定模式匹配的操作时,Magento会检测到相应的部分已过时,并重新加载它。如果操作名称是*,则表示在每个POST和PUT请求中都会更新部分。如果缺少部分标签,则所有部分都将更新。因此,在您访问购物车页面时更新迷你购物车(或购物车部分)在概念上是不正确的。在这种情况下,迷你购物车(或购物车部分)应该已经更新。
如何进行内部实现?
要了解何时以及如何更新部分,让我们看看实现。理解的关键是文件magento2ce/app/code/Magento/Customer/view/frontend/web/js/section-config.js和magento2ce/app/code/Magento/Customer/view/frontend/web/js/customer-data.js。
在最后,为ajaxComplete和submit注册了两个事件处理器。这意味着当任何表单(使用POST或PUT方法)提交到服务器,或当JavaScript发送AJAX、POST或PUT请求时,将调用这些处理器。这两个处理器具有类似的逻辑:使用Magento_Customer/js/section-config检查是否有任何部分需要更新。如果有部分需要更新,则调用customerData.invalidate(sections)。然后从服务器加载所有已失效的部分。
那么,Magento_Customer/js/section-config是如何知道哪些部分应该被移除以及在哪个操作中?答案是Magento/Customer/view/frontend/templates/js/section-config.phtml。
<script type="text/x-magento-init">
<?php
     /* @noEscape */ echo $this->helper(\Magento\Framework\Json\Helper\Data::class)->jsonEncode([
    '*' => ['Magento_Customer/js/section-config' => [
        'sections' => $block->getSections(),
        'clientSideSections' => $block->getClientSideSections(),
        'baseUrls' => array_unique([
            $block->getUrl(null, ['_secure' => true]),
            $block->getUrl(null, ['_secure' => false]),
        ]),
    ]],
]);
?>
</script>
这样,服务器将合并后的部分配置传递到浏览器。
部分如何只通过POST或PUT表单提交或AJAX请求来更新?
此外,还有两个注意事项
这里所描述的是内部实现,可能会更改,因此您只能安全地使用sections.xml,并期望在指定的POST或PUT或DELETE操作触发时更新部分。如果您确定确实需要更新某个部分,您始终可以执行类似以下操作
require('Magento_Customer/js/customer-data').reload(['cart'], false)
在Magento 2中,Section.xml文件是什么?
随着互联网和技术的日益普及,设计、布局和代码也发生了多项变化和增强,以提供更好的用户体验。此外,Magento巧妙地采用了Knockout JS、AJAX等其他附加功能,允许Web应用程序异步地从服务器发送和检索数据,而无需刷新或重新加载。这种技术有助于减少服务器请求,并通过仅重新加载网页的一部分或某个部分来节省时间。例如,我们在Magento 2中有一个扩展提供了Ajax登录功能,并且我们希望在用户成功登录到他们的账户后恢复旧的商品车项。为此,我们只需要刷新迷你商品车,而不是整个页面。默认情况下,Magento 2在两边存储数据,因此如果我们想要刷新某个部分,我们也需要更新浏览器的本地存储数据。
如何在Magento 2中实现Section.xml文件?
为此,首先需要在以下路径创建“di.xml”文件。app\code\Vendor\Extension\etc\di.xml 同样,首先需要在以下路径创建“di.xml”文件。app\code\Vendor\Extension\etc\di.xml
<type name="Magento\Customer\CustomerData\SectionPoolInterface">
	<arguments>
    	<argument name="sectionSourceMap" xsi:type="array">
        	<item name="cart" xsi:type="string">Magento\Checkout\CustomerData\Cart</item>
        	<item name="directory-data" xsi:type="string">Magento\Checkout\CustomerData\DirectoryData</item>
    	</argument>
	</arguments>
</type>
现在,在上面的代码中,我们仅在客户数据部分注册了购物车和目录数据。为此,我们需要在以下路径创建section.xml文件,使用以下代码:app\code\Vendor\Extension\etc\frontend\section.xml
<?xml version="1.0"?>
<config xmlns:xsi="http://www.w3.org/2001/XMLSchema-instance"
        xsi:noNamespaceSchemaLocation="urn:magento:module:Magento_Customer:etc/sections.xsd">
	<action name="routername/controller/action">
    	<section name="cart"/>
	</action>
</config>
因此,现在每次我们调用“ajaxlogin/index/getlogin”之类的操作时,Magento都会认为当前的购物车部分已经过时,并重新初始化购物车部分。您也可以通过使用*而不是操作来在每次请求时刷新购物车部分。
解释一下Magento 2中的客户数据管理?
在处理Magento 2时,您可能会频繁遇到异步的客户数据加载。例如,购物车重新加载、结账、登录以及一些其他操作都是通过AJAX完成的。为了处理这些数据,Magento开发团队提供了一个合适的接口,我们现在将概述这个接口。
当前模块的接口由js-module组成,由RequireJs上传,并且还有一个允许通过AJAX发送数据的后端接口。让我们以在默认的Magento 2主题中显示名称的模板为例。客户的名称是通过以下实现的代码来显示的:
<span data-bind="text: new String('<?php echo $block->escapeHtml(__('Welcome, %1!', '%1'));?>').replace('%1', customer().firstname)">
如您所见,以下代码中的模板被customer().firstname对象属性所替换。在下面的代码中,您将看到与客户对象相关的内容:
<script type="text/x-magento-init">
        {
            "*": {
                "Magento_Ui/js/core/app": {
                    "components": {
                        "customer": {
                            "component": "Magento_Customer/js/view/customer"
                        }
                    }
                }
            }
        }
</script>
您可以在以下文章中找到更多关于js-scripts和模块连接语法的详细信息:“在Magento 2中的JavaScript集成技巧”。
如您所见,客户对象是在Magento_Customer/js/view/customer.js文件中创建的。
define([
   'uiComponent',
   'Magento_Customer/js/customer-data'
], function (Component, customerData) {
   'use strict';

   return Component.extend({
       initialize: function () {
           this._super();
           this.customer = customerData.get('customer');
       }
   });
});
这意味着当前代码返回一个Component对象(我们将在下一篇文章中介绍uiComponent的定义),并覆盖了initialize方法。所有从服务器上传数据的魔法都在这个方法中完成。请注意以下字符串:
this.customer = customerData.get('customer'); this.customer = customerData.get('customer'); 其中customerData是一个RequireJs模块,并在Magento_Customer/js/customer-data.js中初始化。
目前我们所知道的是:我们从customerData.get(‘customer’)对象中获取客户数据。我们不仅可以将“customer”传递到get方法中,还可以传递其他参数。
但是,我们有一些关于customerData使用的问题
从哪里获取数据,可以传递哪些参数到customerData.get();是否可以添加自己的参数到customerData.get();所以,让我们逐一考虑这些问题。
如果您在浏览器中启用调试模式并尝试将产品添加到购物车,您会发现一个相当常见的现象:会向服务器发送多个AJAX查询。但是,如果您重新加载页面,您会发现最初购物车是空的,但在页面加载过程中,购物车会被重新加载,并且之前添加的所有产品都会出现在其中。这种购物车行为告诉我们,在主页面加载完成后,会异步加载购物车数据。
然而,如果您启用调试器,您可能看不到发送到服务器的AJAX查询。但我们刚刚看到数据是从某个地方上传的,请不要忘记,数据不应该与主页面一起发送,因为这可能会引起启用FPC时的问题。基本上,我们得出结论,数据应该从某个地方上传,但绝对不是从AJAX上传。所以我们可能会认为它们被存储在浏览器中。这是真的。
如果您查看“应用→本地存储”(针对Chrome浏览器)选项卡,您将看到这些数据
请查看“mage-cache-storage”部分。所有可以用于customerData对象的数据都存储在这个特定的部分中。如果您删除这个部分然后重新加载页面,您会注意到购物车中的所有产品都会消失。并且只有在您再次重新加载当前部分并添加一个产品到购物车时,它们才会出现。
Mage-cache-storage部分的结构是一个普通的JSON对象,在其顶层我们有参数名称,我们可以将其传递到customerData对象的get方法中。因此,我们最终处理了customerData的结构,但我们仍然有一个问题:所有这些数据是从浏览器中出现的,以及与这些数据相关的代码。
如果您再向购物车添加一个产品,您将能够看到以下服务器查询
https://url_base/customer/section/load/?sections=cart%2Cmessages&update_section_id=true&=1478514106235 1 https://url_base/customer/section/load/?sections=cart%2Cmessages&update_section_id=true&=1478514106235 如URL所示,我们向带有以下参数的Magento\Customer\Controller\Section\Load控制器发送请求:sections=cart%2Cmessages&update_section_id=true。这就是我们需要的控制器,它负责数据更新。这样我们就能更新任何部分。
您还可以根据需要创建自己的部分并使用它。您只需要在di.xml文件中进行以下操作来注册您的部分
<type name="Magento\Customer\CustomerData\SectionPoolInterface">
    <arguments>
        <argument name="sectionSourceMap" xsi:type="array">
            <item name="your_module_data" xsi:type="string">\YourCompany_YourModule\Order\Plugin\Section</item>
        </argument>
    </arguments>
</type>
在以下代码中,类\YourCompany_YourModule\Order\Plugin\Section应该执行Magento\Customer\CustomerData\SectionSourceInterface接口。因此,现在获取所需信息真的非常容易
var dataObject = customerData.get('your_module_data');
var data = dataObject();
dataObject - 这是一个返回ko.observable()方法的对象,因此很容易将其嵌入knokountJs模板中。只需执行以下命令,即可更新浏览器存储中特定部分的数据
customerData.reload(['your_module_data']))
CustomerData提供了几个非常实用的数据处理方法,让我们指定它们
get(section) - 请见上文;set(section,data) - 插入数据;reload(sections) - 重新加载数据;invalidate(section) - 对无效数据进行标记,这是必要的,以重新加载数据。到目前为止一切都很正常,但数据有效性管理出现了问题,因为我们执行了试图不断修改数据的许多操作。因此,我们应该控制这些数据。一个可能的解决方案是在与更改相关的操作上挂一个事件。但你不认为这很麻烦,而且查找错误需要花费太多时间。因此,Magento开发团队发明了一种非常独特的数据有效性控制方法。让我们更详细地看看magento_customer/js/customer-data.js文件(这是一个初始化customerData的模块),特别是这些字符串
$(document).on('ajaxComplete', function (event, xhr, settings) {
        var sections,
            redirects;

        if (settings.type.match(/post|put/i)) {
            sections = sectionConfig.getAffectedSections(settings.url);

            if (sections) {
                customerData.invalidate(sections);
                redirects = ['redirect', 'backUrl'];

                if (_.isObject(xhr.responseJSON) && !_.isEmpty(_.pick(xhr.responseJSON, redirects))) {
                    return;
                }
                customerData.reload(sections, true);
            }
        }
    });
As you can see there is a function, hanged on ajaxComplete event in document object, and this function constantly compares URL address and that’s why URL selects those sections that should be updated. It’s a very useful mechanism of data validity control. We can add some sections, that will be updated upon transition to a certain URL. For that purpose we should add sections.xml file to etc/frontend directory in our module:
<config xmlns:xsi="http://www.w3.org/2001/XMLSchema-instance"
       xsi:noNamespaceSchemaLocation="urn:magento:module:Magento_Customer:etc/sections.xsd">
   <action name="braintree/paypal/placeOrder">
       <section name="cart"/>
       <section name="checkout-data"/>
   </action>
</config>
这个例子是从Braintree模块中获取的。我们注意到,在执行带有URL地址braintree/paypal/placeOrder的AJAX查询(POST,PUT)之后,购物车部分和结账数据部分将会被覆盖。值得一提的是,像消息这样的部分,在请求任何URL时都会被更新,因此当你在模块中使用AJAX查询时,请记住,除了你的请求外,至少还会执行另一个请求来更新部分。你可以使用GET方法代替POST,以避免这种情况。尽管看起来很复杂,但一旦你掌握了它,你将获得一个非常有灵活性的数据管理和AJAX查询工具。