aridez / simple-mail-builder
一个使用流畅接口轻松在Laravel中创建电子邮件的工具
Requires (Dev)
- orchestra/testbench: ^9.4
- phpunit/phpunit: ^11.3
README
使用流畅接口轻松在Laravel中创建电子邮件的工具。
目录
安装
您可以通过composer安装此包
composer require aridez/simple-mail-builder
如果您想自定义邮件视图,可以通过运行以下命令来发布它们
php artisan vendor:publish --provider="Aridez\MailBuilder\Providers\MailBuilderServiceProvider"
使用
基本用法
要开始使用此包,您需要创建一个MailMessageBuilder实例或直接使用Mailbuilder外观。以下是一个在Laravel通知中使用此包的基本示例
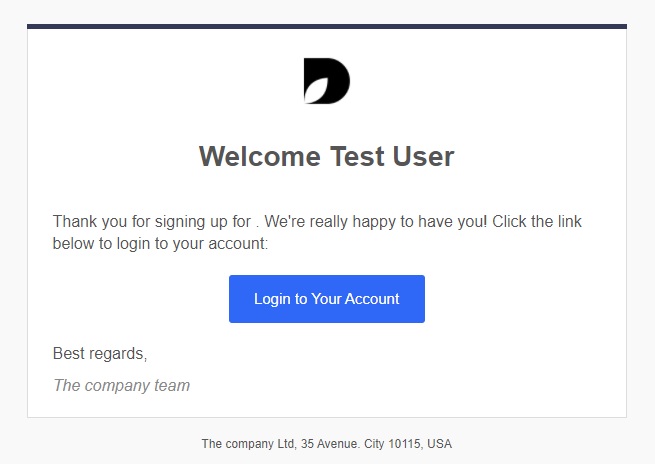
use Illuminate\Notifications\Notification;
use Aridez\MailBuilder\Facades\MailBuilder;

class WelcomeMessage extends Notification
{

    [...]

    public function toMail(object $notifiable)
    {
        return MailBuilder::brand('https://i.imgur.com/KO1vcE9.png')->space(15)
            ->title('Welcome ' . $notifiable->name)->space(20)
            ->text('Thank you for signing up for . We\'re really happy to have you! Click the link below to login to your account:')->space(10)
            ->button('Login to Your Account', 'google.es')->space(10)
            ->text('Best regards,')->space(5)
            ->italic('The company team')
            ->include(['footer' => 'The company Ltd, 35 Avenue. City 10115, USA']);
    }
}
此代码将创建一个看起来像这样的电子邮件
快速参考
MailMessageBuilder类提供了一些方法来添加组件并将数据传递给视图
创建新组件
您可以通过创建或修改此包的默认主题来自定义视图。首先,在安装部分发布视图。这将使它们在resources\views\vendow\mailbuilder\components\themes\default文件夹下可用。
为了创建一个组件,只需在那个目录下创建一个新的blade文件。您可以以默认主题的另一个组件为例。让我们创建一个名为small-text.blade.php的小文本组件
<!-- File: resources\views\vendow\mailbuilder\components\themes\default\small-text.blade.php -->
@props([
    'text' => null
])

<tr>
    <td align="left" style="font-size:0px;padding:0px 25px;word-break:break-word;">
        <div
            style="font-family:'Helvetica Neue',Arial,sans-serif;font-size:8px;line-height:22px;text-align:left;color:#888;">
            {{$text}}
        </div>
    </td>
</tr>
现在,我们可以通过调用函数component来使用此组件。第一个参数是一个字符串,必须是视图的名称(在本例中为small-text),第二个是一个键 => 值数组,其中键必须与组件中定义的props相同
public function toMail(object $notifiable)
{
    return MailBuilder::component('small-text', ['text' => 'This text is passed through the component props now!']);
}
创建新主题
要创建一个全新的自定义主题,只需在resources\views\vendor\mailbuilder\components\themes下创建一个新的文件夹,命名为您想要使用的主题名称,并相应地修改那里的文件
resources/views/vendor/mailbuilder/components/themes
│
├── default
│ ├── brand.md
│ ├── title.md
│ ├── text.md
│ ├── button.md
│ ├── link.md
│ ├── italic.md
│ └── space.md
│
├── blue
│ ├── brand.md
│ ├── title.md
│ ├── text.md
│ ├── button.md
│ ├── link.md
│ ├── italic.md
│ └── space.md
每次创建新主题时,请务必使用index.blade.php作为入口点,并在您想要插入参数化组件的地方包含以下行
@foreach ($components as $component)
@component($component['view'], $component['props'])
@endcomponent
@endforeach
这些行负责调用、渲染并将任何props传递给相应的视图。您可以通过查看index.blade.php文件作为示例。
最后,要使用不同的主题,您可以调用theme函数,传递主题名称作为参数
public function toMail(object $notifiable)
{
    return MailBuilder::theme('blue')->...;
}
传递额外数据
有时,您可能还想传递从您的index.blade.php组件可访问的额外数据,例如用于标题或页脚。对于这些情况,您可以使用include函数,并传递一个键 => 值数组,它将正常传递到您的视图中。例如,如果我们想从我们的索引组件访问一个$footer变量,我们可以这样做
    public function toMail(object $notifiable)
    {
        return MailBuilder::include(['footer' => 'The company Ltd, 35 Avenue. City 10115, USA'])->...<
    }
📝 注意: 请确保避免使用
components键,因为它是为渲染组件数组保留的
贡献
欢迎贡献!请遵循以下指南
- Fork 仓库。
- 创建一个新分支(
git checkout -b feature/你的功能)。 - 进行你的修改。
- 提交你的修改(
git commit -am '添加新功能')。 - 推送到分支(
git push origin feature/你的功能)。 - 创建一个新的 Pull Request。
为了准备开发环境,你需要将它添加到你的 Laravel 应用程序中。本地开发时,你可以创建一个本地仓库。在你的 Laravel 项目的 composer.json 文件中,添加本地仓库路径
"repositories": [
    {
        "type": "path",
        "url": "<path-to>/simple-mail-builder"
    }
]
然后,你可以像要求其他包一样要求这个包
composer require aridez/simple-mail-builder
其他
- 由 ckissi 提供的响应式电子邮件模板