通过  搜索
搜索
adadgio / gear-bundle
许多酷炫的工具、助手和连接器
1.3
2018-11-12 10:49 UTC
Requires
- php: >=5.3
- sensio/framework-extra-bundle: ^3.0|^4.0|^5.0
- symfony/symfony: ^2.7|^3.0
README
安装
使用 composer 安装。
composer require adadgio/gear-bundle
将包添加到您的应用内核。
new Adadgio\GearBundle\AdadgioGearBundle();
目录
API注解和认证
非常容易创建API端点并通过任何类型的认证系统来保护它们。
配置
# in config.yml (basic auth example)
adadgio_gear:
    auth:
        type: Basic     # options: Basic (more default types not available in current version)
        class: ~        # either define "class" or "provider", ex. "Adadgio\GearBundle\Component\Api\Authenticatir\AuthProvider"
        #provider: ~    # either define "class" or "provider", ex. "adadgio_gear.api.authenticator_example_service"
        user: benny
        password: test

# in config.yml (custom service auth example, like API client in database)
adadgio_gear:
    auth:
        #type: ~
        #class: ~       # either define "class" or "provider", ex. "Adadgio\GearBundle\Component\Api\Authenticatir\AuthProvider"
        provider: my_bundle.api.my_client_auth  # you create the service and define what to do: see "adadgio_gear.api.authenticator_example_service"
注解使用
use Adadgio\GearBundle\Component\Api\ApiRequest;
use Adadgio\GearBundle\Component\Api\ApiResponse;
use Adadgio\GearBundle\Component\Api\Annotation\Api;

/**
 * @Route("/test/gear/api", name="test_gear_api")
 * @Api(method={"POST","GET"}, enabled=true)
 */
public function myApiEndpointAction(Request $request, ApiRequest $apiRequest)
{
    return new ApiResponse(array('yes' => 'sir'));
}
使用自定义认证服务器的示例。
use Adadgio\GearBundle\Component\Api\Authenticator\AuthProvider;
use Adadgio\GearBundle\Component\Api\Authenticator\AuthProviderInterface;

class ExampleAuthProviderService extends AuthProvider implements AuthProviderInterface
{
    /**
     * Build your service like you build services every day!
     */
    public function __construct()
    {
        // inject anything in here, like doctrien.orm.entity_manager, or whatever.
    }

    /**
     * Checks auth. You could get request headers key and check that
     * the secret key and client id are in your database for example...
     *
     * @return boolean
     */
    public function authenticate()
    {
        // your owns logic here
        $request = $this->getRequest();
        $headers = $request->getHeaders();

        return true;
    }
}
NodeRed 连接器和循环
配置
# import routing
_adadgio_gear:
    resource: "@AdadgioGearBundle/Resources/config/routing.yml"
# in config.yml
adadgio_gear:
    nodered:
        host: 127.0.0.1
        port: 1880          # optional
        protocol: http://   # optional
        http_auth:          # optional (depends on Node Red httpNodeAuth param)
            user: ~
            pass: ~
然后您需要在您的 NodeRed 应用程序中安装流程。
$ php app/console adadgio:nodered:install --output=/destination/folder
您需要手动导入 NodeRed 应用程序中的流程(或在 NodeRed settings.js 设置中使用 flows 目录配置)。
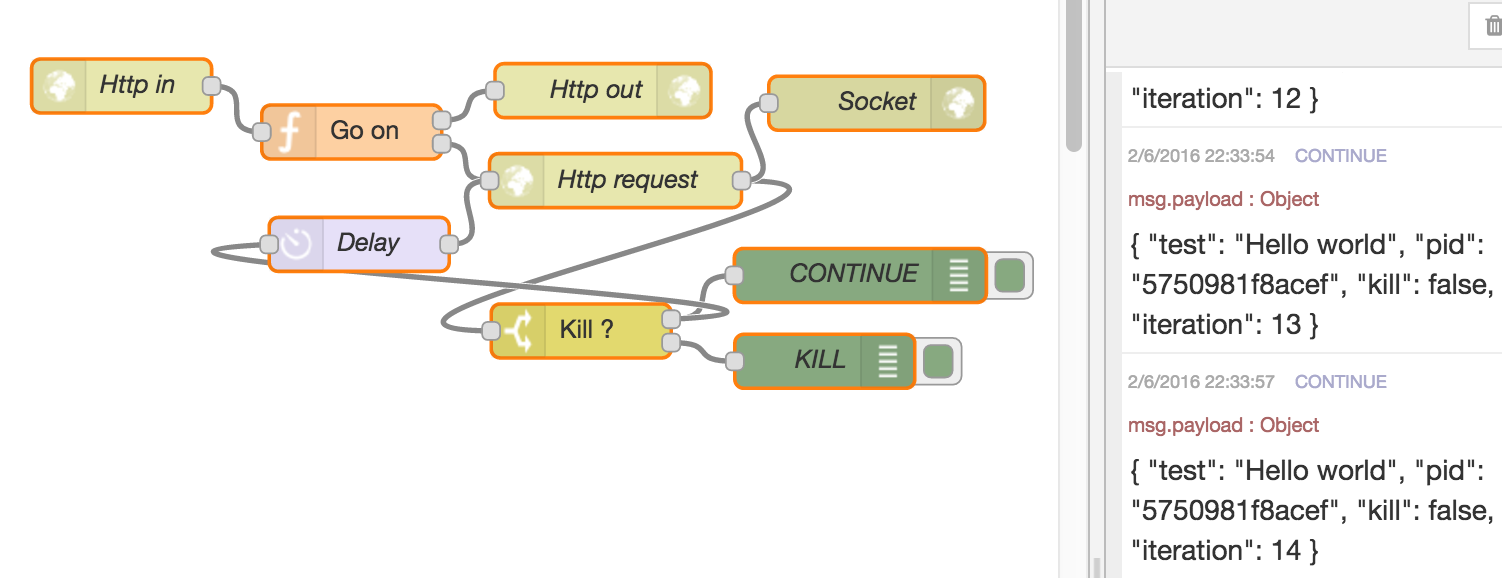
用法
要触发循环(或只是一个延迟的消息),您需要创建一个 \Payload,NodeRed 将将其发送回 AdagagioGearBundle 循环控制器(有关更多信息,请参阅 routing.yml)。当控制器接收到 payload 时,它会分发一个事件。您可以 监听事件 并修改 payload 以实现您的目标。
use Adadgio\GearBundle\Connector\NodeRed\Payload;

// payload contains 3 initial params you cannot override (pid, kill, iteration)
// and they change automatically during the loop lifecycle
$payload = new Payload();

// add more params
$payload->setParameter('my_name', 'Romain'); // nb: 3 params are here by default

// use the connector to start (trigger) the loop
$this->get('adadgio_gear.nodered.connector')->send('POST', '/adadgio/gear/loop/start', $payload); // @todo pass this more transparently
循环将永远不会停止,直到您更改 payload 的 kill 属性。现在 监听 循环回调。Nodered 将无限期地调用它,除非您 kill payload。
// in some listener, far, far away, a long long time ago
// the listener must listen to "adadgio_gear.nodered.payload_received"
public function onPayloadReceived(\Adadgio\GearBundle\Connector\NodeRed\Event\PayloadEvent $event)
{
    // you might need the request, who knows
    $request = $event->getRequest();

    $payload = $event->Payload();
    // notice iteration changed to +1, pid always stays the same (unless you trigger another process)
    // otherwise you get back the parameters you defined earlier

    // if you wanna stop the flow
    if ($payload->getIteration() > 3) {
        $payload->kill();
    }

    // process... something, or modify your input params at runtime
    $name = $payload->getParameter('my_name');
    $name = ... // change your name!
    $payload->setParameter('my_name', $name);
}
CSV导出器
use Adadgio\GearBundle\Component\Reader\CsvExporter;

$exporter = $this->get('adadgio_gear.csv_exporter')
    ->setName("exportFileName")
    ->setColumns(array('label', 'views'))
    ->setData(array(array('one','two'),array('three','for')))
    ->generate();
CSV读取器
use Adadgio\GearBundle\Component\Reader\CsvReader;

$csv = new CsvReader('data/test.csv');

$data = $csv
    ->setDelimiter(';')
    ->read(5, 15) // reads rows from 5 to 15 included (pass null for no limit and offset)
    ->getData();
从数据中实体化
```php use Adadgio\GearBundle\Component\Hydration\EntityHydrator;$hydrator = new EntityHydrator();
// $data = ... 从前一个示例中的数据 $hydrator ->hydrate('Adadgio\DoctrineDQLBundle\Entity\TestEntity') ->with($data) ->map(0, 'id') // 将数组列索引映射到实体属性 ->map(1, 'name');
$entities = $hydrator->getEntities();
</sub> ## <a name="serializer"></a>序列化器 将对象转换为数组。可以转换一个对象或一组对象。 ```php use Adadgio\GearBundle\Component\Serialization\EntitySerializer; $entities = $em->getRepository('AppBundle:Product')->findAll(); $serializer = $this->get('adadgio_gear.entity_serializer'); $dataSerialized = $serializer->serialize($entities); 其他
在开发环境中使用自定义设置文件启动 NodeRed(在此情况下为 Ngrok)。
# 使用自定义设置和 pm2 进程管理器启动 node red pm2 start /usr/local/bin/node-red -- -v --settings=/Library/WebServer/home/symfony/360medical-v3/app/data/nodered/settings.js